


Closer view of the scene:
The words at the card front created by using a Versamark Pen, white embossing powder. Definitely need to use the Stamp-a-mah-jig for this.

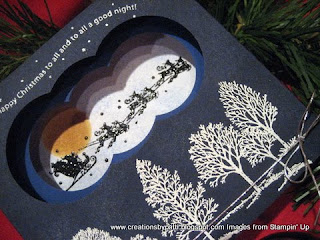
Top View:

Measurements for this card (see photo below):
(1) 6-1/2" x 4-1/4" for the Front, on 6-1/2" side: score 1" on the right and left side
(1) 5-1/2" x 4-1/4" for Middle Section, on 5-1/2" side: score 1/2" on the right and left side
(1) 5-1/2" x 4-1/4" for Middle Section, on 5-1/2" side: score 1/2" on the right and left side
(1) 6-1/2" x 4-1/4" for the Back, on 6-1/2" side: score 1" on the right and left side
Use the 1-3/4" Circle Punch for the card front. Push punch all the way into card, line up the right and left side of punch. Punch center last.

Use the 1-1/2" Circle Punch for the middle section:


Using Versamark ink, stamp across bottom front with Lovely as a Tree stamp. Apply white embossing powder and heat. Be sure to use the embossing buddy for this. Use Craft white ink and a stamping sponge to add white "snow" as the background.

Back panel details:
-To ensure the Santa sleigh is lined horizontal across the punched circle, use a Stamp-a-mah-jig.
-Using the punched middle section as a template, lightly pencil the right and left side circles as a guide for the sleigh image.
-Using the punched middle section as a template, lightly pencil the right and left side circles as a guide for the sleigh image.
-Use a Versamark Pen to ink the Sleigh and stars (no words).
-Apply Black Embossing powder, heat and let cool.
-Punch, on a scrap piece of card stock, a 1" circle to make "sun". Use More mustard and a sponge. Tip: See how I have used a binder clip around the sponge so some of my fingers can stay clean?
- see photo below for sky background

Using a 1" punched circle, mask the "sun" and sponge Ballet Blue Ink for the background. 
Supplies:

Supplies:
- Stamps: Wandering Words (Holiday Mini), Lovely as a Tree
- CS: Night of Navy, Whisper White, Brilliant Blue
- Ink: Craft White, Ballet Blue, More Mustard, Versamark
- Accys: 1-3/4" Circle Punch, 1-1/2" Circle Punch, 1" Circle Punch, Versamark Pen, White Embossing Powder, Black Embossing Powder, Silver Elastic Cord (Holiday Mini), Stamp-a-mah-jig, Stamping Sponges, Embossing Buddy
Thank you for stopping by today..................HUGS........!!!


6 comments:
wow Patti, haven't you been a busy girl. Great cards. Thanks for the tutorial.
Kylie xo
I love your creation Patti. Fabulous.
WOW Patti! You always have such fabulous tips on your blog. Wish I had known this tip with the sponge and the ink for a project I was working on last weekend. I turned not only my entire fingers but the nails too a beautiful shade of green. I was sponging some Holiday Tree chip board books for my grandkids...what a mess.
Thank You for this fabulous tip and believe me-I'll use it next time I'm needing to sponge my projects. It totally would have saved my beautiful french manicure....oh well...live and learn. YIKES! Kadie
This card turned out wonderful! Love this stamp set!
Barbara Diane
Love this card. Your tutorials are always so inspiring. Keep em coming!
Love it!
Post a Comment