Friday, October 29, 2010

Wedding Album for a Friend

Hello..........a wedding album made for a friend. I love how it turned out. The "Happily Ever After Mini Album" instructions were purchased from Laura aka www.followingthepapertrail.blogspot.com . Sigh.......I had every intention of making this album in plenty of time but at the eleventh hour.....it still turned out GREAT! I did tweak the cover and made some changes from Laura's original design - hope she is OK with that. Here goes (lots of photos) so grab a beverage and enjoy..........final album size 6-1/2" x 7-1/2" x 2-1/2"............first up: Tie the Knot Simply Scrappin paper (retired SU) was used throughout the album. The cover with a string of pearls and a simple message at the corner.

Left photo: overview
Right photo: side rings decorated with various tied ribbons and a special metal embellishment

Left photo: album back
Right photo: view of inside pages (there are a total of 7 pages)

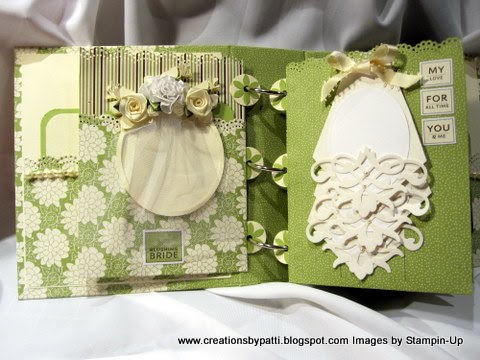
Left photo: inside front cover, a tag made from the invitation, The first page for the bride & groom's photo
Right photo: turn page over to reveal the veil to hold the bride's photo and the left side is for the brides train. The train is decorated using a elaborate die cut with adhesive pearls.

Left photo: pull down each section of the train to place photos on the oval mats
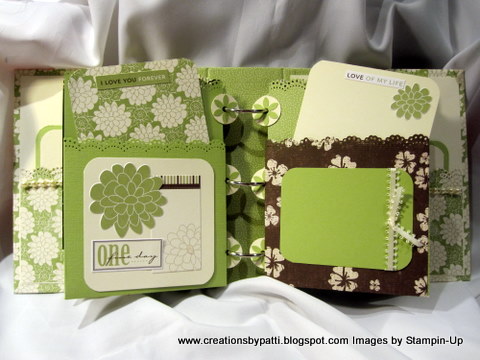
Right photo: turn page to see the ring page and the Groom's page

Left photo: inside the ring page, a tri-fold card for photos and journaling. Inside the Groom's vest shows the shirt which can be pulled out for a photo, tucked in the cumberbund is another photo mat
Right photo: tucked into both sides of the pockets are photo mats for the Maid of Honor and Best man.

Left photo: a basket with little mats for the brides attendants and a garter on the left side along with a photo mat for the Groom's attendants
Right photo: shows the inserts taken out from the pockets

Left photo: closer view of the garter
Right photo: the cake and the toasting page
Left photo: closer view of the cake
Right photo: closer view of the tasting glasses: metal embellishments on the glasses on the gate fold page

Left photo: Cake holds 3 tags, each stamps with special messages. Open the gate fold to reveal sections for additional areas for tasting photos
Right photo: turn the page to reveal pages for the reception photos

Left photo: pull out the tri-fold photo mats on each side to hold reception photos
Right photo: A mat for the new couple on the back of the last page. The back cover page has a pocket containing a tag.

Of course, then a bag had to be made to hold the album: a Kraft bag with some of the "Tie the Knot" stickers. Ticked inside the bag with tissue (finally) is the album................
Thank you for stopping by today.............I hope you enjoyed this post.
Have a great weekend!!!

Tuesday, October 26, 2010

Surprise RAK

Another posting:
This is a surprise Thank You card from Sheri - remember her? She's the one who made that ever so fabulous mini album posted on my blog 8/4/2010.

Inside card:

Closer view of the front card at top:


And the closer view of the card front at the bottom:
Thank you for stopping by today...........................and thank you Sheri for this great card!

My Red Computer

Look what the Fed Ex Driver brought to me!!!! Whoo-hoo - what do you think it is?
OK - let's open up this box - nice secure packaging
Look the new color - surprise: it's RED!
Look at the sleek inside:

Thanking you for sharing my joy today.......................

Monday, October 25, 2010

Skull and Crossbones Greetings

I found some left over Love Letter DSP from a previous project!!! Here's the card that was created using scraps.
The main (center) black/vanilla DSP is 5" x 4-1/4"
The houndstooth DSP and words DSP trims are both 1/2" x 4-1/4"

Attach all pieces, then wrap the grosgrain ribbon on the side before popping with dimensionals to attach to the card front.

Here's a closer view of the skull and crossbones: see the red adhesive rhinestones in the eyes? Pop this with dimensionals on top of a 2" Black circle which is attached to a 2-1/2" Cherry Cobbler circle. Pop the 2-1/2" Cherry Cobbler Circle with dimensionals, then attach to the scallop DSP circle. "BOO" is using a white gel pen - hand writing is OK here.........................

Card inside:
Stamp "scary" message on 4" x 5-1/4" Very Vanilla CS using Black ink. The trim used for top and bottom is 1/2" x 4" for the Love Letter DSP and the Cherry Cobbler trim is 1/4" x 4".


Supplies:
  • Stamps: Scary (non SU)
  • CS: Cherry Cobbler, Black, Very vanilla, Love Letter DSP
  • Ink: Black
  • Accys: Crossbones die (non SU), Circle Scissor Plus, Big Shot Sizzix Scallop Circle #2 Die, Dimensionals, 5/8" Black Grosgrain Ribbon, Dimensionals, White Gel Pen, Red Adhesive Rhinestones

Thank you for stopping by today...............................

Friday, October 22, 2010

Halloween Treat Tower

Look what we have here!!! It's a treat tower.........Having seen these during the holidays at Costco, I've always wanted to make one of these. Here's my version. This is the top adorned with a plastic spider.

Here's the entire tower of 3 boxes: the tag is a simple one: made using Stampin' Write Pens and the Tasty Treat stamp set (retired). The lids are using various embossing folders for texture. The bottoms are all using Black card stock. Tie all the boxes with a sun organdy plaid ribbon incorporating all the colors for Halloween.

Here the tag: use the corner rounder punch (retired). use Stampin' Write pens to color the words of the lids. The finished tag size is 4" x 1-1/2". The finished stamped message is 4-3/8" x 1-1/4". Punch a 1/8" hole and string with some jute.

Remove lids to reveal: candy and spooky tricks in each box! Like the skeleton hand and plastic colorful spiders?

How to make this tower:
(3) Lids: 5-1/8" x 5-1/8" Old Olive, Lovely Lilac, Only Orange CS, score 1" on all sides, Finished lid size is 3-1/8 x 3-1/8"
(3) Bottom box: 7" x 7" in Black CS, score on all side 2". Finished box size is 3" x 3"

Assembled lids:

Boxes assembled:

Supplies:
  • Stamps: Tasty Treats (retired)
  • CS: Black, Only Orange (retired), Old Olive, Lovely Lilac (retired), Whisper White
  • Ink: none
  • Accys: Spider Embossing Folder (non SU), SU Dot Impression Folder, Web Embossing Folder (non SU), Stampin' Write Pens in Pumpkin Pie+Old Olive+Lovely Lilac, Corner Rounder Punch (retired), 1/8" Hand Held Punch (retired), Sticky Tape, Plaid Sheer Organdy Ribbon (non SU), Jute (non SU)

Thank you for stopping by today.....................HAVE A GREAT WEEKEND!!!

Thursday, October 21, 2010

Skeleton Bones Greetings

Can this card be spooky and quick - YUPER!!!! The technique? Ink the embossing folder with black ink, the place the card stock in between and emboss - love the result? I do!!! It really beings out the image and provides a great subtle background, too.

Closer view of the card front:
Simply punch a Cherry Cobbler spider, pop with a dimensional and place on the corner of the message. The message size details:
2-5/8" x 1-1/4 in Whisper White
2-7/8" x 1-1/2" in Cherry Cobbler
3-1/8" x 1-3/4" in Black

Card Inside: simply a punched spider in Cherry Cobbler placed on the Whisper White mat.

Supplies:
  • Stamps: Spooktacular Greetings (retired)
  • CS: Black, Whisper White, Cherry Cobbler
  • Ink: Black, Cherry Cobbler
  • Accys: Skeleton Hand Embossing Folder (non SU), Spider punch (non SU), Dimensionals

Thank you for stopping by today................................

Tuesday, October 19, 2010

Flying Happy Bats

Another fun and happy bat card: The printed paper is so fun to use for the Halloween season. A die cut bat was perfect to simply adorn this quick and easy card.
Closer view of the bat:
This is a die cut bat - from my stash of dies. Use Tombow adhesive to glue on the eyes, Old olive scrap used in the moth opening. Pop up with dimensionals. The "Happy Halloween" is stamped using Old Olive ink, then punched using the large Oval Punch, pop with dimensionals.

Card inside: Whisper Whit mat is 5" x 3-3/4". Strips left over from the front used. Bat paper is 3/4" x 5", Old Olive is 1" x 5"


Supplies:
  • Stamps: Happy Halloween (non SU)
  • CS: Old Olive, Black, Whisper White
  • Ink: Old Olve
  • Accys: Bat Die (non SU), Large Oval Punch, 5/8" Old Olive Grosgrain Ribbon, Dimensionals, Tombow Adhesive

Thank you for stopping by today..........................

Monday, October 18, 2010

Creepy Crawly Spiders

The printed all over spider paper is the focus of this card. The mat is Rich Razzleberry popped with dimensionals - more details below:

The Halloween message stamped using Black ink.
Cut the Whisper White 2-1/2" x 1-1/4" , punch corners using the ticket punch
Cut the Rich Razzleberry 2-3/4" x 1-1/2", punch corners using the ticket punch, pop with dimensionals to adhere to card front.

The punched spider is also popped with dimensionals.
Finish with Old Olive Ribbon.

Card inside:
The strip at the bottom is using scraps left over from the front. 1" x 4" Rich Razzleberry with 3/4" pattern spider DSP. Punch the top corner to reveal the black underneath.


Supplies:
  • Stamps: Spooktacular Greetings (retired)
  • CS: Black, Rich Razzleberry, Whisper White, Spider DSP (non SU)
  • Ink: Black
  • Accys: Ticket Corner Punch, 1/4" Old Olive Grosgrain Ribbon, Spider Punch (non SU), Dimensionals

Thank you for stopping by today........................