









A quick post.
I had been wanting to make these customized Altoid boxes for a while but never found time - the opportunity came up where I was able to makes these cute personalized Altoid boxes using photos for the top to give for the holidays. LOVE this! Am happy with the results and a great gift for anyone to store anything. One Altoid box was made using an initial. So the possibilities are endless with this box................by the way, the Altoid box template is a cut file which can be found on the Silhouette on line store.............now THAT even makes it easier to cut (and the pieces fit perfect and plan the paper for this box. Once cut, it is a snap to finish. Sticky tape is used for all the pieces. I was able to make a template for the photo to cut the exact shape for the top cover and mat.
Here's the inside of the box which is covered......nice finish, eh?
Thanks for coming to visit today.............................hope this will inspire you ti make some of these boxes.
Showing posts with label 2013 Christmas. Show all posts
Thursday, February 6, 2014
Tuesday, February 4, 2014
A Snowflake Thank You
I received this Thank You card from my friend Frances C to share. I believe she used Stampin-Up products to make her card. Nice, eh? The snowflake is stamped, embossed, die cut, then popped with foam squares.
Here's a closer look at the embossed mat:
"Thanks" is inked with silver embossing powder.
Here's a closer look at the embossed mat:
"Thanks" is inked with silver embossing powder.
Thank you for stopping by to visit today.........................
Thursday, January 30, 2014
2013 Christmas Thank You Cards
FINALLY..........yes, finally, I completed all the Thank You cards from the holidays...............boy, better late than never, eh? I had this all over glitter string of light glitter paper (made by POW) from Tuesday Morning last year and decided to use it. It worked out so great. I combined two cutting files to make this card: one cut file is from SVGcutting called Kawaii String of Lights found here and the second one is from Miss Kate Cutables called Christmas Lights found here. Using my Silhouette Designer Edition, I was able to import both SVG cut files to use each part I wanted (note: you can use the knife feature in the Silhouette Designer Edition to cut the parts you want to use). The word "Thanks" is from the Silhouette on line store.
Here's a look at the single card:
See the white highlights used on the string?
And, that glitter paper is to die for..............so smooth tot he touch!
Paper is Stampin-Up Cherry Cobbler for the card base, Recollections Black card stock for the mat and that great paper from POW found at Tuesday Morning.
This card is as quick as it gets for me.............................so cute, eh?
Thank you for coming by to visit today.
Wednesday, January 29, 2014
Sour Cream Christmas Containers
OMG - are these the cutest or what? Thee Sour cream containers are a Silhouette cut file from their on line store. They are so easy to make. (Thank goodness) These were reduced in size to fit some CASH. Folded currency fits well. I had to makes these immediately since I had been running way behind schedule............my elf side was too slow for the holidays. There is a Santa, Snowman and Reindeer. Each can be cut using scraps.
Here's the Snowman - a small pom-pom used for the holly on all the containers.The Santa:
Lastly the Reindeer:
Well, when youa re in a pinch................decorated sour cream containers are great!
Tuesday, January 28, 2014
Holiday Treat Bag Toppers
Had to make a really quick treat bag and this was as quick as it comes. I used the Stamping -Up Top Note die with some holiday paper from my stash. The Merry Christmas stamp is also an older Stampin-Up stamp, too. Those embellishments are from my stash and are meant for gift packages............yay, I finally got to use these items for a good purpose. Tieing that red ribbon is the finish touch.
Can you see the stamped candies in the bag? Oops, didn't get a photo of the candy images. They are colored with Copics. Those candy stamps are from Jaded Blossom called Merry and Bright found here.. Simply use a 1/2" punch to punch them out, then adhere to the kiss bottom.The other bag:
Thank you for stopping by today............................
Monday, January 27, 2014
Oven Treats for a Cookie Exchange
Aren't these the cutest ovens? These were perfect for a cookie swap. The SVG cut file is from Lori Whitlock at the Silhouette on line store. Finished size of this project is 2-3/4" x2-3/4" x3-1/2". Recollections red and black card stock used. These ovens came together quickly after they were cut using my Silhouette. Love that the oven door and handles (secured by small black brads) that opens up to get the treats inside. All the edges have been sponged with brown ink.
The oven door opens up to reveal "baked" chocolate kisses. Ooops, forgot to take photos of the candies on the bottom of the kisses..............they are stamped, then colored using Copics. A 1/2" punch is perfect to punch it out. Stamps are form Jaded Blossom and can be found here.
Looking in to the oven ....we all do that, right? Chocolate kisses inside..........ready to eat!
Love that glitter tree brad in the center. Any occasion brad can be used as well. The other ones are small black brads.
Thank you for stopping by today to visit....................stay tuned for more projects.
Friday, January 24, 2014
Gingerbread Gift Bags
For another quick gift giving, these shopping bags were made using the print file from the Silhouette on line store. The gingerbread man was enlarged to fit the bag. I did an "off set" around the gingerbread to get that white around him. Two size bags made: large and small. It was easy to re size the gingerbread for the bag size. The dot background paper is from Memory Box which I had and should be using.................worked out great! Inside each bag..........????.............surprise bag stuffers which were all Gingerbread themed.
And, of course that great gingerbread wire ribbon was also from my stash of ribbons. Better use it, eh? This was the perfect project.Here's a closer look at the gingerbread man..............ya gotta love that laser printer!!!
Thank you for stopping by today...................more projects coming.
Thursday, January 23, 2014
Gingerbread House of Treats
Aren't these treat boxes cute? They are a cut file from SVGcutting called Gingerbread Lidded House found here. Oops, forgot to take the finished measurements. House is made from Recollections Kraft paper with some sponging on all the edges using any brown ink. Other papers are from my stash. Pink ribbon is from Stampin-up.
Here's a closer look: Stamped "gingerbread kisses" is from Jaded Blossom Stamps Gingerbread Candies found here.The candy is a die I had from my library - hmmm............vendor???? Adhesive red rhinestone for the door knob.
Add Diamond Stickles to the roof icing:
Remove the lid to reveal the treats: LOVE those Ginger candy stamps from Jaded Blossom.
And, aren't they just yummy?Thank you for stopping by today to visit.....................
Wednesday, January 22, 2014
2013 Cookie Exchange Thank You
How fitting is this card for the 2013 7th Annual Cookie Exchange? I love it. It is a stamp from Stampingbella called Uptown Girl Chanel the Chef #EB246. This card really turned out so cute!!! The base card is using SU Real Red, mat is Recollections White, Paper is from my favorite Doodlebug Designs Sugar and Spice (yikes, paper is from 2009 so not sure if it is still available or not).............so cute!!!! Add that sheer Pink Organdy ribbon at the bottom,
Here's a closer look: Copic colors used are:
Skin: E000, E00, E11, R20
Hair: W2, W5, W8
Apron: R89, R46, W2, Clear Star Jelly Roll (around Ruffles)
Blouse: R83
Bowl.Spoon:L E34, E21, YG25, G07, Clear Star Jelly roll (around Rim)
Hat: W1, Clear Star Jelly Roll
Pop image with tiny foam squares.
Here's a closer look: Copic colors used are:
Skin: E000, E00, E11, R20
Hair: W2, W5, W8
Apron: R89, R46, W2, Clear Star Jelly Roll (around Ruffles)
Blouse: R83
Bowl.Spoon:L E34, E21, YG25, G07, Clear Star Jelly roll (around Rim)
Hat: W1, Clear Star Jelly Roll
Pop image with tiny foam squares.
Scallop Oval and Large Oval Punch is from Stampin-Up. The word "Thanks" was computer generated, then popped with foam squares.
Card inside (stamp image is part of the Stampingbella set): a cute strip of the same Doodlebug paper on the inside, too. The Clear Star Gelly Roll pen also used on the top and bottom of the pattern paper strip, too (sorry for the smudge on my camera lens).
Thank you for stopping by today.........I will be using this image for more projects to come................
Tuesday, January 21, 2014
2013 Cookie Exchange - Part 2
And, here is part 2 of the 7th Annual Cookie Swap:
Pecan Squares
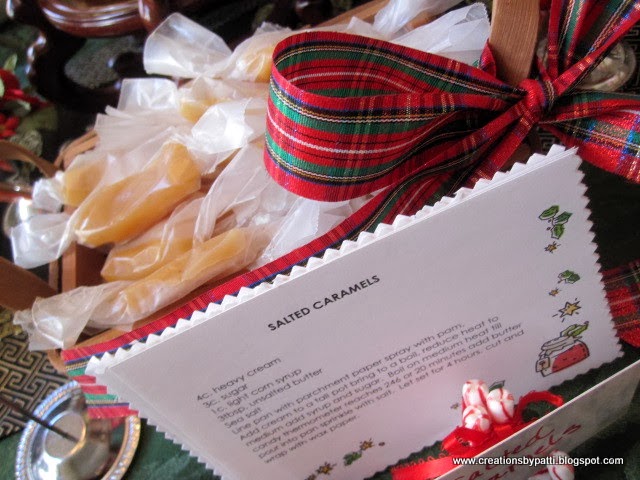
Salted Caramels
White Chocolate Chip and Brown Sugar Spritz Cookies
Mocha Thumbprint Cookies
Coconut Lime Shortbread Stars and P-nut Chubbies
Salted Turtle Bites
Cowboy Cookies
Thank you for stopping by and hope you will try some of these recipes. they were all yummy!
Monday, January 20, 2014
2013 Cookie Exchange - Part 1
I'll have to post the cookie exchange in two parts in order to fit all the photos and recipes.
The 7th annual Cookie Exchange. Not sure if I got all the cookies since it seems some of them disappeared before I took the photo. An assortment is cookies is always fun to get. great Hostesess: Frances and Teresa who outdo themselves each year with fabulous drinks and appetizers while we glaze over the cookies everyone has baked for the occasion. Recipes attached below - click on them for a larger view.
For this event, I baked Coffee Cookies - a very light cookie and doesn't take much butter at all along with that wonderful coffee taste!
Gingerbread Men Cookies
Peppermint Candy Canes and Jam Thumbprints
Jam Shortbread Squares
Rum Balls
JamThumbprints
Stay tuned for part 2.............................
Subscribe to:
Posts (Atom)


