Wednesday, March 30, 2011

Happy Birthday Pop-Up Card

Here's a fun card - my 2nd SVG Card!!!!: I had some of this zig zag DSP appropriate for a guy birthday card. Both the cupcake and the message are popped with dimensionals.
Open the card to reveal the inside message: cool, eh............it's a SVG Premium Pop-Up card from www.svgcuts.com So if you love pop-ups, ya gotta invest in the program SCAL (sure cuts a lot) to make this and other fabulous cards. This DSP was perfect to cut along the zig zag lines for the inside top.bottom of the card.


Here's a side view: I slipped in some of the leftover DSP underneath the message.


Adhere the die cut Old Olive candles and Summer Sun flames above the words "happy". Add gold stickles to the flames. Here are the pieces used to make this card:

Resources:

Stamps: SU Whimsical Words

CS: Brilliant Blue (retired), Whisper White, Old Olive, Summer Sun (retired), DSP unknown

Ink: Black

Others: SVG Happy Birthday from SVGCuts.com, SU Wide Oval Punch, Paper Shapers Oval Punch, Gold Stickles, Cuttlebug Dot Embossing Folder, SU Square Lattice Embossing Folder, SU Big Bold Cupcake Sizzlit Die, 5/8" Old Olive Grosgrain Ribbon, SU Dimensionals, Mini Glue Dot


Hope you enjoyed this one................

Monday, March 28, 2011

Thank You Card

My very first SCAL (sure cuts a lot) card: file is from www.SVGcuts.com Premium Pop-Up Cards. I decided to use the gift wrap for Gina's Thank You card (her gift was posted 3/26). I love how it turned out. I used the floral part of the wrapping which was perfect. By adding some bling ( Black adhesive Rhinestone and adhesive flat back pearl) and her initial. The card front all came together well.

Here's a close-up of the front initial:stamped in black, then punched with: 1", 1-1/4", Designer Label Punch, then popped with dimensionals.


Open the card to reveal the message: the gift wrap was also used on the top/bottom, too


Side view of message: see how the gift wrap paper was slipped underneath the pop-up message.


Resources:

Stamps: SU Lovely Letters Alphabet

CS: SU Pixie Pink (retired), White, Black, Gift Wrap Paper

Ink: Black

Others: 1" Circle Punch, 1-1/4" Circle Punch, SU Designer Label Punch, Dimensionals, 1/4" Old Olive Grosgrain Ribbon, Premium Pop-Up Cards from SVG Cuts, Adhesive Flat Black Pearl & Black Rhinestone: unknown


Enjoy this card?..............hope so........more of these type of cards to come...........

Saturday, March 26, 2011

An Asian Surprise Gift

Look what I got - a big surprise in the mail from the Brown Truck! A gift from Gina Taylor (check out her blog: www.stampingina.com) !!!! Yipee!!!!! So open it up quick................
OMG - it's even gift wrapped with a bow............whoo whoo..................
OMG -can I stand it...............????

Some bubblewrap...............
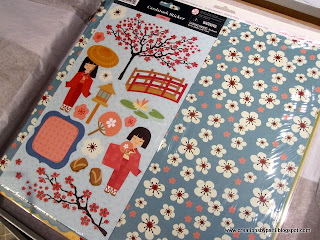
Oh my word.................my absolute favorite paper company: My Little Shoebox

And here is the assortment of paper and stickers I got --------------whoo hoo, happy dancing ont he ceiling.....................am loving ALL OF IT!!!!! And why not!!!!! I feel like Julie Andrews singing The hills are alive with Asian paper....................

Now i have to think of a great project to make..............there's enough here to make a few projects.......so stay tuned!!!!

Thank you Gina, for such a great surprise!!!!

Friday, March 25, 2011

Geisha favor Box - 2

So here is how to make the head for the Geisha Favor:

Parts to make the Geisha:
Head/Neck: (1) 1" Circle Punch - Blush Blossom. Use Fine Line Black pen for eyes, Fine Line Red pen for lips and Pink Chalk for cheeks. Punch (1) 3/4" Square - Blush Blossom
Hair: (2) 1-1/4" Circle Punch - both in Black CS . Cut one of the 1-1/4" Circles in half and clip some bangs.
Bun: (1) 5/8" Circle Punch
Hair Embellishment: 3/16" x 3/4" color to match dress + small flower+adhesive rhinestone
Collar: (1) 3/4" Square - Whisper White. hand cut a "v" shape to one section (as shown)
Obi: 1/2" x 1-1/2" solid color to match dress (snip off at an angle as shown), attach with adhesive, position above the horizontal line.
Assembly
1.Attach Obi to the body of the favor: cut each ends at a slight angle.
2. With one of the 1-1/4" Black Circle, attach 5/8" Black Circle bun and attach 3/4" Square Blush Blossom neck - set aside.
3. Attach bangs to face.
4. Hand draw eyes, mouth and chalk cheeks
5. Apply dimensional to head underside.
6. Attach head to hair, be sure the bun is "inside" so the back of the head is "clean".
7. Adhere hair embellishment, then adhere flower with a mini glue dot. Then attach adhesive rhinestone
8. Attach collar under neck.
9. Slip entire piece into favor box top.
Assembly 2,3,5:
Assembly #4
Assembly #6,7,8:
To make the flower for her hair:
Because Washi paper is a bit thin, add a piece of scrap which will assist in punching the flowers:
Use a round tip tool, push on a mouse pad or soft surface in a circular motion and soon the flowers will start to "curl"
See the right flat flowers (Yellow arrow) compared to the dimensional flowers.............

Project is now complete...........................I hope you will make a few of these, too.
Note: Punched used is SU's trio Flower Punch p- the smallest one was used.

Thursday, March 24, 2011

Geisha Favor Box

Update 3/26/2011: Thank you all for your comments. Here is the improved view of the template (I figured out how to take a better photo of it). For those who would like a PDF file, please e-mail me directly. Get ready for a loooong posting with a bunch of photos! My friend Gene provided the inspiration for this project - it came from a book: "20 to make Mini Gift Boxes by Michelle Powell". I believe she found this book at a Joanne fabric Store..........but mine wouldn't have it since it is quite a small store. This is one of the fabulous projects - lots of trial and lots of error to finally have these results. I made 12 of these girls in a variety of colors. Left Photo: another group photo Right Photo: the Pink Geisha Left Photo: the Lavender Geisha Right Photo: the Red Geisha Left Photo: Back of each Geisha Right Photo: Template is made using (1) 7-1/2 x 7-1/2 Square Washi Paper. Washi paper is used because it is softer and pliable. 65 pound or 80 pound paper will be more "stiff"and hard to fold. Left Photo: after folding all scored lines, project should look like this Right Photo: After folding all dotted lines, fold up to punch a 1/8 or 1/4" hole through 2 layers of Washi Paper Left Photo: Make sure the pleat goes on the inside (see Yellow arrow) in 4 of the sections. Right Photo: After threading a 6" long cut ribbon through punched holes, this would be a good time to place treats inside the pouch Left Photo: Tie ribbon into a bow, leaving (4) "ears" as shown Right Photo: be sure valley pleats are inside toward the center - problematic? add a mini glue dot that will keep it closed. The back should be the bow, the front is in the next photo. Left Photo: Fold down one of the "ears" as shown. Clip off the left "point" aligning it to the fold line. At this time, a mini glue dot can be applied to the back of this section to keep it in place. Right Photo: Make a crease (see Yellow arrow) toward the front - this crease line follows the shape of the front fold. Left Photo: Here's another photo angle to show the crease line. Repeat this step for the left side Right Photo: Both the right and left side should be meeting at the bottom (see Yellow arrow)


Left Photo: Apply adhesive to secure the back "ear (see Yellow arrow)

Right Photo: Bring the "ear" toward the front (see Yellow arrow)


Left Photo: Another view of the back "ear" attached to the right front, clip off excess

Right Photo: Once both sides are attached, pinch and create a fold line (see Yellow arrow)


Left Photo: Here's another view of the underside after pinching......

Right Photo: Here's the Geisha body finished with both sides pinched.............


Stay tuned tomorrow to complete the obi and the Geisha head.....................whew...............

Tuesday, March 22, 2011

Happy Birthday Cupcake

I love this card style and really had some fun making this one...........love all the movement!!! Thank you Kim Score (www.paperpunchaddiction.blogspot.com) for the inspiration. Kim has a video tutorial on her site in her side bar. In addition, there is a video tutorial on Split Coast Stampers, too. For that reason, I suggest a visit to those sites to obtain the measurements for this project. I only added one additional matting on the base of the card. All other measurements will be on Kim's blog or on Split Coast Stampers.


Slide out the message to reveal message:

The "Happy Birthday" (from the Beyond Birthday Cricut cartridge cut at 2") is double matted: Regal Rose with Whisper White.

Here's the cupcake: embossed icing with the swirl embossing folder, then Stardust Stickles added. Add Stardust Stickles to the cherry on top, too. The Regal Rose Grosgrain matched perfectly around the cupcake holder.

Closer view of the message revealed:

Side view showing the back supporting hinge:

Resources:
Stamps: SU Birthday Bakery Hostess Set
Paper: Making Memories Brooke Polka Dot, Making Memories Wild Stripe, SU Regal Rose, SU Whisper White, SU Pretty in Pink
Ink: Staz-On Black
Accys: Cuttlebug Dot Embossing Folder, Cuttlebug Swirl Embossing Folder, 1/4" SU Regal Rose Grosgrain Ribbon, 1" Circle Punch, Sticky Tape, Star Dust Stickles, SU Cupcake Exclusive Sizzlet Die, SU Word Window Punch, SU Modern label Punch, Provo Craft On Your Birthday Cricut Cartridge.

I hope you will attempt to make one of these cards.......................