Sunday, March 31, 2013

Year of the Rooster Sister Stamps

Sister Stamps Zodiac hop Day 2 for Release #12: Year of the Dog and Year of the Rooster.  Card style chosen for this release is a Circle Flip Card. The template for this card is from the Silhouette On Line Store for 99 cents! There are dies with this card style readily available, too if you do not own a Silhouette. Finished card size is 4-1/4" x 5-1/2". 

I would like to give a shout out to Debbie, at the Paper Pulse Blog. She is a incredible wizard at using the Silhouette computer program.  She took a straight image I had and wrap it around in a circle. The image used is around the Rooster. Watch her You Tube video here to learn how. Clap, clap, clap, happy, happy!!!Cool, eh?
Stamp the Rooster twice, then pop with foam squares. Copics used W-1, R89, R46, YR04, YR07
Rooster Kanji word is cut using SCAL, then popped with foam squares.
Card fully opened: message is computer generated. Corners are also cut using my SCAL program SVG cut file. I have used these corners a lot in my Asian cards.
 Overhead view:
Items used to make this card:

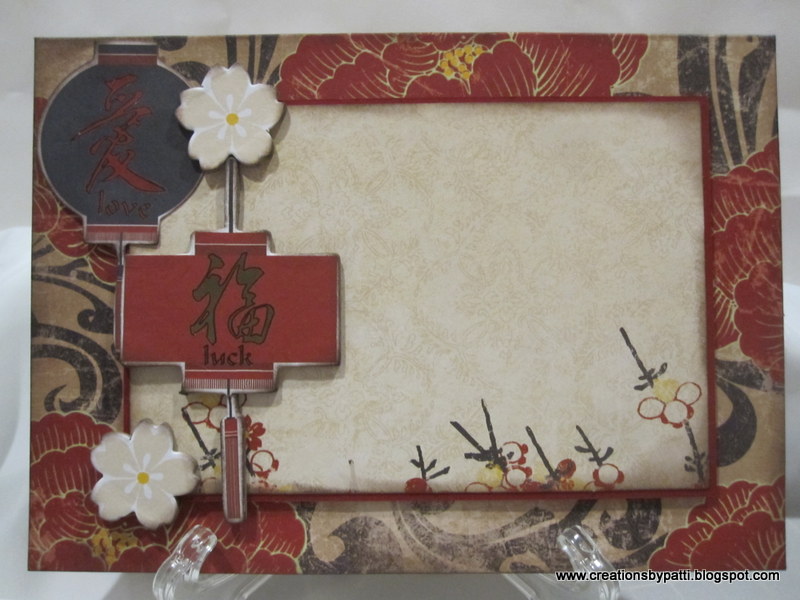
 Apply foam squares only to the back of the front circle and Kanji word.  Corners shown with gold brads in the corner.
In order to emboss the entire card, chose a pattern that has not distinctive front or back. Fold the card in half and position through embossing machine.
Card stock: Recollections Red, recollection Gold Metallic, Neenah White, Black
Accys: Cuttlebug Asian Embossing Folder, Small Gold Brads, !/4" Gold Organdy Ribbon, Foam Squares

Remember, the Year of the Dog and Year of the Rooster images will be released on April 1st.. Hope you enjoyed this project. Happy crafting to all of you.
Please join the others who are participating in the second day release for the Year of the Dog and Rooster:
Linda: http://simpleandsassycreations.blogspot.com/
Laura: http://bytkg.blogspot.com/
Additional participants for Release #12 are:
Vera: http://lingshappyplace.blogspot.com
Debi: http://craftybuzz.blogspot.com

Saturday, March 30, 2013

Year of the Dog Sister Stamps

Hi Everyone, I am very excited to again participate in the Sister Stamps Zodiac hop for Release #12: Year of the Dog and Year of the Rooster. The card style I chose is a Double Slider card. Instruction to make this card can be found here on Split Coast Stampers tutorial site. I changed the measurements to accommodate the card and the specific tabs one each side. this card will fit into a A2 envelope as finished measurements are 3-1/2" x 5-1/2".
Copic colors used:  E27, E31, E34, W5, W7, R81, R30, R59, R46
Here's a side view of the dog where part of the body is popped with foam squares:
The Dog Kanji word is something found on the Internet, imported into SCAL (Sure Cuts a Lot) and cut using my Silhouette.
When the side tabs are pulled, the computer generated message is revealed on both sides:
The template:
Optional: cut 4-1/4" x 10-7/8 to get 2 cards from one A2 (8-1/2" x 11") sheet of paper.

Items to complete this card:
Note: EK Success Modern Cube punch was used to originally make the punched black decoration images. But to make the strip fit across the 4-1/2" length, I recreated it in SCAL so the size can be more flexible. In fact, only one of the squares cut 2" x 2" was used for the Dog Kanji word (card stock changed from Brown to Cherry Cobler).  The side tabs were also created using half of the cube by using the SCAL program.
Card stock: SU Cherry Cobbler, Recollections Gold Metallic, Recollections Vanilla, Black, Neenah White, SU Old Olive
Ink: Momento Tuxedo Black
Accys: Impression Obsession Grass DIE060-I die, Lifestyle Crafts Sequence Embossing Folder, SU Old Olive Grosgrain ribbon, Foam Squares, 1-1/4" Square Punch

Stay tuned tomorrow for the Year of the Rooster image being released at this same time as the Year of the Dog on April 1st.. Hope you enjoyed this project. Happy crafting to all of you.
Please join the others who are participating in this exciting release for the Year of the Dog and Rooster:
Linda: http://simpleandsassycreations.blogspot.com/
Laura: http://bytkg.blogspot.com/
Additional participants for Release #12 are:
Vera: http://lingshappyplace.blogspot.com
Debi: http://craftybuzz.blogspot.com

Wednesday, March 27, 2013

Lucky Kitty Wobble Card

I made my first wobble card using a Lucky Kitty cut file from the on line Silhouette Store.  I did re size the cat to be 2-1/4" x 3" to fit onto this A2 card. Using the Silhouette tools, I also made another arm and a separate head (popped up with foam squares). The money bag (brown color) is also popped with foam squares. Washi paper is from Stone House Stamps: link is here. All card stock is from Recollection except Gold is from Kelly Paper (local paper store in SF). Whiskers are hand drawn (wished I could have done a better job at that........it was too delicate to cut and glue such a fine line...............my eyes!!!).
Here's the wobble mechanism at work:
Kitty is holding a plastic gold coin (adhered using a mini glue dot):
Martha Stewart Double Link Trim punch used here. Use a Glue pen to adhere to the Washi
To make the subtle cheeks, I used some old eye make-up and a Q-tip. Hey, Kitty looks pretty good without those beady eyes............I may have to consider that the next time I make this kitty or figure out what to do with those whiskers.
This card turned out pretty good..............like it? Thank you for joining me today and have a crafty day!


Monday, March 25, 2013

Bo Bunny Serenity Card Kit

While re-organizing my craft room, I ran across this Bo Bunny Serenity card kit purchased last year.......sigh.......another project to complete. Once I opened the package, it was easy to make all the 8 cards in a short amount of time. Loved that it came with chipboard stickers, rub on sentiments, and punch outs.  Instructions are included for each card. I think this is one of the 'better" card kits I've seen. There are various sizes so that makes it more interesting to complete.  Edges of the cards are sponged using brown ink. I love the flexibility to tweak it to make it my own (and I have done that to some of the cards). Here they all are as a group, then there are individual photos:
I have this paper collection so will be able to make duplicate cards. This one is 5"x7". The scalloped shaped top note is embossed using Asian Cuttlebug embossing folder. Memory Box branch die in brown card stock used. Those chipboard blossoms were part of the card kit.  Message (Happy Birthday, Thank You, or whatever) can be applied later.
This card is 4-1/4" x 5-1/2".  I added the two Asian corners cut using my SCAL/Silhouette. The Long Life Kanji symbol in SU Cherry Cobbler was also cut using SCAL/Silhouette. That small top edge note peeking out beneath the stripe is from the card above. The center medallion is a adhesive chipboard.

This card is 5" x 5". It has faux stitching (printed) and a rectangular adhesive chipboard popped with foam squares.  Message can be applied later. 
This card is a birthday card: again, the Long Life Kanji cut in SU Cherry Cobbler card stock with a Kraft background mat is popped with foam squares.  The large floral is a adhesive chipboard popped up with foam squares.  Again, some printed faux brown stitching.
This card is 5-1/2" x 4-1/4". The lantern and the shaped top note are adhesive chipboard. The "wisdom" Kanji word is a rub-on included in the card kit.
A   7" x 4" card. This one I made into my own using the pieces from the card kit.  The two  flowers popped with foam square are positioned to the side with the adhesive chipboard top note next to the flowers. Rose color dew drops are added to the top and bottom corners of the card.
Another 7" x 4-1/2" card with a scallop bottom edge. Adhesive chipboard pieces are the lantern and center multi stripe  with more red faux stitching.  I did decide to mat the center multi stripe square with SU Cherry Cobbler, then pop with adhesive foam squares.  The cherry blossoms are also adhesive chipboard that came in the card set.
Last, and my favorite card: 7" x 5" card with two lanterns. One of the lanterns is a cut out and the other is a adhesive chipboard.  Both have Kanji rub-ons.  The cherry blossoms are also adhesive chipboard. SU Cherry Cobbler card stock is also used as the mat for the center of the card.  I love this paper used.
 Here's what the kit looks like:
Which card is your favorite? All of them? Have a crafty day!


Friday, March 22, 2013

Cotton Tail Village from SVGcuts!!!!

It is so much fun to cut and create this Cotton Tail Village SVG cut file from SVGcuts.com. Each house was easy to assemble and quick to cut using either your Cricut (if you have SCAL2) or your Silhouette (if you have SCAL3). I think you will agree they are so very cute.  Here are the Cotton Tail Village houses:
The papers used for these houses were from the DCWV Spring Fling and some scraps I had on hand as well.  As long as all the colors are soft, it will all work. This is the Egg House finished size is 4" x 6".  Some of the  additions I made are: added card stock vellum to the windows and doors, used a Martha Stewart Grass punch around the bottom of the egg house, added small flowers (using the Punch Bunch punch)...and here's a closer view:
 Look at the door - it's egg shape with a small adhesive pearl for the door knob.
 Like the flowers and punched grass?
Remove the Egg House to fill with your choice of treats:


And, then I had the  great idea to turn this house to hold a tea light:
Here's the back:
Ready for the Easter House?  I added the white picket fence, contrast trim around the windows and also punched flower and leaves above the door, along with the pink ribbon on the box lid. Finished size is: 4" x 2-1/2" x 6-1/4"


Here's the side view:
A closer look at the windows and door:
 The wreath:
 Remove the house to fill with treats of your choice:
Ready for the last house: The Mushroom finished size is 7" x 3-1/4". I added kraft crinkles at the bottom of the mushroom and used a woodgrain embossing folder for the opening. Ribbon around the lid is retired SU.

Mushroom underneath is also sponged using brown ink:
Vellum butterflies (Cherry Lyn Designs DL112 Exotic Butterfly Small) used on the mushroom cap:
Remove the Mushroom house to fill with treats of your choice:
I really enjoyed this cut file and hope you will try it, too. A very Happy crafty day to all.


Wednesday, March 20, 2013

Easter Chicks

Had a little window of time to make these cute little Chick Treat containers. The cut file is from the Silhouette on line store for 99 cents!!!!!I did re-size it be to smaller while keeping the wings the same size.  Finished box size is now 2" x 2" x 2-1/2". I can get (2) boxes in one sheet of A2 paper which is pretty good. The Yellow and orange card stock along  with Orange check wire ribbon are both from Recollections.  They are filled with Sunburst Jelly Beans..........yummy.................

Here's a view of one of the boxes:
Side View:
Inside view:
So don't you just love these?  Happy crafting to you, too