Friday, June 29, 2012

Rock and Rollin Birthday Card

Are you ready for some fun?  We attended Hot August Nights last year: Reno's 25th Anniversary of vintage muscle cars and music from the 70's. Boy, it was so much fun. We hung out with our Reno friends. One of them has an upcoming birthday, this card was perfect. I love shaped cards and this one was fun to make using my SCAL and cutting with my Silhouette. This is another great SVGcuts.com collection called Rock and Rollin. There are so many great projects in this collection to make.............I did re-size this original  card down a little to finish: 6" x 4-1/4".  I just love this silhouette image with roller skates (see the red dots under her shoes).  Are you just lovin the windshield, headlights, and chrome? Stardust Stickles used along with a white gel pen for some detail
.And, of course, I love the poodle skirt and red scarf at her neck, too. The silhouette is popped with dimensionals.
Here is the detail of the "Happy Birthday" which is also popped with dimensionals and sponged with SU Chocolate Chip ink. See the white gel pen detail on the tires, too.
Card inside: Stamped message is using SU Chocolate Chip ink + retired SU's It's Your Birthday stamp set.  Oh, yes, sponge those shaped edges, too.
I can't wait to make the other projects from the Rock and Rollin Collection.  Have a great crafty day.

Wednesday, June 27, 2012

Sew Crafty B'day Card


For an upcoming birthday, a "Sew Crafty" card using SVGcuts.com Sew crafty Collection using SCAL and my Silhouette machine to cut all the images shown.  There are other fun crafty images in this collection. The original cut file is for a hanging home decor.........it is so simple to re-size all the pieces for a card front using the SCAL computer program.  Paper used is SU Black, Michael's Kraft, and Graphic 45's Bits and Pieces Kraft Reflections Collection. Both Kraft and Graphic 45 paper are sponged with SU's Chocolate Chip ink. Use small color card stock scraps for the thread and "sew crafty" words. The dress form is also popped with dimensionals and the ribbon is single knotted adhered with a mini glue dot at the waist. All images were cut using SCAL. A quickie glue pen or 2 Way Glue pen is handy to adhere many of the small pieces.
Here's a closer look at the sewing items on the top right hand corner of the card: yup, those are separated snaps (adhere using mini glue dots) with a fancy dancy button.
And on the bottom left corner:  some more fancy dancy antique looking buttons. Use a fine black pen to make thread lines on the spools of thread (which are popped with dimensionals). Love the pinked edge detail on this card, too.
Card inside: Vanilla card stock from Michael's. Stamp used is from retired SU It's Your Birthday using SU Chocolate Chip ink. Sponge edges using SU Chocolate Chip ink, too.
This fun card is so easy to make................try it!!!! and have fun, too.

Tuesday, June 26, 2012

Butterfly and Flowers by Jan

I got this ever so fabulous card from Jan Castle aka Jan's Joy (her blog here www.jancastle.blogspot.com) Doesn't it look like a hanging framed photo? There is a shimmery detail to this card.  "Thinking of You" is embossed. A scattering of the tiniest adhesive rhinestones.........yikes, my eyes!!!!........positioned on the center of the flowers and the butterfly as well as for the "nail".
Here's another view: the black card stock used has a shimmery finish.
Card Inside: The punched boarder on the inside fold is a new twist.
Card Details:
  • Stamp: #800-29 from Peddler's Pack in Beaverton, Oregon
  • Ink: VersaFine black.......embossed it with clear embossing powder
  • The top (which looks like a decorative hanger) is a corner die 'B175 J' from Cheery Lynn Designs
  • Tim Holtz Distress Markers used to color, and highlighted a few spots with 'Smooch Illuminate' on the butterfly.
  • Card inside trim is using EK Success Morocco Lace boarder edge punch
Isn't this nice? Thank you, Jan!!!
Have a great crafting day............................

Monday, June 25, 2012

Pop-up Origamic Architecture Cake

update 6/25 9:30 AM: link for cake template corrected

This birthday card was a real "popper". The front of the card selected images were made specially for another cousin Curtis.  Curtis lettering font was done using Liz Display Pro. Background mat is using the Cuttlebug "bricked" embossing folder with inked inside folder technique.  Bicycle image is a SCAL cut from SVGcuts.com cut file Peony Cottage collection/Bicycle Card using my Silhouette to cut. The grass was made using Martha Stewarts punch. I did add the bar across the seat for the boy bicycle and did not use the basket in the cut file.
Slowly open the card to reveal:
The card inside has the milestone year and also the 3-D cake. This cake cut file is from Carol who has a fabrulous blog called Extreme Cards. You can find this free cut file here. There is a video how to make this cake. Using SCAL, I made the frame around the cake using designer paper (not included in the original file but easily created with SCAL). The "happy birthday" was made from SVGcuts.com cut file collection: Premium Pop-Up Cards. Those candy confetti: made using 1/4" hand held circle punch.
And here is the view from the side:
Hope you enjoyed this pop up cake.............have a crafty day.

Friday, June 22, 2012

Musical Birthday Card

For the gal who loves to play (and teach) piano: this card was cute!  The SVG cut file is from My Scrap Chick and can be found here.  I used my SCAL computer program and my Silhouette to cut all the pieces. The original card was portrait, mine is changed to landscape position. Made in my favorite colors: Red, White, Black with co-ordinating mini dots red/black paper. Details of stamped message used below.
Here's a closer look at the crystal gel pen used to outline all the musical notes: for that shimmery look!
Card inside: Notes are also outlined with Crystal Gel pen. Top and bottom board is punched with EK Success scallop boarder punch. Also added 1/4" red and white grosgrain ribbons. "happy Birthday" is cut from SVGcuts.com Happy Birthday to You collection Cupcake Lever Card.
Side view of card:
This stamped message is from retired SU Congrats stamp set:  
This message is from Paper Trey Inc's Big Birthday Wishes stamp set:
To make the pop-up:
Side view of pop-up:
That's all for today.......have a crafty day!

Wednesday, June 20, 2012

Dandelion Mini Stamp Nugget Treats

Aren't these JUST the cutest cutest ever?  They are made from those Hershey nuggets using the Dandelion Designs Mini stamps set. The set is small enough (each image is 1" high") to cover the front of these little purses.  There are 7 stamps in the set - 6 girls and one boy - I didn't think the boy stamp would work with these purses. Simply color the images, cut, then pop with dimensionals onto purse.The finished size for these are 1-1/2" x 1" x 1-1/4" (excluding the ribbon). Washi paper (from your local craft store made by Yasutomo Fold'ems Origami Paper) and co-ordindating Sakura punch added the finishing touch. Sakura flower is popped with dimensionals as well.
More photos:
Side View:
Here's the template:
Components for each purse: Also with above template cut using solid card stock you will need (1) cut co-ordinating 1/4" grosgrain ribbon + 1" x 3-1/2" long cut Washi to wrap the nugget, +(1) 1-1/4" x 5-1/8" Washi Strip.
Wrapped nuggets:
Apply adhesive for the grosgrain ribbon (cut 5" long). Apply adhesive to attach the nugget. Then add half of a clear Velcro closure to finish up the purse.
So cute? eh................have a great crafting day.

Monday, June 18, 2012

A Tool Card and Box Gift

DH's Cousin had a milestone b'day celebration this weekend. I decided to make this cool card and the tool box to match. Cousin Larry is very handy around the house so this worked out well as the gift for him.  Both the card and the tool box is a SCAL cutting file from SVGcuts.com using my Silhouette machine to cut the images. The cut files used are from SVGcuts Cliff's Clubhouse Cards: Workshop Card and My Day with Dad svg collection. Finished box size is 3" x 5-7/8" x 3-1/4".
The card was really quick and simple to make. I added the handles and some tool details to the card. All the pieces are sponged with SU Close to Cocoa ink. The level has clear acetate that was colored using Copic YR04 Chrome Orange..looks realistic, eh? Only the peg board is popped with dimensionals........finishing touch is tied twine at the fold.
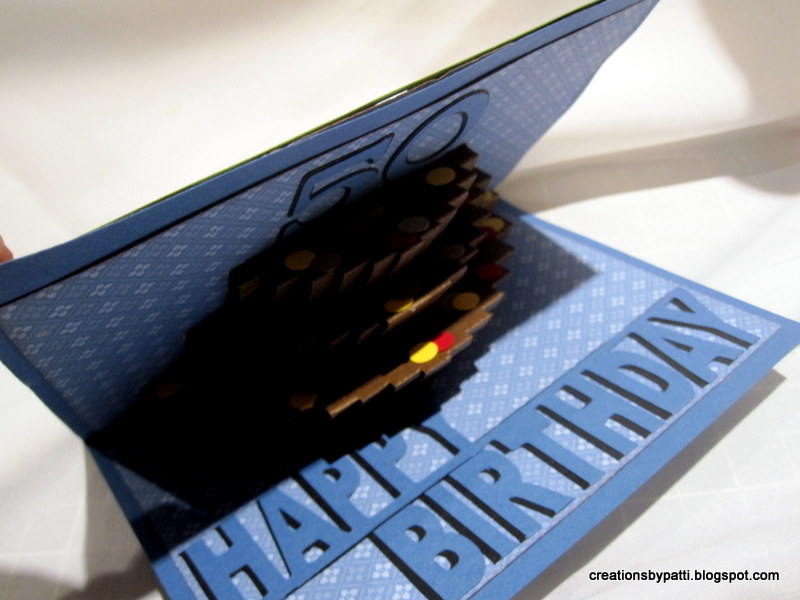
Card inside: stamped image is from retired SU It's your Birthday set and the "60" is from Stampendous Fifteen Candles stamp set. edges also sponged with SU Close to Cocoa ink.
Here is the tool box: A silver gel pen around the handles and front latch. The latch is popped with dimensionals.  The front panel is embossed using Cuttlebug Diamond Plate folder. Wooden measuring stick is from Maya Road - sponged it with SU Close to Cocoa ink. "Larry" is cut using Liza Display Pro font and my Silhouette Cutting machine. 
Top of the tool box:
And, inside: Inside I made an additional tray to hold some paper tools.  The lining inside the tray is also embossed with the Cuttlebug Diamond Plate folder and sponged with SU Close to Cocoa ink. The tools were fun to make and also sponged with ink.
Remove the tray to reveal: Almond Roca sweets!!!! This fits 20 pieces.
Tray details: to pull out the tray, handles made using 1-1/4" and 3/4" punched circles

Bottom of the tool box:
This was a fun project to complete. The tool box was really quick. SVGcuts.com did a GREAT job in making this cut file so easy to assemble. Thank you Mary & Leo (from SVGcuts.com). Hope you enjoyed this and have a great fun crafty day!

Thursday, June 14, 2012

Dandelion Mini Stamp Booklet

Wow - I am scratching my head really HARD and too a far amount of time!!!! Lots of trial and error.  This is truly a challenge to learn how to post on Blogger after my computer snafu - all of a sudden there seems to be a new format which I had to navigate very carefully to even post. Yikes, and, of course, I had just a few photos to align and describe...............eek!!!! There are some parts I do like (the undo button) and the strike through button which i can now use. But uploading the photos????? Gotta get use to that one...........I  had to upload these a few times since I kept losing them somewhere in cyber space....................anyway..............I finally got this cute little mini completed in spite of all my technical issues. It is using the new Dandelion Mini Stamps which can be found here (with other gorgeous samples made from this set). The front is a sentiment also from Dandelion Design Stamps punched using SU Small Oval punch. The finished size is 2-1/4" x 2-1/4". And, the paper is from Michael's Recollection line.
Side view:
When the album is untied, the first 2 pages are revealed. There are Pink or Chocolate Brown Sakura flowers on all the inside pages. The Sakura flowers are a die from Wikicaps Cherry Blossom -Outline 4x4 (and can be found here).


On the fourth page, a stamped message (from Dandelion Designs)
Top view:

Here are the components to make this:
(4) 4-1/2" x 4-1/2" pattern paper (2 of each design)
(2) 2-1/4 x 2-1/4" light weight chipboard for the covers
(2) 3" x 3" pattern paper to cover the chipboard covers
(3) Brown Sakura Flower outlines (1-3/4" size)
(2) Brown Sakura Flower insides (from the 1-3/4 size)
(4) Pink Sakura Flower outlines (1-3/4" size)
(2) Pink Sakura Flower insides (from the 1-3/4" size)
(7) stamped and cut out Dandelion Minis - pop these with dimensionals or leave flat.
(2) cut 5" long 1/4" Pink satin ribbon ties
Template for each section as follows: 4 pieces are needed of this template. Be sure to ONLY adhere the inside Sakura Flower up to the fold line so the flower can fold up when the book is closed.  Also be sure to Stamp the 4th page before final assembly of all the extended tabs. After assembling all the tabs, adhere all 4 sections back to back.


For the covers: adhere to pattern paper.
Fold up corners, apply adhesive along edge.
Apply sticky tape for the cut ribbons.
Adhere front & back covers to the 4 sections.
Whew............now that took a while to get in.
Anyway, things will go better soon.....right?
And a very happy crafting day to all!!!!