Monday, May 31, 2010

Tropical View of the Beach - Part 1

hope everyone is having a great Memorial Day holiday. I am still on a Tropical theme........this is a special card. I will show the card front today. So plan to stay tuned for the card inside tom. Finished card size is 4-1/4" x 5-1/2".

A closer view of the message:

This is what is needed for this card:

(1) 5-1/2" x 8-1/2", score @ 4-1/4" along the 8-1/2" side
(1) 3-3/4" x 4-3/8" Island Oasis DSP
(1) 3-1/4" x 3-7/8" Pumpkin Pie CS - use Square Lattice Impression Folder
(1) 2-3/4" x 3-1/2" Whisper White CS
(1) Large Oval Punched in Pumpkin Pie - use Square Lattice Impression Folder
(1) stamped Small Oval Punched in Whisper White

Use a scrap of paper to make a 1-1/4" template circle for the sun. Use the stamping Dauber on Only Orange and More Mustard inks.

Remove template and position the 1-1/4" circle on top to sponge the outer section in More Mustard: creating a "halo effect"

Tear solid CS to make a template for the "sand". Use stamping daubers to sponge along the torn edge.

Use Old Olive ink to stamp the palm tree several times:


Use the Square Lattice Impression Folder on the Pumpkin Pie pieces:


Apply dimensionals to the back:


Apply Pumpkin Pie to the Island Oasis DSP, then DSP is attached to the Tempting Turquoise card front. Card front is now completed..............
Supplies:
  • Stamps: Tropical Party, It's the Thought (Summer Mini Hostess)
  • CS: Tempting Turquoise, Whisper White, Pumpkin Pie, Island Oasis DSP
  • Ink: Old Olive, Close to Cocoa, More Mustard, Only Orange
  • Accys: SU Exclusive Square Lattice Impression Folder, Dimensionals, Small Oval Punch, Large Oval Punch, Stamping Daubers, 1-1/4" Circle Punch, Old Olive Stampin' Write Pen.

Thank you for stopping by today.........stay tuned for the surprise inside tom..........

Friday, May 28, 2010

Great RAKs

I absolutely LOVE 3-D projects and here are (2) of my very favorite from last week's shoebox swap. I brought (2)projects for others to select and got (2) in return. This butterfly chipboard candy holder was made by Gina Taylor (see her blog www.ginataylor.wordpress.com) . It used the Beautiful Butterfly Bigz Big Shot Bigz die and the wonderful Sending Love DSP from the Occasions Mini Catalog (retired).

Here's the back:

Side view:

The 2nd 3-D project I selected was a chipboard coaster candy container made by Marybeth (she doesn't have a blog). The window was made by using the Magnetic Mover and Shapers Curly Label Die - I think this is so cool the cut out piece was used for the top of the box, too. This is a GREAT gift to make.

Here's a closer view of the box top:

Inside the box reveals a solid box about 3/4" in height: look at all those jelly beans!!!

Thanks for stopping by today............hope you enjoyed these projects.

Thursday, May 27, 2010

Shoebox Swaps

A get together with the Wacky Stampers: here's our group photo from last week:

I missed all the business blah blah but did arrive to participate in the shoewbox swap. The decor on the tables was so much fun and destive! Denise made this fabulous Lei using the exclusive SU Island Floral Bigz die - AWESOME!! Darn, I forgot to take a photo of her jelly bean margaritas with Island Floral die flowers through the straws. She also made flowers that attached to a foam visor - can you imagine?


Frances made this envelope card:


Message revealed:

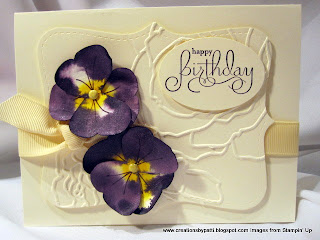
Marybeth made this fabulous card - she already prepped the pansies for us (using the butterfly punch and sparkly misting). This card was voted Best of Class! You can understand why..........

Here is a close-up of the pansies:

Joanne has us make this great flower on the matchbox using 10 punched schallop flowers, spritzed with water.

Inside contents of the matchbox: (2) covered chocolate nuggets!

Lynn prepped this card: I personalized it by changing out the color and added texture to the real red background, along with making the message banner with a wavy curve and red/whit gingham ribbon.

Here's a close-up of the watercolor done:


Gina had this fabulous birdhouse card (check out her blog: http://www.ginatatylor.wordpress.com/) for some more fabrulous cards.

Look - and here is the card opened:


Kathy's card here..........I missed placing (2) stamped buttons on the Chocolate chip CS part........not sure how I missed that one......

Here is a card from Vicki.......I added the "torn" interest and moon to make this card look "rough"

Sharon has this retro card made by using punches: Did I miss stamping my message again..........????

Mary M made this card: story about this card? It's one of Shellie's that she did from the Workshop of a lifetime.
Quick, simple, and elegant:

This card was created by Cheryl: I've never attempted stenciling so this was a great example to try this technique. The special paper really made it elegant.
Hope you enjoyed all these cards.....................
Wednesday, May 26, 2010

Coconut Card

Look what I got!!!! I love when I get a surprise card from others and then I absolutely LOVE it, too!!!! As the Tropical week contines...........Gail W gave me this fabulous card she made as a "thank you". Gail doesn't have a blog (yet) but she should. Finished card is 5" X 7". She used the Island Floral Bigz Die and also the new Square Lattice Impression Folder. I love how she incorporated the new Itty bitty punch and clear itty bitty buttons in the center of the flower.

Card Back:

Card opens and there is a note inside (which I have turned over...hee hee....)


I'll try to identify supplies used:
  • Stamps: unknown
  • CS: Clsoe to Cocoa, Rose Red, Old Olive, Whisper White, Pumpkin
  • Ink: Black
  • Accys: SU Square Lattice Impressions Folder, SU Exclusive Big Shot Island Floral Bigz Die, Itty Bitty Shapes Punch, Bitty Buttons, Mini Glie Dots

Thank you for stopping by today..................enjoy!!!

Tuesday, May 25, 2010

Tropical Beach Basket 2 with Straw Hat

Here's another version of the Tropical Beach Basket AND a Straw Hat............I think they are so cute together!!! Sign....yes, I cut those leaves and YES, they look better............right? Looks like it's going to be a Tropical week..........how to make the hat - see below:

Basket Front:

Basket back:

Straw hat front view: Secure die cut "band" at brim this small piece is part of the Basket & Blooms die). Cut out stamped leaf. Pop flowers with dimensionals.

Straw hat top view:

Inside view of Straw Hat:

How to make the basket: refer to yesterday's blog posting.
Here's what you need to complete the straw hat:
(2) basket fronts in So Saffron CS
(1) Basket Bottom in So Saffron CS
(2) striped Island Oasis DSP (not in photo)

Use the Square Lattice Embossing folder on the (2) basket and bottom:

Connect the (2) basket pieces. Then cut right at the bottom of the basket handle opening

Mark with the bone folder 1" from the top of the basket. This will be the guide for cutting the frayed edges.

Apply the sticky tape on the bottom (for the top of the hat) as shown. Start cutting at an angle "frayed" edges

Finished "strawing" the brim of the hat:
After securing the hat, remove the sticky tape inside, drop in the top of the hat. Attach the striped DSP, then attach the cut leaf, cut flowers with dimensionals. Your project is complete.
Supplies:
  • Stamps: Tropical Party
  • CS: So Saffron, Rose Red, Tempting Turquoise, Whisper White, Island Oasis DSP
  • Ink: Close to Cocoa, Old Olive, Rose Red, Tempting Turquoise, Pumpkin
  • Accys: SU Exclusive Basket & Blooms Big Shot die, SU Exclusive Square Lattice Impressions Folder, Soft Suede+Tempting Turquoise+Summer Sun+ Melon Mambo+Pumpkin Stampin' Write Pen, 1/16" hand held punch, Wide Oval Punch, Linen Thread, Sticky Tape, Dimesionals.

Thank you for stopping by today.......enjoy!!!

Monday, May 24, 2010

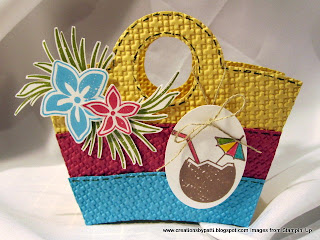
Tropical Beach Basket

I have been dreaming about this basket for a couple days and finally decided to give it a go.........I like how it turned out .............do you? The basket is easy to assemble............love that stitching made by using a pen?

Here's the front:

Here's the overview:

And the back:

How to make these:
(2) Baskets & Blooms Diebaskets in So Saffron CS

(2) Punpkin CS 2nd layer: 1-3/4" high
(2) Rose Red CS bottom layer: 7/8" high
(1) So Saffron CS Box: cut 4-3/4" x 5". On the 5: side, score 2", 3". Turn paper and on the 4-3/4" side, score 1", 3-3/4". Cut slits (solid lines).


After cutting basket pieces, position the cut pieces as follows:

Using the Big Shot, place the all basket pieces through the Square Lattice Texture Impressions Plate

Using Soft Suede Stampin' Write Pen, make stitch lines at the top pieces of each section.

Apply sticky tape to the front and Back section of the box:

Apply sticky tape to the sides of the box:

Stamp flowers and cut out, apply dimensional to the back. Punch leaves using the Extra Large Bird punch. Stamp coconut, color with Stampin Write Pens, then punch using the wide oval punch. Use 1/16" hand held punch to thread linen thread through the basket handle.

Due to the texture created, best to use sticky tape to secure the 2nd and bottom basket layer:

Remove the backing of the sticky tape and apply the back basket.

Remove front box sticky tape and position the front basket. Remove sticky tape from the side box and secure. Project is complete!!!!

Supplies:
  • Stamps: Tropical Party
  • CS: So Saffron, Pumpkin, Rose Red, Whisper White
  • Ink: Close to Cocoa, Tempting Turquoise, Rose Red
  • Accys: SU Exclusive Big Shot Basket & Blooms Die, SU Exclusive Big Shot Square Lattice Textured Impressions Folder, 2 Step Extra Large Bird Punch, Wide Oval Punch, 1/16" Circle Hand Held Punch, Stampin" Write Pens: Soft Suede+Tempting Turquoise+Summer Sun+Old Olive+Melon Mambo, Linen Thread, Sticky Tape, Dimensionals.

Thank you for stopping by today................HUGS......!!!!