Showing posts with label 2013 Asian. Show all posts

Friday, January 10, 2014

A Birthday Shadow Music Box

Hello 2014...........
I am back trying to catch up with my blogging after a long "rest". This project was made without a plan. I knew the outcome I wanted but didn't have definitive steps. So bear with me as I try Io get back into the swing of blogging.  This is the project for my dear blog friend, Eunice (her blog: A star for Chiemi - see her link on my right hand side bar). Project size is 6" x 6-1/2" x 1" thick.  The shoji screen was made using my Silhouette Cutting machine by just simple rectangles.  Neat, eh? Two sets of shoji screens cut to sandwich the vellum card stock.  In the center of the door, a black circle with a hidden magnetic closure. I absolutely love this Washi paper, too.
Opening the left side:
Then open the right side to reveal a shadow box featuring Kimono Marci from La-la Land Crafts. Pagoda in the back wall is a Cricut Cartridge from Provocraft . The Bridge cut in Black card stock  - die is from La-la Land Crafts found here is positioned on a layer of acetate sandwiched in between foam core.. 
Some additional details about the front embellishments: These stamped and cut blossoms are from the Kimono Marci with Fan stamp set also from La-la Land Crafts.  Copic colors used: R46, R43, R83, R21 with a adhesive flat back pearl in the centers.  The branch is from Memory Box.
On the bottom right side, there is a turning mechanism......for what?  Why to play that famous tune" Happy Birthday". I happen to purchase this special item from a local store in San Francisco called "Arch".  They sell lots of artist supplies here and this one of the special items.
The mechanism can be pulled out - it is completely covered.
Here is the mechanism "uncovered" - it is basically housed in a box.
And, here is Kimono Marci sandwiched in between layers of acetate. Copic colors used for Kimono Marci:  E000, E00, E11, R20, W2, W4, W6, W8, R45, R43, E55, Y38, + Yellow Stickles
Another view:
Some additional blossoms on the inside along with some die cut grass from La-la Land Crafts found here.
See the Memory Box branch on the back wall on the Washi Paper?  The blossoms are positioned on a layer of acetate.
Here you can see the bridge more clearly along with die cut grass which is behind the top layer acetate.
Because this shadowbox was built from scratch, the sides inside are also covered with scraps of Washi paper (I didn't like the white foam core edges showing) for that finished look. Gold 1/8" mat is around the entire front opening.
You can also see the inside edges covered using scrap so Washi paper here, too.
Thank you for your patience................hope you all like this project.

Friday, November 22, 2013

Dandelion Fall Thank You

A really quick post today: I got this really cute Thank You card from my friend: Frances C. (she doesn't have a blog but should!) and wanted to share it with you. I love her selection of Fall papers used and also LOVE the (her blog)  Dandelion  Stamp used SC-8 Mum which can be found in the store here. There is also a whole slightly larger set CL-16 Flower Girls which can also be found in the store, too.
Frances did a great job coloring her with Copics. The adhesive rhinestones in her hair are perfect.
And, don't you love the stitch ribbon that finishes off the card so well?  That small tag is also so cute, too
Thank you for stopping by today to visit and a very Happy Fall to all, too....................

Friday, November 15, 2013

Dandelion Holiday Wreath

Are you ready for this?  This turned out much better than I expected. I LOVE it!!!!! I happen to purchase this holiday wreath from a recent Asian Craft Fair - I knew I was going to slight alter it.  The original 9" wreath is made by "Wong Creations", a local Crafter. It already had the pleated Lucky Red Envelope Fans and Fabric Fun Foam Fortune Cookies.  I added some "snow" (using brush correction fluid that can be found at Daiso - a Japanese Store in my local area).  Then I added some Dandelion Design images using the following stamp sets:
CL-8 Friends Set, CL-11 Keiko Set
MC-8 Christmas Flowers, MC-10 Sweet Wishes, MC-12 Christmas Things, MC-24 Tea Time, MC-25 Hi There
I love how all the characters are about the same size so they fit so perfectly on the wreath
Copic colors used for all the images: E21, E43, E15, R20 V04, V09, V12, V99, Y11, Y38,  R21, R24, R29, R32, R39, R85, BV02, BV04.  Here's one of the Dandelion images with a present in her hand. Her dress hand decorated using Copics and touches of Sakura Crystal gel pen used for some sparkle. Her present is using Stickles Star Dust.
Here's another images using yellows for her dress and highlights in Sakura Crystal gel pen. Her candy cane has Stickles Star Dust. See the poinsettia?  All the centers of the poinsettias are using Viva Gold pen.
This Dandelion girls is in pink colors - her dress pattern is made using Copic colors.  Her hat has the Stickles Star Dust. Sakura Crystal gel pen also used on her dress, too
 A BOY!!!! Yes, and he has his favorite friend: a dog with him.  He is in Lavender  with some patterns on his clothing using Copic pens. His hat , like the others, has Stickles Star Dust.
And, here are "best buds" - some Sakura Crystal gel pen used for their clothing and hair accessories. Clothing made using Copics markers.
 A closer look at the areas using Stickles Star Dust:
 the candy cane:
 the present:
All the images and poinsettias were attached using a wire, curled around a pencil, using a foam to secure one end of the wire to the image, then wrapping the wire around the wreath extensions. It worked out well. It was much better than using a hot glue gun.
Hope you enjoyed this altered wreath..................for lots of inspiration, check out Dandelion's blog found here.

Wednesday, November 13, 2013

Dandelion Treats in an Altoid Box

Today I finally altered a Altoids tin box. I had been wanting to make one of these for a while. Lo and behold ----  a cut file in the  Silhouette Store.  Whoo - hoo. It makes it soooo simple to cut and cover the Altoids box - what a breeze to do!!!!! You have to try it!!!! Gotta love the on line Silhouette store!!! For the image, I used the Dandelion Designs Stamp set MC-17 Girl's Day and words " to: you, from: me" also by Dandelion Designs Stamps on the inside cover. The Dandelion Designs Blog can be found here. for lots more inspiring ideas. Look how cute the finished project looks!!! Decorative paper is from Crate Paper Pink Plum Collection.
See how the cut file cuts out the notches so perfectly............Metallic Pink textured card stock and some Dark Brown card stock used for this project.
 Here's the front of the tin..............just love it............it fits so perfectly................
 Stickles Star Dust added to the fans on each girl and also around the decorative paper.
 Open the tin to show inside................LOVE this!!!!
 Here's the lid with a popped up stamped message and Stickles Star Dust around the edge:
 And here are eight foiled Rolos with the stamped images punched out using a 3/4" circle punch. Inside is covered with metallic pink textured paper.
Here are some of the pieces cut for this project.....just add some sticky tape and you are on your way to a great gift for someone...................
Thank you for stopping by today and hope you enjoy this cute little project.

Monday, November 11, 2013

Kimono Marci Bendi Birthday Card

This birthday card was for two different friends who had birthday's in the month of October. It started out as a simpler card but oh well, it turned out a bit more complex than I planned but results are still good.  Card style: Bendi card. Tutorial from Emma Fewkes found here. There is also a tutorial on Splitcoast Stampers found here. Acetate was used for the right and left "arms". I wanted the back scenery to show more clearly. So that meant I needed to consider doing a mirror image for the grass and the tree. That means cutting double grass pieces for each acetate arm and positioning the tree properly. Main image is from La-la Land Crafts. Kimono Marci found here and Grass Die found here.

Copic colors used to color Kimono Marci: R24, R81, R85, E27, E55, E77 BG96, YG17, G21
Hair: W1, W4, W6, W7, W8, W10
Face: R20, E000, E00, E01, E11

 Side view:
 Overhead view
Papers used for Marci's dress is from My Little Shoebox Cherry Delight - Serenade. Other card stock used is scraps of pink and brown.
Open the right side of the card:
Memory Box Arboscello Tree die cut in Neenah White card stock so it can be colored  front and back using Copics so when the left acetate "arm" is opened, the backside of the tree is also the same as the front............and the Memory Box Floating Mound (flowers) die cut in a dark pink and a light pink card stock.
This photo shows both sides of the acetate arms open:
Taylored Expressions Build a Scene - Swirly Clouds die found here. Happy Birthday message on cloud is a Starform sticker
Here's a closer look at the tree in the background:
You can see the paper used for the front and back mat better in this photo which is from My Little Shoebox Lovely Day - Easy Breezy. For the stamped message, Ink used is Versafine Onyx Black with Clear embossing powder. Papertrey Stamp set: Big Birthday Wishes
Thank you for stopping by today and I hope this inspires you to make something fun, too
 

Wednesday, November 6, 2013

Day 3 La-la Land Retreat Projects

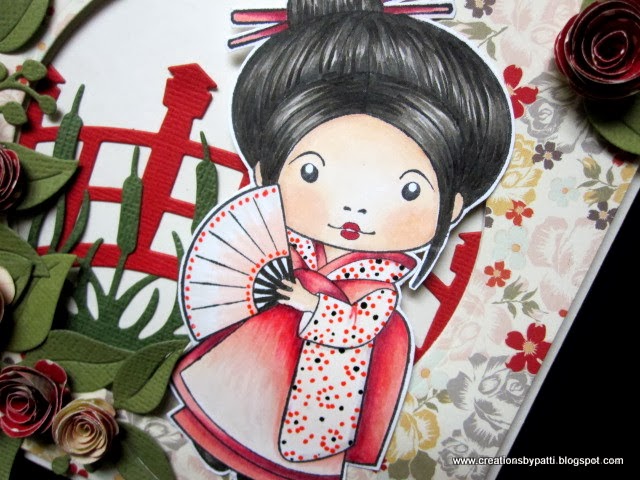
Day 3 La-la Land Retreat projects:I couldn't wait to make this cute cute card: Kimono Marci with Fan by Design Team member Sue (her blog here) - image found here. Dies used are the Berry Flourish, Cattails Die, Bridge Die, Rolled Rose Large Die, Rolled Rose Small and Medium Die all can be found here. Card size is 5-1/2" x 5-1/2".  I got an extra rose in my kit so I decided to position it on the top right corner of the card.
 I absolutely LOVE how Sue used  gel/spica pens to make the pattern on her dress. The dots using the gel/spica pen on the fan are also very clever, too.  The paper selection for this card is so perfect!
 And, here's a closer look - darn, photo does not capture the shine from the pens.
 Love those rolled roses:
I wanted to make use of the circle cut from the front of the card so I used it on the inside along with using the Bridge Die.
Thank you Sue, for your inspiration using Kimono Marci with Fan and card layout.
 
Next Project: Trinket Box designed by Irina. Trinket Box can be found here. This is the second project in the retreat using the Trinket Box - there are a variety of projects using this very versatile box......cool, eh?  and each one so different. This one is a quick and simple box using the Christmas Tree Die and also the Tuffy (the Dog) from the Christmas Ornament Luka stamp set found here. Edges of the tree are sponged using Ranger Distress Vintage Photo, then embellish it using Viva White Pearl Pen for the snowy effect.
 Side view of the Trinket Box:
 Here's Tuffy:
 The Tree:
Inside the Trinket Box - I think I must have lost the Poinsettia that was suppose to go on the inside cover........oh well............
Third Trinket Box designed by Irina. This Trinket Box is unrecognizable with the easel effect on the top and the inside surprise.  The Christmas Tree Die is used her for this project but the snow effect using the Viva White Pearl Pen is on the circle with the Christmas Lantern Marci Stamp found here. The Grosgrain ribbon with a double bow acts as the perfect embellishment for the easel.
 Side view:
 A closer look At Christmas Lantern Marci with the Viva White Pearl pen used for the snowflake effect:
 The ribbon which works to hold up the easel:
Inside Trinket Box: A cover over the opening was make (pretty smart!) with an acetate over the circle to reveal contents: like tea lights, chocolates, and other surprises.
 The message:
 The box "lid" removed:
 And don't you just LOVE how the feet were created?  They are all stacked circles............very clever!
Thank you Irina, for such great ideas how to use the Trinket Box in so many lever ways!
But wait -----stay tuned tom for yet more projects from Day 3!!!!!