Monday, January 30, 2012

Birthday Washi Bitty Album

My favorite gift to make: a bitty album covered using Washi paper. This gift serves as the card, too and it was sent to a favorite blog friend of mine in Hawaii. The ovals were cut using my Silhouette Cameo and SCAL3. Krylon Gold painter pen is used for the chipboard edges. A variety of silk and paper flowers surround the oval frame.

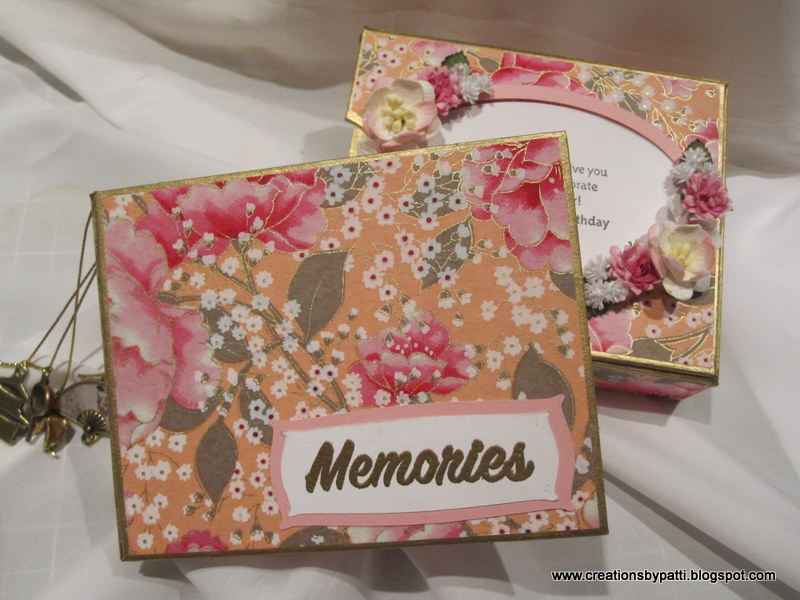
Confession: yes, this was a belated birthday present...........as stamped in the message.
And, the album spine has ever so fabulous charms .......cute, eh?
Here's a closer look at those flowers. I used a hot glue gun to attach them to be certain they will not fall off....................

Surprise: The oval stamped message in the front album casing is removable for a photo. The photo would be protected by the acetate (also cut usng my Silhouette Cameo and SCAL3)
Album simply has the gold embossed words"memories". The frame is from the SCAL3 label library and size for the stamp message and a mat.

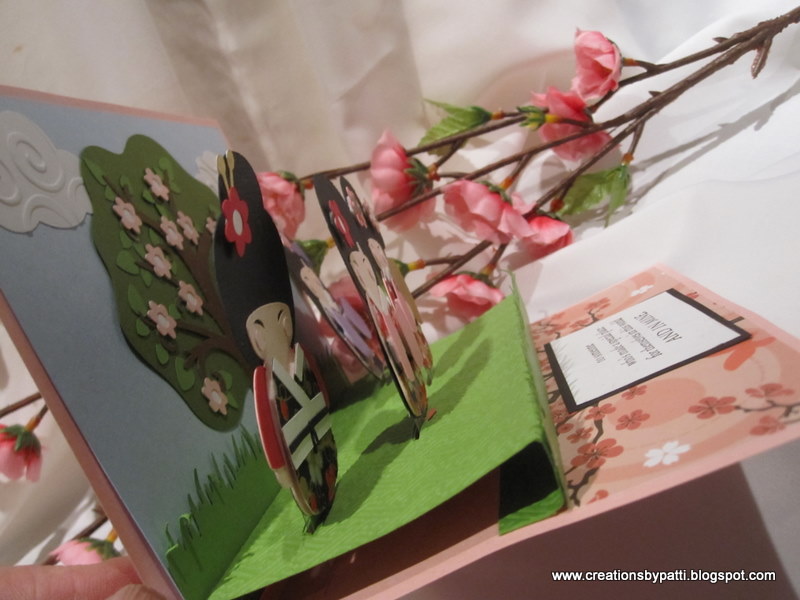
For the inside, a 1-1/4" strip of Washi on each side with embossed solid finishes the album
Here's a better view of the Blossom Mums embossing folder made by Crafts-Too.

Supplies:


  • Stamps: Paper Trey Inc Big Birthday Wishes, All Night Media Disney Scrapbooking Stamps

  • CS: Hanko Washi, SU Pretty in Pink, Recollections White, SU SAB 6x6 Paper Pack

  • Ink: Staz On Black, Versamark

  • Accys: SU Bitty Book (retired), Gold Embossing Powder, Gold Cord, Blue Moon Charms, Blossom Mums embossing Folder, Assorted Silk Flowers, Acetate, Dimensionals, Glue Stick, Hot Glue

Thank you for stopping by today.............see ya soon..............

Friday, January 27, 2012

Kyoto Kuties Birthday Pop-Up

I am loving this birthday card: made using my Silhouette Cameo and SCAL3. The card frame was made a file that was available from the Silhouette on line store for only 99 cents. It got re sized to fit this card.I love how the Silhouette Cameo cut this so easy without any issues like my other machine. The finished card size is 5" x 7" to accommodate the surprise inside. The paper used is from My Little Shoebox and is called Oasis - Pink Blossom.......I LOVE this paper!!!
Slowly open the card:

Side view:

Card Fully opened: it's a stage card (for Kim Score's tutorial how to make this card - click here). I did make a small adjustment to the size of the stage by making it shorter to accommodate the stamped message. The stage is embossed with an Asian embossing folder (difficult to see from the photos). The "pop-ups" are also using acetate for support.
The inside stamped message:

Here are the "kuties"!!! They are all about 3" high. Clouds were made using a Fiskars cloud punch along with swirls embossing folder. Use a Martha Stewart grass punch for the stage. All the images are from the Kyoto Kuties SVG cut file that is available FREE from Under a Cherry Tree Jin Yongs's site here. Using Washi for the clothing rally added some fun to the ladies. I was really impressed with how the Silhouette Cameo cut the lavender umbrella stick where the width is only about 1/16" - wow!!!! I am impressed with it. The fan is cut using Metallic Gold paper with scored fan lines after it is cut.

The tree in the background:

The card can be completely flat

Back of stamp (made by Mari & Me): love it!!!!
Supplies:


  • Stamps: Paper Trey Inc Big Birthday Wishes, Mari & Me "hand stamped by"

  • CS: Recollections: Black, White, Metallic Gold, Paper Company: Blue, Green, Brown, Pink, SU: Lovely Lilac, Lavender lace, Pink Pirouette, Hanko Washi, My Little Shoebox Oasis-Pink Blossom DSP

  • Ink: Staz On Black

  • Accys: Martha Stewart Grass Punch, Fiskars Large Cloud Punch, Cuttlebug Swirl Embossing Folder, Asia Embossing Folder, 2 Way Glue Oen, Sticky Tape, Dimenionals

Thank you for stopping by today................

Wednesday, January 25, 2012

Sister Stamps Lion Dancers

I just had to ink up this stamp from Sister stamps release #4 Lion Dancers during the Chinese New Year celebration time. Be sure to visit the Sister Stamps blog for lots of inspirational ideas! You can get this stamp set here from Pineapple Cove. The card style is called "Dutch Fold" - there is a video tutorial that can be found here. I love it when there's already a tutorial and I can provide a link. SU Real Red and SU So Saffron were the perfect colors to co-ordinate with the satin frog closures used for this card.

Here's a closer look: the corners are from Sizzix Architectural Accents Set. Use the Cuttlebug Asian embossing folders for the background. Lion Dancers are popped with dimensionals. Copic colors used: E21, R20, W4, W7, W10, W1, R46, RV25, YR04, Y38. Yellow Stickles and Moonlight Smooch also used.

The satin frogs do come apart. They were easily attached using mini glue dots. I thought maybe I had to get out my hot glue gun but was so glad the mini glue dots worked. I have a bunch of these lying around so I thought hmmmmm, good way to use them. They were purchased while I was in Shanghai a couple years ago but can be found in your local Chinatown shop.
Card inside message is simple: stamp is from Waltzing Mouse: Asia Garden Additions
thank you for coming by and happy crafting..............

Monday, January 23, 2012

Dandelion Fuzzy and Ping Valentine Pop-Up

This Valentine card is sooooo cute! I used the newly released Dandelion cling style Fuzzy Bear 1 and Fuzzy Bear 2 stamp sets to make this one card. I also incorporated Ping from the Friend to Friend Dandelion stamp set, too. The DSP used is a retired pack from SU a couple years ago: hard to see in the photo ...........some iridescent glimmer: perfect for this card!

The balloons, stamped and cut out, popped with dimensionals. Red and Pink embroidery floss used for the balloon strings.

Slowly open card:

Card Fully opened shows both Fuzzy and Ping suspending and floating on a scalloped heart!!!
Copic colors used for Fuzzy and Ping: RV25, RV46, RV29, RV02, RV04, E21, E55, E34, RV21. Both are cut out, then popped with dimensionals. I like that they are holding hands. Oh, so cute! And, did you see the stamped message at the bottom of the heart?
To make this card:
(1) 5-1/2" x 8-1/4" SU Real red Cs, score @ 4-1/4" on the 8-1/4" side
(1) 4" x 5-1/4" Paper Company Pink CS
(1) 3-3/4"x 5" DSP of your choice
(2) 4" x 5-1/8" DSP of your choice for the card inside
(1) "spinning" movement cut in CS Vanilla. I used Sizzix Spinning 3-D die, then reduced the spinner mechanism to be 20% smaller since my card is A2 size. The original spinning movement appeared a bit large.
(3) Heart strips or any border will also work. These heart strips were made using the SVG cut files from SVGcuts.com Valentine Mailbox Collection. I couldn't find any heart strips in my search on line so I simply did a "weld" using SCAL3 with the separate hearts to connect them, then I made the cut using my Silhouette Cameo
(1) 3-1/2" x 3-1/4" Scallop heart which can be found in the Valentine Mailbox Collection
(6) Pink Hearts: these were cut using my SCAL3 program with my Silhouette Cameo
Thank you for stopping by today and a very happy crafting day to you............

Friday, January 20, 2012

Mari & Me New Year Celebration

This is a center step card celebrating Chinese New Year. There is a full tutorial how to make this card here. The side steps were increased to 1-1/4" to accommodate for the stamp and mat width. The FREE Fancy Asian Boarder at the bottom of the card is from Paulo and can be found here. It cut very easily using my SCAL3 program and cutting it with my Silhouette Cameo. Finished card size is 5-1/2" x 5-1/2" . Stamps are from Mari & Me and can be purchased here.

The process is simple: Stamp, color and cut the Lion image. Then Pop with dimensionals. Copic colors used for the Lion are: R29, E21, o, BG49, Y13, B000, Y38, YR07 + Yellow Stickles. Apply the Yellow Stickles down the Lion stripes and sparingly on the head area. Also apply Gold smooch on the mouth outline and horn. Look closely, horizontal stripes on the body are made using a Sakura Clear Star Jelly Roll Pen . Add Smooch Moonlight to the whites of the eyes and on the Lion's beard. Metallic Pen The kids Copic Colors used are; B21, B24, B26, R20, E21.

Card inside also has a fire cracker border stamped across the bottom. Copic colors used: R29, R35 + Gold Smooch

This card can be completely flat:

Each strip of the stamped fire crackers are colored using Copic E34, R29, R35 with some Gold Smooch as accent.

Back of card:

Supplies:


  • Stamps: all from Mari & Me

  • CS: SU Real Red, Recollections Black, Neenah White

  • Ink: Momento Black

  • Accys: Mini Glue Dots, faux Gold Coins, Copics as listed above, Smooch Gold, Smooch Moonlight, Yellow Stickles, SVG Asian Fancy Border Cut File, Sakura Clear Star Jelly Roll Pen, Dimensional

Thank you for stopping by today.............

Monday, January 16, 2012

Dandelion New Year Slider Money Card

Lookee here........a cute Year of the Dragon card. This card style was introduced to my me Carol K. at one of the stamp get togethers. The measurements have been tweaked a little to accommodate the dragon stamp. The image is from Dandelion. There are two size dragons in the cling set and a message image along with the block Asian Dragon word shown in the top right corner of the card. See more stamps from Dandelion here.

Here's a closer view of the card front. Yellow stickles added sparingly to the head and top of body. Copic colors used: R46, Y38, Y18, W1. Antique gold coins are attached using Mini Glue dots.


Pull the larger coin to the right to reveal a message


Pull the coin all the way to the right to reveal a even more surprise: MONEY!!!! of course, you can slip any amount in this spot.


To make this card you will need:

(1) 5-1/2" x 8-1/2" in Black, score @ 4-1/4" on the 8-1/2" side

(1) 5-1/4 x 4" mat in Red

(1) 3-3/4" x 4-3/4" slider in Black, score @1/2" on all sides

(1) 2-1/2" x 3-1/2" slider mat in Red

(1) 2-1/4" x 3-1/4" slider mat in White

(1) 5-1/8" x 3-1/2 slider insert in Red, score @2", 4-1/8" leaving 1/2" at the right side

(1) 3-1/4" x 1-7/8" mat for slider in White

(1) Pull tab: fold 3" x 3" in half (so it is 1-1/2"), use a 1" circle punch (see photo below)

(3) Antique Gold coins: 2 small and 1 large

2012 cut using SCAL3/Silhouette Cameo using Chow Fun font 3-1/2" x7/8"


Here's how to punch the circle pull tab:

Fold all 1/2" sides on the Black insert. Fold all the score lines on the red insert as shown
Flip the red insert over, add dimensionals to the back of the red insert - be sure dimensionals are away from the 1/2" black slider.


Attach the punched circle tab along the right side centering along the edge.


Add mini glue dots to the corners (see arrow below) to secure end of black slider. Remove back of dimensionals - position on card.


Hopefully there are enough details above to enable and inspire you to make one of your own.

Happy crafting................

Thursday, January 12, 2012

Baby Girl Bitty Book

We went to a Baby Celebration and I made this for the newborn: a Bitty Book Album and a Baby Bottle card. I've made the Bitty Book albums previously here and here . I enjoy making them for the parents as a keepsake. The "welcome little one" is a spinner using two actual pennies. I used my computer font and my SCAL3 with my Silhouette Cameo to cut the name for the album. The final touch: use a fine black pen to make some outlines on the bottle and nipple. To make the super cute baby bottle card, the Bundle of Joy SVG Collection from SVG.com was used. And, of course, my Silhouette Cameo and SCAL3 is used to cut.

Here's a better look at the Baby Bottle card: finished size is 4-1/8" x 6-1/4".
Inside Card message:

After removing the album from the case, front album cover is embellished with a stamped onesie. There are also some favorite heart charms tied to the spine of the album, too.

Here's the inside of the album:

Supplies used:


  • Stamps: SU Riveting, SU A Little Love, SU Figures of Speech, SU By Ones and by Twos, SU Itty Bitty Backgrounds, SU So Many Scallops


  • CS: SU Pretty in Pink, Recollections White. SU SAB 6x6 Pack (retired)


  • Ink: Staz On Black, SU Pretty in Pink


  • Accys: Martha Stewart Floral Vine Punch, SU Scallop Circle Punch, 1-1/4" Circle Punch, Copic R20, 1/8" Pink Satin Ribbon, SU Bitty Book (retired), SU Top Note Die, SU word Window punch, 1" Circle Punch, 1- 3/8" Circle Punch, Copic Pen R20, Dimensionals, 5/8" Pink Organdy Ribbon


Thank you for stopping by today.

Tuesday, January 10, 2012

Gingerbread Man Thank You Cards

Whoops.....is it mid January ALREADY? Where did the first 2 weeks of 2012 go? I must be way hibernating from mt New Year resolution of relaxing. I did need to get my thank you notes out this year in a somewhat early timeline. I used a cut file from my Silhouette on line library: a double slider thank you card that only cost 99 cents!!!! Yup, you get the file and it loads immediately to your Silhouette for cutting. The score lines and everything are included and this card size is 5-1/2" x 4-1/4". Most double slider cards I had previously made were narrower in size. This one will fit into a A2 envelope!!! Aren't they cute?

A snowflake was included in the cut file but I decided to use some cut gingerbread men I had around. The words "thank you" ARE included in the file. I cut the strip for the top slider and made a smaller insert for the bottom slider. The solid and pattern mat was easy to simply cut with my cutter. SU Close to Cocoa ink to sponge all t he edges for some character.

Use a 2 way glue pen to adhered the words

Gingerbread man is sponged with SU Close to Cocoa ink. Black card stock was adhered behind the eye holes. Adhere the single knot gingham bow with a mini glue dot. The entire gingerbread man is popped with dimensionals.

Here is the Silhouette Snowflake version. The snowflake is cool and very detailed which will be very useful for Christmas 2012. Adhesive Rhinestones are added to the snowflake. The entire snowflake is popped with dimensionals.

Supplies used:


  • Ink: SU Close to Cocoa


  • CS: Recollections Kraft, Paper Company Red, Recollections White, Paper Company Chocolate, Hanko Handmade Paper Assortment, Creative Imaginations Samantha Walker DSP


  • Accys: Adhesive Rhinestones, Gingham 1/4 Ribbon, 3/8" Gold Ribbon, Dimensionals, 2 Way Glue Pen, Sticky Tape, Gold Brad, Sizzix Gingerbread Man Die, Ink Essentials Sponge Dauber


thank you for checking in today.................