Monday, November 15, 2010

Holiday Banner: Believe (in the magic)

OK - I didn't know I would be making this until Saturday...............I never can take good photos of any banner. I just don't know how to do this so there are 3 sections shot on my wood floor below as well as single shots of each section. Each section measures 4-1/2" x 7-1/2" (re-enforced using lightweight chipboard = cereal boxes). That decorative edge at the bottom on the DSP and Mat - I used one of my edge dies I had on hand. The corners were also rounded using a Chomper.
Each section is tied together with a 7" length of double knotted 1/4" Very Vanilla Grosgrain ribbon through the pewter extra large eyelets. Each Alphabet is glues to a scrap piece of mat board, then cut using the Big Shot.
Beginning, "B", "E" :

"L", "I", "E":

"V", "E", and end:
The Stocking:
Plastic snowflakes randomly attached. They were originally from a garland which was cut apart (I believe this was purchased from a local drug store after the holidays). Then emboss the stocking and the contrast , too to give this image some character. The poinsettia is from my stash - not sure where it is from. Use the 5/8" Organdy ribbon tucked under the poinsettia with a mini glue dot. The entire stocking is popped with dimensionals. The felt adhesive penguin is also popped with dimensionals.

The Tree:
Randomly attach gold snowflake confetti (you know the ones: you get them anywhere for parties and they come hundred to a small bag!) using mini glue dots on the tree. Those babbles: they are shades of red dew drops also randomly attached with mini glue dots. Pop the tree with dimensionals. The star on top of the tree....not sure where I got those but I have a bin full so I better use them. "Friends" acetate metal rimmed tag is from my stash (I prob got this on a clearance bin somewhere). The baker's twine finishes off the look on top of the metal tag.............

The ornament:
Plastic snowflakes and gold confetti snowflakes randomly attached. The ornament is embossed with a snowflake background and popped with dimensionals. A metallic gold ornament top is cut and crimped. The gold tie: found that in my stash of left over ribbon (probably from a present years ago!!!!). Any edge punch will work on this image: I happen to use ones I have on hand that needed some attention.

And here is the stocking with a letter:

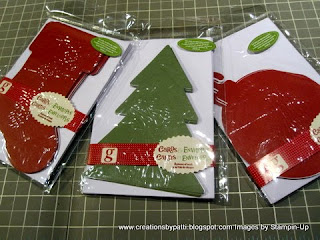
This is what I started with: a packet of 8 A2 note cards with envelopes with 3 shaped images. Cut the shaped note cards at the fold line to get the opposite image. In order to co-ordinate the colors within this banner, the tree was cut up and used for the stocking. To make this banner:
(4) trees = 2 note cards
(3) stockings = 1-1/2 note cards
(20 ornaments = 1 note card
+ 1-1/2 tree note card to make the stocking
total 6 note cards used...................the BEST part? these were in the $1 bin at your local famous craft store!!! so the major part of this banner was very economical!!!
AND, those felt adhesive penguins? They are 1-1/2" x 2" We'll, they were $1.39/16 of them from your local craft store.................$ .09/pc!!!! Cool, eh!!! Works for me!!!
No step by step today....................this project is free style...........and do "use what you have on hand" - outside purchases very minimal.................even recycle products used.....sigh...........I like it!
Supplies:
  • Stamps: none
  • CS: Crumb Cake (Kraft), DSP (non SU), Metallic Gold (non SU)
  • Ink: Chocolate Chip
  • Accys: Serif Essentials Big Shot Alphabets die, Extra Large Eyelets in Pewter, Crop-o-dile, Dimensionals, 1/4" Very Vanilla Grosgrain Ribbon Mini Glue Dots,, Felt Penguins (non SU), Crimper, 5/8
    Organdy Ribbon (non SU), Baker's twine (non SU), Snowflakes (non SU), Gold Snowflake Confetti (non SU), Punches (non SU), Embossing Folders (non SU), Floral Embellishments (non SU), Felt Adhesive Penguins (non SU), Sponge Daubers, Corner Chomper (non SU)

Thank you for stopping by today..........................

Friday, November 12, 2010

Bitty Box: Punched Reindeer

Another Bitty Box: a punched Reindeer. It turned out cuter than I imagined. The DSP? it's from a retired pack - only scraps are needed.

Close-up of the snowflake (new Northern frost Decorative Strip Sizzlit die): rhinestones have been attached for that festive feeling!

Open the lid to reveal: reindeer treats.......and a reindeer portrait from the Jolly Bingo Bits stamp set...........add a tied single knotted 1/4" Chocolate Grosgrain ribbon around the box to complete this project.

Here's a closer view of that reindeer portrait: use Stampin' Write Pens to achieve this look.

To make this project:
(1) Bitty Box in Crumb Cake (Kraft) CS
(3) 2-3/8" x 2-3/8" DSP
(1) Whisper White Northern Frost Decorative Strip die
(1) Large Oval punched in Chocolate Chip for the reindeer face
(2) Swirls Scribbles Sizzlit Die in Black for antlers
(2) 1/4" circle punch in Whisper White for eyes
(1) 1/4" circle punch in Chocolate Chip, cut in half for eye lids (not in photo)
(2) 1/8" circle punch in Black for eyes
(1) 1/2" circle punch in Real Red for nose

Adhere inside lid and bottom with 2 of the DSP:

Adhere DSP to the lid. Attach antlers and star with 2 Way Glue Pen. Then adhere adhesive rhinestone to the snowflake.

Then add dimensionals to the assembled reindeer face, place on lid. Project complete.
Supplies:
  • Stamps: Jolly Bingo Bits
  • CS: Crumb Cake (Kraft), Whisper White, Black, Chocolate Chip, Real Red, DSP (retired)
  • Ink: none
  • Accys: SU Big Shot Northern Frost Decorative Sizzlit Strip, Swirls Scribbles Sizzlit Die, Large Oval Punch, 1/4" Circle Punch (retired), 1/8" Circle Punch (retired), 1" Circle Punch, 1-1/8" Circle Punch (non SU), White Gel Pen, Stampin Write Real Red+Black+Chocolate Chip Pen, 1/4" Chocolate Chip Grosgrain Ribbon, Rhinestone adhesive (non SU), Deimensionals, 2 Way Glue Pen

Thank you for stopping by today................have a great weekend

Thursday, November 11, 2010

Bitty Box: Ginger Bread Man

Here's another project using the Bitty Box & Envelope die. This project also uses the sticky pages (I pulled the sticky pages out of hibernation for the holidays!). I love how it turned out - it gave this project just the right amount of glitter.

Side view:

Open the lid to reveal a message and 2 Peppermint Pattie treats:

Closer view of the inside lid:

To make this project:
(1) Bitty Box in real Red
(5) 1-3/4" Circle in Chocolate Chip (not 7 as in photo)
(1) Sticky piece 2-3/8" x 2-3/8"
(6) Punched Heart to Heart (smallest one) in Real Red
(6) 1/4" Circles in Whisper White for the eyes


Use a 1-1/4" circle as the template for the smile (see pink arrow): do this for 4 of the punched circles. The others will be used for the bottom of the Peppermint Patties. Note: a 1" circle template will make a smaller "smile". Yikes: it looks like I grabbed the wrong size circle and used a 1-1/2" instead so my Ginger Bread Man is really smiling!

Use Craft White ink to sponge all edges of the circles

Use a white gel pen for "hair" and "smile"

Adhere punched hearts using tweezers and 2 way glue pen. Then add eyes also using 2 way glue pen and the assistance of tweezers. (A good thing? - only needed 2 Peppermint Patties and not 3 as pictured in photo).

Remove back of sticky piece (the white section), adhere to lid. remove the top layer of the sticky piece, place Ginger Bread face with dimensionals onto exposed sticky piece. Proceed to next photo for the next step..............

Sprinkle Dazzling Diamonds on exposed sticky piece. Brush off excess.

Supplies:
  • Stamps: Fabulous Phrases, Got Treats
  • CS: Real Red, Chocolate Chip, Whisper White
  • Ink: Craft White, Chocolate Chip
  • Accys: SU Exclusive Bitty Box & Envelope Big Shot Die, Dazzling Diamonds Ultrafine Glitter, Sticky page, Heart to Heart Punch, 1-3/4" Circle Punch, 1/4" Circle Punch (retired), Medium Jewlry Tag Punch, Curly label Punch, 1/4" Sheer Organdy Ribbon (non SU), Baker's Twine (non SU), Sticky Tape, White Gel Pen, Real Red Stampin' Write Pen, Dimensionals, 2 Way Glue Pen.

Thank you for stopping by today........................

Wednesday, November 10, 2010

Bitty Box Treats: Punched Santa

Another Bitty Box: Santa!!!! He is has a so very sparkly background!

Side view:

Open the lid to reveal a message to "enjoy" the contents!!!!

To make this project:
(1) Bitty Box in Cherry Cobbler

(1) 1-3/4" Circle in Blush Blossom
(1) 1/2" circle punch in Blush Blossom for the nose
(1) Ornament Punch in Whisper White, cut off the "hanger" part, this is the bottom of the "face"
(2) 2 Step bird Punch - wings only in Whisper White used for the moustache
(1) 1/2" circle punch in Whisper White for the hat
(2) 1/4" circle punch in Black for the eyes
(1) 2-3/8" x 2-3/8" Sticky piece

To make brim of hat, first punch wide oval on a scrap of whisper white CS

Then move the punch up about 1/2" and punch again.

Cut a template 2-3/8" x 2-3/8" square in any color. Use this template to decide position the punch pieces on the lid (and to ensure all pieces fit).
Use Bashful a sponge dauber with Blue ink for the white pieces. Put through the dot embossing folder.

Use a Sponging Dauber to "daub" cheeks with Pretty in Pink Ink. Adhere beard using 2 Way Glue Pen. Apply dimensionals to moustache/nose and brim of hat

Remove the solid white layer of the sticky tape, place on top of lid.
Remove the (top layer) orange plastic covering the sticky piece.
Position completed Santa on top of sticky piece.
Generously sprinkle red glitter over the exposed sticky areas.
Tap off glitter
Remove excess glitter with a brush.
The results are so fabulous and festive!!!!
Stamp "Enjoy", punch out with 1-3/4" circle punch, adhere and fill with treats.
Supplies:
  • Stamps: Holiday Collection (retired)
  • CS: Cherry Cobbler, Black, Whisper White, Blush Blossom (retired)
  • Ink: Cherry Cobbler, Bashful Blue, Pretty in Pink
  • Accys: SU Exclusive Bitty Box & Envelope Big Shot die, Ornament Punch, Wide Oval Punch, 1/2" Circle Punch, 2 Step Bird Punch, 1-3/4" Circle Punch, SU Big Shot Dot Embossing Folder, 2 Way Glue Pen, Sticky Pages, Romantic Red Ultrafine Stampin Glitter (retired), Dimensionals, White Gel Pen, Sponge Dauber

Thank you for stopping by today................

Tuesday, November 9, 2010

Bitty Box Treats: Punched Snowman

Here's a treat to give!!!! It's not really Frosty but a close cousin............cute!!! The punch idea came from ...........darn, I didn't write it down.............so if you see this and recognize it - please do let me know so I can link it to you. I added the scarf and holly on the hat. The Bitty box finished size is 2-3/8" x 2-3/8" x 3/4" and is a snap to assemble!

Inside box: (2) treats

Close-up of the Real Red stamped treat message punched using the Scallop Square Punch:

To make this project:
(1) Baja Breeze Bitty Box
To make this box top embellishment:
(1) Black Word Window in Black for Hat

(1) 1-1/4" Square Punch in Black for Hat, trim off 1/4", use 3/16" corner rounder on two of the corners
(2) 1/4" Circle Punch in Black for the eyes
(1) 1-1/2" Circle in White foe Snowman body
(1) Ornament punch in White for the head, trim off the "hanger" part
(1) carrot, hand cut in Pumpkin, round one end using scissors
(2) hearts in Real Red - punch the smallest heart
(3) 3/8" x 1-1/2" strips of DSP - scraps will do!
(2) Old Olive punched leaves from the 2 step Bird Punch .
(2) 1-3/4" x 4-1/2" Baja Breeze strips to cover Chocolate

Use sponge dauber to ink Bashful Blue onto edges of the Snowman head and body piece. Use Craft White ink on the Hat and box edges.

Adhere brim of hat and hat to Snowman head. To make that great smile, use a 1-1/4" Circle as a template (see pink arrow). Adhere punched hearts at each end of the smile. Add eyes and carrot nose. Use a white gel pen on eyes.....set aside.

Adhere Snowman body to the left corner of the lid. Trim off excess, re sponge edges using Bashful Blue ink. Assemble scarf, then split end of scarf with scissors. Stamp message on the bottom right corner with Black ink.

Apply dimensionals to the back of the Snowman head. Adhere on top of box lid.


Supplies:
  • Stamps: Tags until Christmas, Vintage Labels (sale-a-bration: retired)
  • CS: Baja Breeze, Whisper White, Black, Pumpkin, Real red, Old Olive, Scrap DSP
  • Ink: Black, Craft White, Bashful Blue, Real Red
  • Accys: SU Exclusive Bitty Box & Envelope Big Shot die, Ornament Punch, 1-1/2" Circle Punch, Extra Large Heart to Heart Punch, Word Window Punch, 1-1/4" Square Punch, 2 Step Bird Punch, 1/4" hand held circle punch (retired), 1-1/4" Circle Punch, 2 Way Glue Pen, Black Pen (generic), Scallop Square Punch, Sticky Tape, Dimensionals, Red Adhesive Rhinestones (non SU)

Thank you for stopping by today...................

Monday, November 8, 2010

Santa Apron Treat Holder

There's nothing like a new updated version of the apron treat container from 2009 (see my blog previously posted on 12/18/09 Recipe Holder for the tutorial, too). I've had this sketch for a couple weeks and it came to life today............no message is stamped as it is obvious this is a gift. A tag can be added. The belt is 3/8" wide around the apron. The buckle is 5/8" x5/8" brushed gold CS. Finished project size is 4-1/4" x 5-1/2 (excluding grosgrain ribbon).

Berry embellishment detail: score punched leaf in half, hand draw the "veins", adhere adhesive rhinestones.

Detail of bottom: overlap bottom circles using Tombow adhesive, apply stardust Stickles.

Back view:


Supplies:
  • Stamps: none
  • CS: Real Red, Black, Brushed Gold, Old Olive
  • Ink: none
  • Accys: SU Dot Embossing Folder, 3/4" Circle punch, Small Oval Punch, 1/2" Circle Punch, 3/8" Circle Punch, 1/4" White Grosgrain, Tombow Adhesive, Stickles (non SU), Sticky Tape, Adhesive Red Rhinestones (non SU), Stampin' Write Pen in Old Olive

Thank you for stopping by today........................

Friday, November 5, 2010

Ready For Christmas 2010

Yay - an album to share!!! I am excited because I have had this kit for 2 years now and finally completed it in time for this years 2010 Holiday season...........whew!!!! The front cover is ready for photos to be attached. I love the colors used in this album - they are my favorite: red, white, and black!!!! I also love the shape of the cover as well as inside pages: some pages have page protectors and some are unusal sizes to break up the "normal" scrap booking page size. Below is a sampling of the inside pages. Finished album size is 9-1/2" x 9-1/2". The red wire spine is 1" diameter.

Cover upper right corner:


Inside back cover:

Overview of album:
I'm not sure if this album kit is still avialable or not. I am glad it is finished now.
Thank you for stopping by today..............................have a great weekend!