Friday, April 29, 2011

Asian Birthday Lever Card

Update made on 5/1/11:
The inspiration for the cool Lever Pop-Up card is from Thienly who is one of the Designers for SVGcuts.com. See her fabulous creations on the Craft Zone section at SVGcuts.com. She also has a blog and Facebook page: www.modpaperie.blogspot.com where many of the projects are posted. Thank you Thienly for your patience and help to allow me to make this card for my special friend.

This project is a Gift for a very special friend. It's a Lever style B'day card: Asian style!

The card: card front is embossed. front card mat is also embossed and flanked with punched vellum butterflies along with a SCAL SVG cherry blossom cut file, SCAL SVG Fan cut file.


Here's a closer detail of the mat details:

First: the gift envelope..........LOVE that patterned paper by My Little Shoebox with a strip of punched cherry blossoms (Martha Stewart punch) with a cherry blossom closure. Centers of the cherry blossom are 1/2" punched circle attached to the back

The gift tag is a stamped banner with "Happy Birthday" in both English and Chinese. The banner stamp is from Stampmagick - there are interchangeable words that fit into the banner.

Open the flap to reveal the gift: a lattice metal die. Love that flat invisible Velcro closure.

Love this stamp in the back of the envelope: "Proud Creation" is from Stampmagick

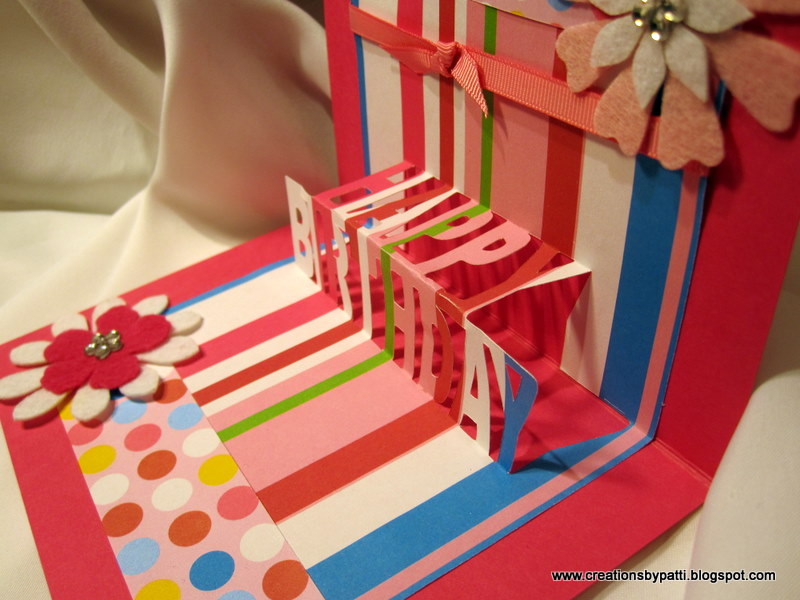
Here's the opened card:

The contrast solid color words "Happy Birthday" are off set a little to show the background of the patterned paper.

To make this project:
(1) SVG Premium Pop Up Cut file front, embossed - finished size 8-1/2" x 5-1/2"
(1) Inside car SVG Premium Cit file with "Happy Birthday" imported into cut file - finished size 8-1/2" x 5-1/2"
(1) 3-3/4x 2-1/2" Solid Contrast mat, (1) 3-1/2" x 2-1/4" solid embossed mat
(1) 3-1/2" x 3/8" stamped Vellum message.
(1) Solid " Happy Birthday" cut from SVG Premium Pop Up Cut file
(6) Cherry Blossoms with centers from Japanese Flower Girl: My Scrapbook Chicks
(1) Fan SVG Cut File from Scrappedlives.info, a shadow for the fan will need to be created
(2) large punched Martha Stewart Butterflies in Vellum
(3) Small punched Martha Stewart Butterflies in Vellum

To carefully secure the contrast words, first: score in between the two words. Using two C-Thru rulers, carefully fold up the words. Use one ruler to anchor one of the words, the other to guide "up" the word as shown.

Position the stamped message on vellum. Piece, then adhere with brads on each side.

Be sure to check the outside and inside card, shave off excess as shown if necessary;

Apply dimensionals to the front mat, fan, and cherry blossoms as shown:

At this point, the inside should look as shown in the photo. Then randomly adhere the cherry blossoms and punched vellum butterflies. Mini glue dots used to adhere the butterflies.

Resources:


  • Stamps: Stampmagick, Papertrey's Big Birthday Wishes

  • CS: SU Riding Hood Red, SU So Saffron, SU Chocolate Chip, My Little Shoebox Oasis Summer Right DSP, SU Vellum Card Stock

  • Ink: Black Staz-on, SU Chocolate Chip

  • SCAL SVG Cut Files: from SVGcuts.com Premium Pop-up Cards and Lever Card Pop-up, from My Scrapbook Chicks Japanese Flower Girl, from Scrappedlives.info Fan

  • others: 1/2" Circle Punch, Cuttlebug Cherry Blossom Embossing Folder, Martha Stewart Small & Large Butterfly punch, Martha Stewart Large Cherry Blossom Punch, Velcro adhesive dots, SU Dimensionals, Mini Glue Dots


I hope you enjoyed this project...........I enjoyed creating it for my special friend, Gail W.

Wednesday, April 27, 2011

Another Birthday Pop-Up

Another Card, another pop Up..........lovin this SCAL SVG file which has become pretty flexible to make a few different Birthday cards. This one is also using some of the $1 Target Scrapbook paper. Circle image is stamped using Marina Mist ink. The Marina Mist ink matched well with the Pacific Point card stock used. To co-ordinate the outside with the inside, 1-1/2" and 3/4" Circle Punches were used on the white mat and randomly adhered to the white mat. Green Galore Card Stock is a great co-ordinating contrast for this card. The small punched star is popped with a dimensional. The whole "Wish Big" is popped with dimensionals. Flat back adhesive pearls are attached to the bottom of the card. The white satin single knot bow finishes the front of the card.


Card inside also has adhesive flat back pearls and satin single know bow - BUT notice the top of the inside card?..................punched candle edge!!!!


Here's a closer view of the punched edge.....topped with Gold Stickles.


Side view of the Happy Birthday Pop Up:


Resources:


Stamps: Word Play, Circle Circus


CS: Pacific Point, Green Galore, White, $1 Target Spot Scrapbook Paper


Ink: marina Mist


Others: Small Star Punch, Dimensionals, SU 5/8" White Satin Ribbon, Adhesive Flat Back Pearls, Gold Stickles, EK Success Candle Edge Punch, SVG.com Happy Birthday Pop-Up cut File.


Thank you for stopping by today.................

Monday, April 25, 2011

Birthday Pop Up

I've been recently working on a bunch of Pop Up Birthday cards. I used some retired card stock and some left over $1 spot scrapbook paper. Originally, the pop up was to test the size of the Happy Birthday Pop Up but then I had enough paper to complete a card. Outside mat is 4-1/4" x 3-1/4" . The Wish Big White section is 1-1/2" x 1-3/4", each mat is 1/4" larger and popped with dimensionals.


Here's the felt flower embellishment attached using mini Glue dots. The Adhesive rhinestone flower from my stash.


Open the card to reveal a combination of dots ans stripes with more felt embellished flowers on each corner. The simple Pop up (from SVGcuts.com Premium Pop Up cut file) is in the center.


Here's a closer look at the felt flowers


Side view of the Pop Up:


Resources:

Stamps: SU Word Play

CS: SU Melon Mambo, White, $1 Target Spot Scrap Paper

Ink: SU Melon Mambo

Others: 1/4" fantasy Rose Grosgrain Ribbon, Adhesive Felt (unknown), Happy Birthday SVG File svgcuts.com


Stay tuned for additional Pop Up cards..............

Friday, April 22, 2011

A Bow Maker

Here's something I wanted to share with everyone. I first saw this on Becca's web site (http://www.amazingpapergrace.com/) a couple months ago. Then I saw them at the Scrapbook Expo and also they started popping up on other blogs, too................I reverted back to Becca's site (see her posting on 3/16/2011 and also on 2/15/2011 Becca bit: Peg Bows). I love how she was able to easily make one of these out of scrap wood and WOW - they sure make a fabulous bow. Check Becca's site - she has a video using this peg method. This particular one measures: 5-1/4" x 3-1/4". The pegs are 3/8" and the holes are slightly bigger. The first four holes (from right to left) are 1" apart. The last hole is 1-1/2" apart.

The organdy bow on the pegs will finish 1" wide.

The finished bow:


There are probably other bow makers out there available - I like this one since it is by far, the most economical! Thank goodness for having a man around the house to make something that is really a 10 minute project.

Wednesday, April 20, 2011

8 Year Old Twin B'day Cards

Now here's something I don't do too often: make twin 8 year old birthday cards!!!! These cards evolved and turned out very nice - I know the Mom will be happy with them. Stamping and some Cricut die cutting involved. The Poodle one is for a girl and the Octopus one is for a boy. More details below:


Details on Jack's card: The pattern paper is a scrap I had left over from Target's $1 spot - with all the bright colors, it worked out great. The balloons, Octopus, Party Hat are cut using the Cricut Create a Critter cart. Use a Black fine line pen was used for the balloon string and the balloon. The cake stamp is from Stampendous called "Fifteen Candles". This stamp set is cool because the year and message can be easily changed. The cake is colored using SU Pens that co-ordinated with the paper. Jack's name: SU die cut letters. Streamers are randomly stamped using Black ink.
Inside Jack's card: EK Succes candle edge punch used on the top, use a yellow marker for the flames. Tie in the front pattern paper by using a scrap across the inside. Top it off with a co-ordinating die cut present.

Here's Emma's card: same layout but colors changed. Thank goodness the $1 Target Scrap pack had a pink version. The poodle was a perfect animal to be used for this card.

Card inside:

Here's a closer look at the card inside candle tops:

The Stampendous "Fifteen Candles"

Other resources:


  • Stamps: Stampendous Fifteen Candles, SU Word Play


  • CS: SU Bermuda Bay, SU Pumpkin Pie, SU Melon Mambo, White, Misc. DSP


  • Ink: Black


  • Others: Cricut Create a Critter Cart, EK Success Edge Candle Punch,SU Pens: Bermuda Bay, Pumpkin Pie, Crushed Curry, Positively Pink, Crushed Curry, Dimensionals.


Thank you for stopping by today....................

Monday, April 18, 2011

Graduation Pop-Up Card

This is not the traditional Black Cap and Diploma Graduation Card. Originally a bouquet of flowers was planned .............didn't turn out as originally planned. No patterned paper used so lots of texture was used for this card. Cuttlebug Stylized Flowers cut in Pink Pirouette is used as the backdrop. The 1/4" SU Certainly Celery Ribbon runs in between the Martha Stewart Eyelet punched in White. This is a A2 size card.


Here's a closer view of the fancy front: Spellbinders Fancy Tags 3 die cut and embossed with SU Regal Rose used, then popped with Dimensionals. Use Wild Card Cricut Cart for the "Class of" cut in White and Calendar for the "2011" cut in Pink Pirouette.

Open the card to reveal: "CONGRATS" pop-up (from SVGcuts.com Premium Pop-Up cut file)inside with a cluster of die cute flowers (Sizzix Flower Garden Sizzlit Strip die) along with decorative Martha Stewart Eyelet punch edge at the top and bottom. Add the same SU 1/4" Certainly Celery Grosgrain Ribbon with single knot ties finishes the inside. Too bad I already glued down the top section. This area could have been a pocket for a gift card/check to be slipped into.........


Here's a side view of the Pop-up:


Here's how I made the flower clusters: Die cut strips of White, SU Regal rose, SU Certainly Celery (or scraps can be used since only the leaves are needed), scraps of SU Pink Pirouette

Using the White as the base: start adhering the trimmed pieces on top as shown:

After all the pieces are placed, finished flower cluster should be as shown. Trim to width, adhere.


Hope you enjoyed this posting...............thanks for stopping by...............

Saturday, April 16, 2011

A Notebook from the Pleasanton Expo

This project is way cool. It was a Make & Take from the Oohlalal Designs Booth at the Pleasanton Scrapbook Expo a couple weeks ago. I changed the notebook holder to be with black fabric, the orientation to open just like a book, embossed the heart, and a chipboard frame with flat back pearls for "Friends". Finished project size is 9-1/4" x 10" x 1/2". The background chipboard on top of the black fabric came "naked" - ink was applied directly from the ink pad on top. Ranger's Distressed Walnut Ink was used throughout the project. The dress form can be purchased already embellished with the ribbon and rose along with safety pin+charms. See Christine Delgadillo's blog site for additional information: http://www.oohlaladesignoriginals.com/. Christine teaches amazing scrapbook classes in the San Francisco Bay area so be sure to look her up!

Here's the black chipboard frame with the flat back pearl adhered with dimensionals.


Here's my version of the inside notebook. I decided to add slanted pockets to both sides. The right side to hold the lined paper which can be later replaced with a new one. The left side is a pocket to hold various loose note. A pen is added: I have decided to use Kraft paper with the black seam binding for the pen holder - this last task to be completed. That printed paper on the right pocket and top of the notebook? It's the packaging from the dress form used - love that recycling!


This is the original notebook with a black/Kraft color cloth background (already assembled) and the "Friends" banner.


The notebook cover was to flip up as shown:


This is how I revamped a cover: Cut out chipboard - I happen to use a mat board (which is thicker than chipboard)


Apply a spray adhesive on the chipboard and position onto the black fabric:

Apply sticky tape around each shipboard piece. Do not remove yet. Corners need to be made first !!!! Each corner is made in the same way: remove a small portion of the sticky tape at the corners, pull corner toward the center of the chipboard (see yellow arrow), add another square piece of sticky tape, then carefully start to fold up sides after removing the rest of the sticky tape.

Finished corner should result as follows (see yellow arrow):


After all the fabric has been secured, adhere Kraft card stock to the inside. Be sure to score in between each side of the 1/2" spine so that the "book" will crease properly. After adhering and scoring the left inside cover, the right side Kraft card stock can be accurately cut to finish the inside. No specific measurements for the pockets - just be sure the "seams" are hidden underneath the edges. Add a 1/2" fold over to the pocket slant edge - it adds strength to the opening. The decorative paper is then added.


I really like this project and will be making similar ones involving fabric!!! !