Friday, March 30, 2012

Dandelion Egg Treat Box

Here's a really cute Dandelion Designs Egg Treat Box: the template can be found in the stamp set Happy Easter cling set (CL-5) - see the blog posting here from Dandelion Designs for more inspiration. For this project, the stamp set used is "Happy Spring MC-19". The "Happy Easter" stamped words is from the Dandelion Design: "Happy Easter MC-18" . Overall size is 3-3/4" x 3" (for the egg shape). The box behind the egg is smaller in size: 2-3/4" x 2". A paper rose is attached on top of the pink sheer grosgrain ribbon. The punch used is from EK Success called: Patterned Circles. It was cut in half for each side of the egg.

Slowly tilt open the hinged egg top to reveal Fuzzy Chicky: Copic colors used: R81, Y13, Y18, YR07.

Here's Fuzzy Chick fully popped out of the egg: cute, cute, cute. Note Glossy Accents was added to the beak.

box view:

I love how this cute project turned out...............don't you? Have a great crafty day making something fun!

Wednesday, March 28, 2012

Good Fortune Card

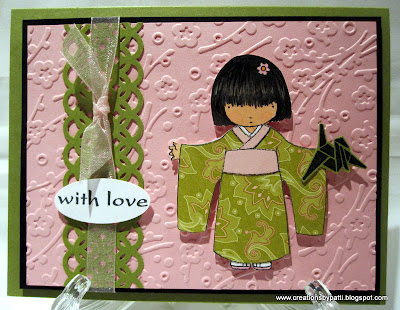
A couple cards today: found stamp set from My Favorite Things (MFT) called Good Fortune from Memories Live On in Cupertino, California and just had to buy it (sorry, it was the last one but am sure they could get more). It was so cute and I inked up a couple color combos. Now if you check the stamp, the girl's hair style is slightly different. I added bangs. The Kimonos are all stamped with 3x3 DSP scraps. The card colors were chosen based on the DSP colors. The Crane Origami Stamp is using Black Momento Ink, cut out, attached to her hand with a 2 way glue pen. Crane stamp is a retired 2002 SU "Gifts from the Orient" Set. The Background mat is a Asian Cuttlebug Embossing Folder. Message "with Love" is from Waltzing Mouse Stamps "Asian Gardens", punched out using SU Small Oval Punch. EK Success "Patterned Circles" Punch is used for the left side strip.

This color combo is SU Pretty in Pink, Pixie Pink, Black: use organdy ribbon to tie on top of the left side strip. Copic colors used: E21, R20, R27, R81, Y18, W4, W7, W10. She is cut out and popped with dimensionals.

The second one is in SU Barely Banana, Almost Amethyst, Black color combo:
Another in SU Barely Banana, Pretty in Pink, Black color combo:
This one is in SU Real Red, Rose Red, and Black color combo:
Here's one with SU Old Olive, Pretty In Pink, Black color combo:
Inside each card: corners punched using Martha Stewart "Modern Garland" corner punch.
Thank you for stopping by today to visit. And a very happy crafting day to you all.

Monday, March 26, 2012

Dandelion Fuzzy Chick Jelly Bean Treat Box

Does this Chick scream Spring or what? I certainly wanted to color her in a bright yellow. This cute little stamp set is called "Happy Spring" from Dandelion Designs. I love the PDF Jelly Bean treat holder template on the Dandelion Designs Blog (found here). Finished size of the treat holder is 2" x 2-7/8" (excluding Chicky) x 1".

Stamp the Chick with Memento Black on Neenah White paper. Copics used: R81, Y13, Y18, YR07 and a little Glossy Accents on the beak. The Jelly Bean is scrap DSP from ????? Ya don't need much for this image at all. Emboss the Jelly Bean treat holder with the Dot Cuttlebug Embossing folder. Pop the chick onto the treat holder with dimensionals.

And, here is the holder inside view:

So I hope you enjoyed this post, too and a very happy crafting day to you all!!!

Friday, March 23, 2012

Dandelion Fuzzy Bunny Carrot Treat Box

Easter will be coming up soon and lots of bunnies will be hopping around. I love this Dandelion Designs Fuzzy Bunny (I named him that) even though the stamp set is called "Happy Easter" . The carrot PDFtemplate can be found on Dandelion Designs' Blog here. There's even a Jelly Bean treat Box which I will post tom. These treat holders are easy to assemble and hold just the right amount of treat. The finished treat holder size is 4-1/2" x 1-1/2" (excluding Bunny) x 1".
And, here is Fuzzy Bunny: Stamped using Momento Black ink on Neenah White Paper. Copic Colors used R83, R81, W1 with a little dab of Glossy Accents on the nose. Cut Fuzzy Bunny out and pop him on dimensionals. The carrot is embossed with Cuttlebug Swirl Embossing Folder and the Carrot top is the Dot Embossing Folder. Paper is SU Only Orange and Glorious Green.
Backside of the carrot treat:

Top view:

So I hope you will be inspired to make some of these cute holders with Fuzzy Bunny. A happy crafting day to all....................

Wednesday, March 21, 2012

Chocolate Treat Box

Here's a really cute treat box. It is a kit that can be purchased from Memories Live On in Cupertino, California. This box is designed by Deb Hurtig. Along with the cut/scored pieces, great detailed instructions are enclosed with a information to more more of these cute little boxes. The finished project measures 2-1/2" x 2-1/2" excluding the little handle at the top. Inside box measures 2" x 2". Don't you just love that sunflower on the belly band (a Sizzix die)

Here's a closer look at that cool handle used to tote your treat:
Inside the box:

Hope you enjoyed this little box and will stop by Memories Lives On on Cupertino, California or shop their on line store. They have a small section in the store that has several kits available both treat holders as well as albums for purchase.

A happy crafting day to all of you.....................

Monday, March 19, 2012

Easter Gum Holder

A quick post today:
This is the cutest gum holder made by my friend Carol. It is so cute. The size is 2-1/4" x 4-1/4". carol loves punch art so this project is mostly made using punches: Oval Punch, Bird punch, Small tag punch, and Flower Punch. Clever, eh?

Here is the flap opened to slip the gum (or cash!) inside.

A happy crafting day to all....................

Friday, March 16, 2012

Chocolate Box Album

I attended a class to make this project last week and had such a great time. The class was held at Memories Live On in Cupertino, California. Check their site as they have other classes, too. This class was given by Lisa Martinez. The fun paper used is a 6x6 paper pack from Best Creations called Candy Shop. Album finished size is 5 X 5. Front cover candy pieces and decorative shapes are from the Silhouette Store. There is acetate behind the decorative shape between the candy and the gold box top. Metal rings hold this album together.

This may be my favorite part of the album: love the awning for the top and the candy embellishments which are cut and popped up.
The side doughnut strip is a pocket holding two tags. The Silhouette cut doughnut sits on a doilie (die is from Cheery Lynn) and is embellished using those Pearl pens which dry shiny and look like candy sprinkles.

More tags removed from the side pocket and the doughnut flipped up for a photo.

Here's a yummy page. The cupcake is a Silhouette cut image. I added the Cuttlebug swirl embossing folder to the cupcake top and glossy accents to the cherry. The opposite side is a printed acetate page.

With the cupcake top flipped up: a photo opportunity. You can see the Stardust Gel pen giving shine to the cupcake liner.

The Yummy page is full of glitter and bling cupcakes:
I love this page with the slanted Jelly Bean pockets with tags.
Here's the tags from the 6x6 Candy Shop pack:
A co-ordinating page with the "Sweet" from the 6x6 pack and those Silhouette cut lolly pops:

I actually changed the lolly pops so they flip up for a photo:
Don't you love the pockets with the EK Success punched edges:
Tags from the 6x6 Candy Shop pack:

Back of album. I made an extra Chocolate and found a place for it........
I loved this class with friends and am so happy with the finished product.
A happy crafting day to all of you.

Wednesday, March 14, 2012

A Fabulous Recipe Paperbag Mini

This is the most clever recipe album. I love it. I found this album in a store in Cupertino, California called Memories Live On. It was created by Michelle McDowell. Michelle did offer this album as a kit but they sold out. I am a lucky person who was able to purchase this finished project. The store has some great classes of all kinds; scrapbook pages, mini books, party favors, and cards. This album is 5-1/2" x 5-1/2" and is made from 3 kraft lunch bags. Lots of fun embellishments. The front has some fun stickers. The metal rings have a lot of fun ribbons. What is seen here is part of Lunch bag #1.

Open the page to reveal a slant pocket for the recipe card. A pocket on the right side holding a tag. The recipe card with the "breakfast" is a rub-on and is slipped into the lunch bag opening.
Flip over the page again to reveal another pocket. The right side is a photo mat with photo corners.

Lunch Bag #2: "Lunch" is a rub-on on the punched label pull out recipe card. A slanted pocket which holds a fun doilie and a Recipe tag. The right side is a pocket with an ingredient tag.
Another pocket with a recipe card. Right side is a photo mat
Lunch Bag #3: holds a "dinner" rub-on in the lunch bag opening. A photo mat is on this page with fun punched corners. The right side is a pocket with a "notes" tag.
Album back


Now isn't this a wonderful project? So have yourself a very happy crafty day................!!!!

Monday, March 12, 2012

A Surprise "Just Because" Package

Now how can a girl be so lucky. I love getting mail at my door step. I received a box full of surprises!!! The box was a surprise, too from my Las Vegas friend: Gene. One of the items in the box was this great Dragon card - it is so cool. The company name is Fred Mullet/Red Pearl Company. I got the medium size stamp but now I have this large size Dragon card. I love how there is the bamboo element embellishment on this card.

Now here's a box that really moves my heart: in my favorite colors and embellished with the perfect Washi paper!!!! And, don't you just love that MS punch on the edge!!!!
Don't you just love the stamped message?

And, look inside.......but wait........look at those shiny gold square brads at the front of the matchbox compartments. Now that is cool. Each compartment is filled with fun embellishments:
Here's a better picture of the embellishments: cute, eh.........? There are flowers, pandas (and other animals) and branches of blossoms. So cute.

I am so blessed to have such a great friend.....thank you, thank you so very much Gene!!! You are the BEST!!!!

Friday, March 9, 2012

Gate Fold Sakura Dandelion Thank You Card

This was a fun card to make. I used the SVGcuts.com Sakura Flower cut file (which can be found here) to create this card. It was cut using my Silhouette Cameo with my SCAL3 (Sure Cuts a Lot computer program). I love that I can make the Sakura Flower any size, then weld the various sizes to make this "crazy" card. This card will fit into a A2 envelope so careful postiioning of the smaller Sakura flowers was needed. The stamp sets used are from Dandelion Girl's Day and Dandelion Keiko Set which can be found here.

Open the right side to reveal one of the "fan girl":
Open the left side to reveal another "fan girl"- they are from Dandelion Girl's Day which can be found here:

Message inside is from Dandelion Keiko Set. Stamped heart is filled in with a gold pen.

Here's a closer look at Keiko:

Like my stamp in the back? It's from Art Nekko.

This is how the card was made: the long cut piece was made using SCAL3 and cut with my Silhouette Cameo in Pixie Pink. Each of the Sakura flowers are sponged with Pixie Pink and Pretty in Pink ink.

Two of the three Dandelion Girl's Day stamps were used. The larger one is from Dandelion's Keiko set. Copic colors used to color their face, hair, flowers, and shoe bottoms are: E21, R20, R85, W10. and a Gold pen for the flower centers in her hair.
Supplies:


  • Stamps: Dandelion Girl's Day, Dandelion Keiko Set, Art Accents "stamped by"


  • CS: Gold, Neenah White, Washi Paper, SU Pixie Pink, SU Pretty in Pink


  • Ink: SU Pretty in Pink, SU Pixie Pink, Memento Black


  • Accys: Pentel Slicci Gold Pen, Copic Colors as listed above, Sponge Daubers, Dimensionals.


Thank you for stopping by today and a very happy crafting day to you.