Thursday, September 30, 2010

Booglie Halloween Card

This was such a fun card to make...........just like the Booglie Halloween House posted on 9/21/2010 with the same theme. Both the house and this card was just as much fun to make.

Front top of card:

Front bottom of card with the treaters in costume:

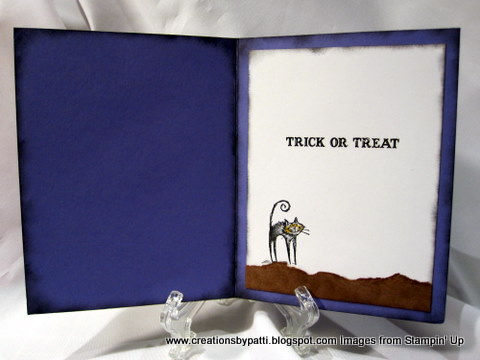
Card inside: Message is a rub-on from the $1 bin Edges are sponged for that spooky feeling.


To make this card:
(1) 5-1/2" x 8-1/2", score along the 8-1/2" side @4-1/4"
(1) 3-3/4" x 5" Lovely Lilac CS for the front mat
(1) 3-3/4" x 5" Whisper White CS for the card inside
(2) 3-3/4" x 1" strops of Crumb Cake (Kraft) CS for the fence
(2) 3-3/4" x 1" Old Olive CS for the grass
Close to Cocoa to cut tree (not in Photo), use inked texture plate to create wood grain effect, then pop with dimensionals.
Scraps of Black CS to die cut Bats (not in photo), add googlie eyes, pop with dimensional
Scrap of More Mustard to die cut moon (not in photo)
Scraps of Almost Amethyst to die cut clouds (not in photo)

Sponge edges for the card inside and out using Craft White ink:


Sponge edges of the front Lovely Lilac mat and both punched grass pieces using Black ink.


Sponge punched fences using Soft Suede Ink:


Stamp images in Black, use Aqua pens along with a variety of ink colors for images. After coloring, cut images, adhere dimensionals to adhere to card.

Supplies:
  • Stamps: Booglie Eyes (retired)
  • CS: Whisper White, Lovely Lilac (retired), Black, More Mustard, Old Olive, Kraft, Close to Cocoa (retired), Almost Amethyst
  • Ink: Black, Close to Cocoa (retired), Craft White, Cajun Craze, Lovely Lilac, Old Olive, Rich Razzleberry, Real Red
  • Accys: SU Texture Plate #4, Tree & Bat Die (non SU), Fence Boarder Punch (non SU), Grass Boarder Punch (non SU), Stamping Daubers, 1-1/2" Circle Punch, Aqua Pens, Blush Blossom Stampin' Write Pen, Dimensionals, Rub-on (non SU)

Thank you for stopping by today...........................

Wednesday, September 29, 2010

Ghost Halloween Card

This card is similar to the Ghost Halloween House posted on 9/22/2010. It uses many of the same elements from the house. The ribbon adds some bright and cheeriness to the card. Stamps used are retired BUT I still love them and they still work for the Halloween season. I couldn't justify purchasing more Halloween stamps for my colelction when I love these, too.

Card front at bottom:

Inside: all edges are sponged as well as the inside white card.

Closer view of the inside: "Trick or Treat" is one of those rub-ins from the $1 bin....came in handy to use for this card.

To make this card:
(1) 5-1/2" x 8-1/2" Lovely Lilac CS, score along the 8-1/2" side @ 4-1/4"
(1) 3-3/4" x 5" Old Olive CS for card front
(1) 3-3/4" x 5" Whisper White CS for the inside card
(1) 1" x 8-1/2" strip of Close to Cocoa CS for the "ground", to be torn along the 8-1/2" side

Stamp background on Old Olive CS using Versamark ink:

Use Sponge Daubers to ink edges in Black for all pieces except Close to Cocoa is inked using Close to Cocoa Ink.
Stamp images used in Black ink:

Use Aqua Pen to color the images, cut out, apply dimensionals to (only) Witch and position on to card.

Supplies:
  • Stamps: Halloween Backgrounds (retired), Spooktacular Greetings (retired)
  • CS: Close to Cocoa (retired), Lovely Lilac (retired), Whisper White, Old Olive
  • Ink: Black, More Mustard, Cajun Craze, Old Olive, Close to Cocoa, Versamark
  • Accys: Decorative Punch, Aqua Pen, Dimensionals, Ribbon (non SU), Sponge Daubers, Mini Glue Dots, Rub-on (non SU)

Thank you for stopping by today.........

Tuesday, September 28, 2010

Dracula's Halloween Card

This is a card (it's been a while for a card) I made which is very similar to the Dracula Halloween House posted yesterday. I had a couple stickers left from the project - just like "left-overs".........I actually put them away and wondered why I shouldn't just use them because, they will be forgotten until next year and then there will be something new.........ever get in this pickle? In my quest to use up what I have..........this card was created!

Close-up of the card front at the bottom - there's a red adhesive rhinestone on the spider:
Message is a rub-on (it is from one of those $1 bins)

Card Inside: sponge the inside card pieces (including the fold) using Black ink.
Simple pieces for this card:
Outside card front:
(1) Basic Grey 5-1/2" x 8-1/2", score along 8-1/2" side @4-1/4"
(1) 3/3/4" x 4-3/4" Going Grey (retired) mat, emboss using web folder
(1) 1" x 3-1/2" Real Red CS for Dripping Blood Punch Boarder Punch
(1) 1" x 3-1/2" Black CS for the Graveyard Boarder Punch
(1) 8" cut 1/4" Red Organdy Ribbon
Inside card (not in photo below):
(1) Whisper White CS 3-3/4" x 4-3/4" Whisper White CS
(1) 1" x 3-3/4" Real Red CS for Dripping Blood Punch
Graveyard boarder sponged with Craft White ink. Web, Dripping Blood Boarder, Card edges are all sponged with black ink

These are the left over stickers purchased at your local crafts tore..........the edges are sponged using black ink - it works and looks so much better, too:


Inside card before assembly

Supplies:
  • Stamps: none
  • CS: Going Grey (retired), Basic Grey, Real Red, Whisper White
  • Ink: Black, Craft White
  • Accys: Dripping Blood Boarder Punch (non SU), Graveyard Boarder Punch (non SU), Web embossing folder (non SU - SU does have one but I can't justify having two of these folders), Bat die (no SU), 1/4" Red Organdy Ribbon (non SU), Sponge Daubers, Mini Glue Dots, Dimensionals, Rub-On Message (non SU), Red Adhesive Rhinestone

Thank you for stopping by today........................

Monday, September 27, 2010

Dracula's Halloween House

Here's my favorite house: Dracula....it's a serious house in my favorite colors. I absolutely love the glitter roofs. The swirl die is attached inside the chimney for this house. Love the sripping blood edge punch and graveyard boarder punch. I have had these punches for a while and finally had an op[portunity to use them!!!

Roof view: Bats randomly secured.

Front house bottom: Coffin has (1) adhesive rhinestone in the center. Coffin is popped with a dimensional to the house. The vellum Dracula is cool............the sheer organdy ribbon tied around the lid.

Right side of house: Graveyard stickers were perfect since they had the dripping blood on graves.......

Back of house: more randomly placed bats. Vent on Peak is punched with 3/4", then 1" red is a punched circle, sponged with black ink. The graveyard is one of the cool stickers with the dripping blood positioned in between the windows.

Left side of house:

Sponge chimney, gables, and peak edges using Craft White ink:

Stamp windows, cut out, apply dimensionals to adhere to house (note : there are 6 large windows and 2 small windows, along with a vent which are not pictured in the photo below). Stamp Coffin using Versamark, emboss with white powder, cut out, apply dimensionals to adhere to house. Dracula is stamped with Versamark ink, then embossed with clear powder, cut out, plan to adhere by using mini glue dots.

Sponge house on the edges using Craft White Ink, then randomly stamp flying bats (Wicked Cool Stamp set).

(2) 1-1/4" x 8-1/2" strips of Basic Grey (retired) are used for the Punched Graveyard boarder. Sponge using Black ink:

Bats are die cut and embossed. Use a fine black pen to add character to the bat or sponging them is also an option. With tweezers, adhesive rhinestones are added. Randomly position the bats on the roof and on the house.

For this house, the windows, graveyard stickers and graveyard punched boarder is laid out on the house before applying any adhesive. Window tops need to be positioned at least 3/4" from the top (the 3/4" is the width of the lid). After adhering all pieces, bottom of the house can be assembled.

Supplies:
  • Stamps: Wicked Cool, Windows, Coffin, Dracula (non SU)
  • CS: Black, Going Grey (retired), Whisper White, Real Red, Glitter Red (non SU), Card Stock Vellum
  • Ink: Versamark, Black, Real Red, Craft White
  • Accys: SU Big Shot Swirl Sizzlit Die, 1" Circle Punch, 3/4" Circle Punch, Clear Embossing Powder, White Embossing Powder, Dripping Blood Punch (non SU), Graveyard Punch (non SU), Sticky Tape, Dimensionals, Sponge Daubers, Mini Glue Dots, 1/4" Red Organdy Ribbon (non SU), Bat dies (non SU), Red adhesive Rhinestones (non SU), Graveyard Stickers (non SU).

Thank you for stopping by today...................

Friday, September 24, 2010

Halloween Decorating

I love this metal castle. It was meant to hold tea lights but I use for holding some small treats and with a little stretch web.........transform this castle into a creepy place hung with skeletons and bone hands. This metal castle is more than 10 years old now............and still has that wow factor! The Frankenstein peeking out of the side of the castle used to be a candy container.
This little cubby holes are filled with crazy pumpkins and petal punch treats previously posted:


Here's a skeleton goblet full of those petal punch treats previously posted:

A skeleton goblet full of Halloween pens.............

Stacked crazy pumpkins:

Really - this is just a small sampling of the decorations.................have a great weekend!

Thursday, September 23, 2010

Halloween RAKs

When a group of gals get together, I am always amazed at their creativity. Are you ready for something outstanding? Look at these wonderful cupcakes decorated with such fabulous sprinkles and toppers. The cupcake liners were, of course, also co-ordinated with the Halloween theme.........OUTSTANDING!!!! These were made by Jackie C.

Here are two outstanding treat trades: The coaster treat box is from Jackie C. and the Scallop Envelope box is from Gail W.

For the coaster box: the web paper used and the oh so cute glitter through out really makes this treat. That cat is a "faux" piece of candy (which is way cool because it is "sqooshy").

Inside contained Spooky chocolates!

Gail W's treat trade had a cute little note and also a special mini antibacterial bottle.

Ya think I won some blog candy or something................check out this Halloween goodie bag from Gail M................it is not only full of great stuff inside.....the outside is just as spook-tackular (I couldn't resist)..............

The is a Hologram sticker............lookin "normal" here:

Now lookin "skinny as bones" here..................

And that tag........way cool.......great job making this one!!!!

And, THAT was just the outside of the bag.............inside: some textured Washi paper, a pack of assorted ribbon, some Velcro dots, some Candy corn, some Pop adhesive dots, a mini stamp mat, sticky tape, Halloween pack of tissue, and a Cricut cartridge booklet on a CD............man oh man..........wow - is this way cool or what?

This was so much fun!!!!