A small message on the roof:

Close-up of the message:

Back:

The roof is removed to reveal the gift card:

The main pieces of gift card:
(1) 3-1/2" x 9-1/2" Real Red CS, score along the 9-1/2" side at 4-3/4"
(1) 2-3/4" x 5-1/2" Very Vanilla CS - this is the gift card insert
(1) 1-1/4"x 4-1/4" Old Olive CS - this is the Back Roof
(1) 7/8" x 4-3/4" Old Olive CS - 1st layer of Front Roof
(1) 1-1/4" x 4-3/4" Old Olive CS - 2nd Layer of Front Roof
(1) 1-3/4" x 4-3/4" Old Olive CS - bottom layer of Front Roof

Using the Scallop Edge Punch, punch all strips (except the Back Roof: the piece that is 1-1/4" x 4-1/8") and sponge using Old Olive ink.
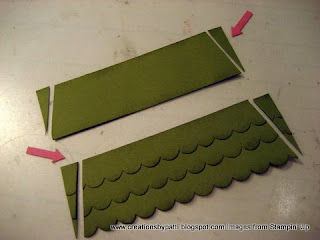
Adhere the Front Roof scalloped pieces. Note: Once the Front Roof layers are adhered, trim Front roof length to finish 4-1/4" long. Cut off 3/8" to "0" each side of the front and Back roofs (see arrows). Sponge cut areas if desired:
(1) 1-1/4" Circle Punch for the head
(1) Small Tag Punch for the body
(1) Small punched heart from the Heart to Heart Punch
(4) Word Window punches for the legs and arms
Use Close to Cocoa ink to sponge around the edges of all the punched pieces. Use a white gel pen for the "icing". Add dimensionals to the head and body. Position limbs onto the front of the gift card holder, then add head and body. Note: total height of Gingerbread Man should not exceed 3-7/8".

Use the Slit punch to secure Gift Card on the insert. Add sticky tape to the gift card holder and secure close:
Position the dimensionals on the front and back of Gift Card insert as shown. At this time, roof can be attached.
Supplies:
- Stamps: Delightful Decorations (Holiday Mini), Christmas Punch (level 2 Hostess), The More the Merrier (Level 3 Hostess)
- CS: Real Red, Old Olive, Very Vanilla, Crushed Curry, Creamy Caramel
- Ink: Real Red, Old Olive, Close to Cocoa
- Accys: Small Tag Punch, Word Window Punch, Heart to Heart Punch, Scallop Edge Punch, Small Oval Punch, 3/4" Circle Punch, Slit Punch, White Gel Pen, 3/16" Red Gingham Ribbon, Dimensionals, Sticky Tape, Stamping Sponges.
Thank you for stopping by today...............HUGS!!!


10 comments:
Good enough to eat!! This is a fabulous gift card holder. Thanks again for your efforts in sharing the details.
Kylie xo
What a cute idea :)
Oh, he is adorable! Thank you for the tutorial. I definitely will give it a try.
OMG! Adorable! And it looks simple to make. TFS!
So cute! Great idea! TFS. I love your blog! Thanks!!
I love ALL your projects - such talent!! I love the gingerbread man:)
Patty:
I love this project!! Hey I am having trouble with Blogger I wanted to ask you if you have enountered the same thing. I can't get to your email for some reason. Can you please email me at whitneyrichardson1969@gmail.com so I cna talk to you about this problem I am having with blogger its the weirdest thing I can't post until I figure it ourt and its driving me crazy. I am sorry I don't know who else to ask.
Thanks, Whitney
This is adorable! Thanks so much for sharing your tutorial.
I love getting your blog updates. This guy is too cute for words.
Highly popular gift cards are very help think for increasing your membership.
Post a Comment