


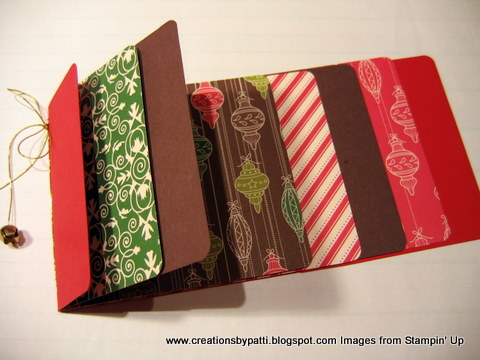
Top view:

Here's how to make this project:
(1) 4-1/4" x 11" CS, score @ 2"along the 11" side - I used Real Red CS
(1) 4-1/4" x 11" CS, score @ 3" along the 11" side - I used Merry Moments DSP
(1) 4-1/4" x 11" CS. score @ 4" along the 11" side - I used Chocolate Chip CS
(1) 4-1/4" x 11" CS, score @ 4" along the 11" side - I used Merry Moments DSP

Use the 3/16" corner rounder for all coreners of the (4) pages. Stack each page on top of each other, then use Crop-o-dile to punch hole 1/2" from the bottom edge. Thread elastic cord and add a jingle bell at the end.

Assembled scrapbook should look like this:
Here are the stamps and punches that will be used for the scrapbook tab pages:

After stamping each image on Very Vanilla CS, use the 1/16" Hand held punch and thread elastic cord for these tabs. Apply sticky tape to one side of the tabs, then add to scrapbook page.

Use piercer to make hole for the rhonestone brad. Attach to first scrapbook layer using Mini Glue Dots.

Supplies:
- Stamps: Tree Trimmings, Spotlight on Christmas, Christmas Punch (Level 2 Hostess)
- CS: Real Red, Docolate Chip, Very Vanilla, Merry Moments DSP
- Ink: Chocolate Chip
- Accys: 3/16" Corner Rounder Punch, Ornament Punch, Oval Scallop Punch, Modern Label Punch, Curly Label Punch, Scallop Square Punch, Wide Oval Punch, Jumbo Snowflake Punch, Piercer, Gold Elastic Cord, Dimensionals, Square Fire Rhinestone Brads, Sticky Tape, Crop-o-dile, Mini Glue Dots, 1/16" hand held punch (retired), Jingle Bells (non SU).
Thank you for stopping by today.......hope you enjoyed this project. Hugs.


3 comments:
Wow Patti, what a great creation. It looks fantastic. Thanks for the directions.
Kylie xo
Patti, it is fantastic - but as usual I need "extra help": Where exactly do you punch the hole (in the middle of which page)? And do you just punch one hole at the bottom and wrap the cord around or do you punch another one at the top to thread the cord through? i just don't get it...
Thanks for helping me
Nessie
Hi Nessie,
Punch the hole 1/2" from the top edge AND also punch a hole ath the bottom edge right in fold line. Then thread the gold elastic cord through the holes. Tie the elastic cord into a single knot, then tie the bow. Hope this will be helpful information.
Hugs,
Patti
Post a Comment