The letters are die cuts from a Cricut cartridge. That small watch - OMG - I've had it for 15 years and I am finally using it....it's really a button. The stamp images and paper background are from what I have on hand.

The spine is using black O-wires. Hanging on the spine are stickers which are put together "back to back" to create this look. The round tag is stamped with a crown from the SU Tiny Tags stamp set and using Black Staz-On ink. Ribbons used are Chocolate chip and striped retired SU ribbon - I used a light yellow Stampin' Write pen to ink over the white stripe.

The back of the album:

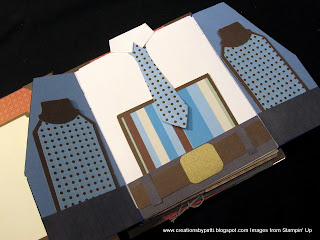
Are you ready for the surprise inside? This is the first page: left side for a photo or for journaling. The right side: it's a suit!!!! Cool, eh? Real buttons at front and a satin ribbon flower at the lapel. Both buttons and flower are secured with mini glue dots There is a small pocket I added, too.

Now here's the fun part, open the suit and inside reveals (3) tags that come out for photos or for journaling. I LOVE the fact that the center tag is slipped into the pants. The (2) side tags are slipped into the inside pockets. THAT belt!!!! Laura revised her belt to 1/2" wide but I already had mine cut so I just used it. Thank goodness I had some co-ordinating blue paper from ???? who knows where it came from (a corner in my room). I did go back to cover the inside suit with solid blue (retired SU) CS which worked perfectly because the underside of the suit paper was printed squares.

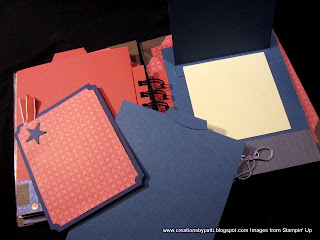
Here are the tags removed from their pockets: Plenty of places to apply photos and journaling. Notice the white shirt is also removed from the pocket, too

The second page reveals a Argyle sweater. First, the left side: please note the back side of the suit: 2 more places for journaling. A Close to Cocoa Stampin' Write pen was used to give the stitching on the belt loops and waistband. The 3D part of this page: the argyle sweater pulls out of the pants and flips upward - see next photo........

Here are the tags removed from their pockets.Shirt is also removed from the pocket. The argyle tag was in the pant pocket.

3rd page is the flannel-like shirt. The left side is the back of the argyle sweater with a tag in to pant pocket. The shirt has chipboard buttons die cut in Creamy Caramel SU CS. I added a diagonally cut pocket to the left side. This shirt reminds me of the 1970's when wearing Pendelton Shirts were so foxy. What else but to pair this with a Ruby Red CS turtleneck.

Open the shirt to reveal(3) tags. (2) are tucked into the sides of the shirt - I happen to make the pocket the same as the shirt (matching the checks, of course). Ticket corner punch used for the tags as well as retired taffeta ribbon attached with a mini glue dot on the side tags. A white gel pens is used for the top stitching on the waistband and belt loops. Brushed Brass CS used for the faux "rivets" at the front and back belt loop bottom and buckle.

Here are the tags removed from their pockets.

The 4th and last page: Left back side of the flannel side shirt is another tag. The ribbed turtleneck (ribbing was made by scoring 1/4" apart) with chipboard MVP alphabet letters (SU's Billboard Decorative Stripe die) on top of a large Punched star and Wide Oval Punched Very Vanilla CS. The sweat pants are also scored 1/4" apart with embroidery floss and the ties.

The sweatshirt front flips up to reveal a mat CS for a photo or journaling. The turtleneck is removed from the pocket along with the left tag.

The back page shows the back side of the sweatshirt and a removable tag tucked into the sweat pants. The back inside page is the same as the front inside page: room for a photo or for journaling.
Supplies used from SU:
- Stamps: Tiny Tags
- CS: Whisper White, Rose Red, Chocolate Chip, Brushed Gold, Brushed Copper, Very Vanilla
- Accys: Ticket Corner punch, Round Tab Punch, Photo Corners Punch, Star Punch, Tag Corner Punch, Large Oval Punch, Wide Oval Punch, Large Star Punch, Billboard Alphabet Big Shot die, 1/4" Circle Punch, Big Shot Sizzlits Die, Close to Cocoa Stampin Write Pen, White Gel Pen, Mini Glue Dots, Silver Eyelets, Crop-o-dile.
I really enjoyed making this album. THANK YOU LAURA for such great instructions. I hope you all enjoyed seeing this project, too and will visit Laura soon.


9 comments:
this is just too cute.
love the pinstripe suit!
scrapbook-crazy.com
Great job Patti! I've been debating buying these instructions, you might have just tipped the scales for me! I love Laura's blog,YouTube, and Ustream stuff. Of course, I always follow your creative blog too. Such wonderful ideas.
This is beautyful.
Hugs Anett
Dang, another project to add to the list. (grin)
But I think I might have to sneak this one up near the top. Super Cute!
Hi Patti!
This is absolutely wonderful! I love it! I checked out Laura's blog and got caught up in it and her videos! I have printed some I want to try soon! :<)
Wishing you a great day today! You aced it on this project! :<)
Hugs,
Barbara Diane
This is wonderful! I've never seen anything like it, so I'm heading over to check out her site. Thanks for the heads-up!
wouaouh!!!
it 's just so cute!!
i love it.
WOW! It came out soooooo awesome!! Super great job!! It's fun to see it in other papers!
Laura @ FollowingThePaperTrail
Hi
That is the nicest idea I have ever seen. LOVE it! TFS! I just discovered your blog and you have amazing stuff. You are so talened!
Post a Comment