


Here's a close-up of the front. The snowflake is popped with a dimensional. The bird is double layer (slightly off centered so it shows) and also popped with a dimensional.

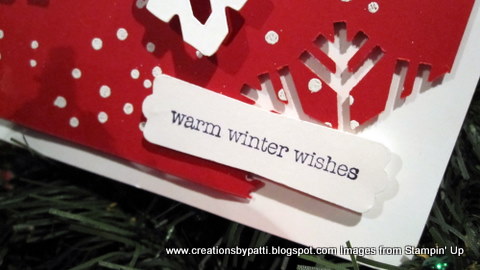
Message is stamped with Black ink and popped with a dimensional after using the Modern Label Punch. The front corner is punched using the Jumbo Snowflake Punch - I love how the Whisper White CS shows through! Tip: to be sure your message is level, use (2) dimensionals for the right side of the message since the front has a dimensional and the left side has a dimensional.
And this is the BEST part : the INSIDE!!! Love this!!!!! Do you??? There are (7) floating Snowflakes as well as punched snowflakes. S-N-O-W is spelled out across the top..................I cut a couple white trees from the SU Sizzlits Merry Details die so I placed them in the right bottom corner........CUTE!

Top view:

HOW TO MAKE THIS CARD:
For the Front:
(1) 5-1/2" x 8-1/2" Whisper White CS, score @ 4-1/4" along the 8-1/2" side.
(1) 3-3/4" x 5 Real Red CS
(1) Whisper White CS Big Shot Snowflake #2 Die
(1) Whisper White Bird from the SU Exclusive Sizzlits Merry Details die
(1) Real Red Bird from the SU Exclusive Sizzlits Merry Details die

For the Card Inside:
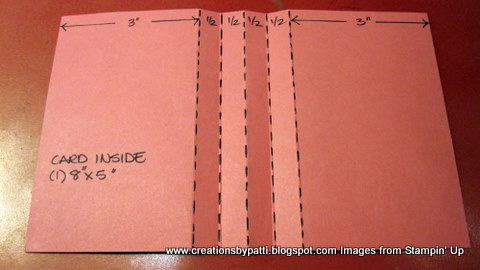
(1) 5" x 8" CS in Real Red, Score along the 8" side 3", 3-1/2", 4", 4-1/2", 5"
Cut acetate pieces as follows (note: these measurements are shown using solid CS for purpose of this tutorial)
(3) 3/4" x 2-1/2"
(2) 3/4" x 2"
(2) 3/4" x 1-1/2"

Use the Big Shot Snowflake #2 die for the front, Punch (3) Jumbo Snowflakes (using Jumbo Snowflake Punch) and (4) smaller snowflakes using the SU Exclusive Sizzlit Merry Details Die. (ooops, just noticed the photo is showing 1 incorrect small snowflake and there should be (2) birds)

For the front and inside background, stamp and emboss using the itty bitty stamp as shown.

Use the Jumbo Snowflake on the front right corner as shown:

After adhering the S-N-O-W across the inside top, randomly punch the snowflake on each side.

Position the acetate on each mountain/valley. Be sure the Jumbo Snowflake does not exceed 1/4" beyond the inside CS (as shown by the Pink Arrow, otherwise it will be peeking outside the card). My card is made in the following order:
-starting top, 1/2" from the 1st fold line starting from the left side - 1st acetate 2-1/2": Small Snowflake
-1/2" from the bottom 1st fold line - 2nd acetate 2-1/2": Jumbo Snowflake
-3rd fold line from the top, 1-3/8" down, 3rd acetate 2": Small Snowflake
-3rd fold line from the bottom, 1-3/8" up, 4th acetate 2": Jumbo Snowflake
-4th fold line from the top, 2" down, 5th acetate 2-1/2": Jumbo Snowflake
-5th fold line from the top 1-1/4" down, 6th acetate 1-1/2": Small Snowflake
-5th fold line from the bottom1-1/4" up, 7th acetate 1-1/2": Small Snowflake

Here's an "open" view of the inside card:

To adhere the inside layer to the card, apply snail to the edges and around the snowflake. Use sticky tape for the edge on the fold line and do not apply adhesive between the scored lines (see arrows):

Now turn your card over and you have completed your project.
Supplies:
- Stamps: The More the Merrier, Itty Bitty Background
- CS: Real Red, Whisper White
- Ink: Black, Versamark
- Accys: Jumbo Snowflake Punch, Big Shot Snowflake #2 Die, SU Exclusive Big Shot Sizzlits Merry Details Die, Big Shot Naturally Serif Alphabet Strip Die, Modern Label Punch, Clear Acetate, White Embossing Powder, Sticky Tape, Dimensionals
Thank you for stopping by to visit.....stayed tuned for Wicked Challenge #2 tom..........HUGS!!!


10 comments:
I LOVE this card!! Very creative and festive!! :)
Great card - Making me feel like Christmas
Great card. Thanks for sharing your tutorial with us.
Patti, thank you for sharing the tutorial. I love your card, is wonderful. congratulations!!!!
Congratulations Patti! :<) You ARE a Wicked Stamper!
Great project and great tutorial!
Wishing you well! I will write soon.
Barbara Diane
Congrats Patty! Such a fun card & great tut as always:) TFS!
I loved it. Great job with tutorial. Congratulation for being wicked stamper.
WTG. I love this card and think it is over the top great. I just have to get the snowflake punch and the snowflake die to make it.
We will be watching you over on SCS. Thanks for sharing this great news.
Carey
aka Roscoe's mommy
wowzers!!!! I think this is the greatest card yet !!! I don't have the snow flake punches, but I think I'm going to give this one a try with my cricut !!! can't wait to get down into my girl den (scrapping room) !!! keep 'em coming!!
Such a beautiful card. Can't wait to try this one.
Post a Comment