Another update to this posting: a great watermelon basket - ya gotta pay a visit to: Elizabeth made one last year. Her blog www.animalscraps.blogspot.com the project is posted 7/12/09 - so check her out and also checkout those yummy cookies!!!!
Update to this posting:
the watermelon basket was inspired by Lori - her blog: www.afternoons-delight.typepad.com . She has a watermelon basket and a gorgeous card posted on 5/11/2010. This is my version but def. give her a visit.
The basket theme continues.......this wasn't planned. Cute little basket for the summer. This finished basket size is 3-3/4" x 4" x 2". It is actually a simple basket to make and doesn't use any stamps.

Side view:

Top view:

To make this basket:
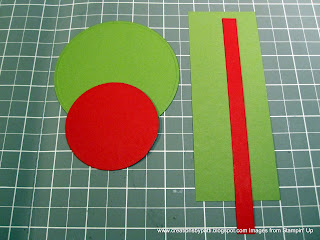
(1) 3-3/4" Old Olive CS Circle
(1) 2-3/4" Very Vanilla CS Circle
(1) 2-1/2" Real Red CS
(1) 3" x 6" for the sides, bottom. Score on the 6" side @ 2-1/4", 3-3/4". On the 2-1/2" side, score 1/2", 2-1/4".
(1) 1/2" x 6-1/2" Real Red Handle, sponge with Old Olive

Cut all the circles in half: sponge all pieces except the Vanilla sections

Sponge the Old Olive pieces with a dauber. Using a craft knife, cut across the bottom as shown: width of basket should finish 1-3/4" (see vanilla arrows). Making this cut will help the basket stand up. Repeat for the other circle.

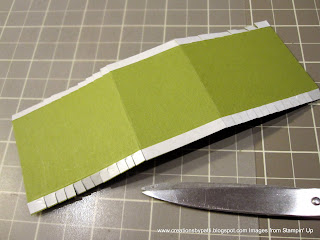
Apply sticky tape to the 1/2" scored "alley". Clip to the fold lines of the 2-1/4" sections. It is not necessary to clip the middle section since no curving is needed for this area.

Sponge the sides as shown using a dauber with Old Olive ink:

Remove backing of sticky tape. Apply center (flat section) first, then work around the curved sections.

Trim away excess as needed (see vanilla arrows)

To make the watermelon seeds: use the Extra Large 2 Step Bird Punch leaf only and punch out. Trim away the leaf vein. Apply to watermelon using 2 way glue pen.

At the last minute, I decided to make a lid for this basket. What you will need:
(1) 3-3/4" x 2" in Old Olive CS,. On the 3-3/4" side, score 1-3/4", 2-1/4". Cut away the 1/2" alleys except for the middle section (see lid tutorial on July 8 for the same type of basket lid)
(1) 2-3/4" x 2" Very Vanilla CS
(1) 2-1/2" x 2" Real Red CS
Sponge the Old Olive and Real Red layers. Adhere in the order as shown. Position sponged handle in between the outside watermelon pieces (this is so the red handle doesn't show in the inside.) With a mini glue dot or sticky tape, adhere lid to one side and then the other and project is complete after tieing a gingham ribbon around the handle.

Supplies:
- Stamps: none
- CS: Real Red, Very Vanilla, Old Olive, Black
- Ink: Old Olive
- Accys: Extra Large 2 Step Bird Punch, Sponging Daubers, Mini Glue Dots, Sticky Tape, Red Gingham Ribbon (retired), 2 Way Glue Pen.
Thank you for stopping by today.......................


11 comments:
Just brilliance! Love it. Another amazing creation. Wonderful inspiration again.
Liam
I love this! I just bought that bird punch. Great use of it!
If you cased this please leave credit where credit is due. I know you have seen by blog (and I am honored to have received the Creative Blogger award from you), but I do appreciate credit.
See this post:
http://afternoons-delight.typepad.com/my_weblog/2010/05/picnic-time.html
Thanks!
Lori
I love your projects they are always so cute, but this basket is just adorable. FUN fun fun!
so cute~ love your creativity! Love it! YOU are awesome!!!
Another wonderful project, Patti! Your pic/tutorials are always excellent and easy to follow. Thank heavens for your creative mind! Cami
Oh, I just love this basket, too! Thanks for sharing these ideas with us!
OMG,Patti! So much work went into making this watermelon basket, but WOW!!!! This turned out looking fabulous!
merci pour le tuto et le partage
c'est très sympa et très beau
I loved the strawberry and watermelon this, so cheerful and creative.
Cute! I like the lid idea. I made a watermelon tote last summer as well.
http://animalscraps.blogspot.com/2009/07/watermelon-gift-bag.html
Post a Comment