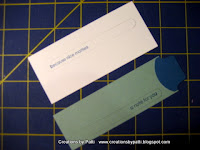
Have the following ready:
- Cut (1) Pacific Point CS 5-1/2" x 8-1/2", score in half
- Punch (1) Pacific Point tab using Round Tab Punch
- Cut (1) Baja Breeze CS 5-1/4" x 4", 2"x 4-1/2"
- Cut (1) Whisper White CS 2" x 4-1/2"
- Stamp & Cut out (2) Butterflies from Great Friends
- Cut (1) Whisper White Label from SU Exclusive Bigz XL Matchbox Die, Stamp using Pacific Blue Ink, label from Matchbox Greetings. Stamp leaf on top of label using Baja Breeze ink.
Using the Word Window Punch, slide punch all the way into Baja Breeze leaving 1/2" from each edge as shown below.

Then use 1" Circle Punch to punch opening centered at right side.

The front of the card should now look like this below. Attach Pacific Point tab to the Baja Breeze strip.

Position the Baja Breeze slider over the punched 1" Circle opening sure the slider is straight. Then use a pencil to lightly mark the opening for stamping the words.

Repeat this process with the strip of Whisper White CS.

Using a stamp-a-mah-jig,
- position "because nice matters" stamp using Pacific Point ink onto the Whisper White slider as.
- position "a note for you" stamp using Pacific Point ink onto the Baja Breeze slider.

Randomly stamp Baja Breeze front using the leaf stamp from Great Friend with Pacific Point ink. The leaf is stamped 1st, 2nd, and 3rd generation for dark - light effect. Then 2 way glue is used and Dazzling Diamond glitter is applied.

To assemble front of the card, apply dimensionals on each corner (DO NOT remove the dimensionals yet). Position the Whisper White CS, apply adhesive, ensure stamped words are straight, then flip card front over and press down to Pacific Point card front.

This is the result of the above step:

Position the Baja Breeze slider in back of the card front as shown below, ensure words are straight. Add dimensionals along the slider and at the end. Remove dimensional backing and position on top of Pacific Point.

Position (1) Dimensional in between the punched Word Window as shown. Be sure the Baja Breeze slider can be pulled.

(There is no photo) These are some final steps:
-Remove dimensional, center Label on top of dimensional.
-Fold butterflies in half, then apply a little Tombow Glue along fold and place on top of Label.
-Slide Baja Breeze slider over to the right, then repeat process for the 2nd Butterfly.
Whew..........I really hope this is clear. If not, please feel free to e-mail me.
Thank you for your patience waiting for this tutorial.


4 comments:
hello Patti
this slider card tutorial is great and your direction is so clear. Thanks so much for taking the time to do it for us.
WOW what an awesome card, I just love it, and now I even have the directions- you are just too good!!! Thanks so much for sharing all you do. Cathy
Thanks for taking the time to make the slider card tutorial. Now it's possible for me to make one! jmniffer
I look at your projects on the blog and wish I could come "over to play" with you. You are so talented! This is a beautiful card in a clever format.
Post a Comment