This is a front view of the box:

Inside, the shoes sit on top of cut tissue paper.

Looking really cute so far........................

Close-up view of shoe:

Shoe bottom:

Here are details how to make this project:
The BOX:
Lid template: Cut (1) 7-1/8" x 8-1/8", score 1-1/2" around all sides. Cut as shown - Do not assemble lid until after window is cut.

Box template: cut (1) 8"x9", score 2" around all sides. Cut as shown. Assemble box. Finished size is 4"x5".

In order to create a window for the lid, one side of the lid will need to be folded over and under the clear acrylic plate (the size of the lid is wider than the opening of the Big Shot) so it won't be "cut". Center the die and cut using the Big Shot. Once it is cut, use your bone folder to smooth out any unwanted additional creases from folding over and under the clear acrylic. Assemble Lid. Apply Glitter to the opening and allow to dry. Using mini glue dots, place the clear acetate on the inside of the lid. The acetate used is recycled packaging (points for me!)

THE SHOES:
Using the shoe template (which can be found on http://www.splitcoaststampers.com/forums/showthread.php?t=224896, cut a right and left side. Tip: Cut a chipboard of the template without the tabs. This will provide the "seam allowance" for cutting the slits (see left side in photo). After cutting slits for shoe, use the chipboard template to create a smooth rounded edge (right side of the photo). Remove the chipboard template and use a bone folder to further crease the folds.

Also needed: 2 insoles and 2 bottoms (not shown in photo). For this project, 2 Whisper White insoles cut and 2 Pink Pirouette Designer Paper cut. Apply a small bead of Tombow adhesive around the CS that will be in the inside of the shoe. Line up the insole as shown, then work your way around the shoe ensuring all tabs are flat and glued (see next photo below).

Bottom of shoe should look like this once it is glued:

After shoe is assembled, apply glitter around opening. Allow to dry, then add a 1/4" Whisper White "faux button" to the strap, apply glitter. Close strap with a dimensional to shoe.

THE FLOWERS:
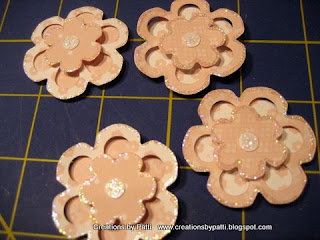
Close-up of flower: Use the SU Exclusive Big Shot Basket and Blooms die to cut 3 types of flowers. Add a dimensional on each layer. The center of the flower is Whisper White using a 1/4" circle punch, attached with Tombow adhesive. Stickles glitter is applies to 2 layers and the center of all the flowers.

Have 4 die cut flowers for this project: one on each shoe and the rest on the lid of the box. All flowers are attached using dimensionals.

Supplies:
- Stamps: none
- CS: Pink Pirouette Designer Series Paper, Whisper White
- ink: none
- Accys: SU Exclusive Big Shot Baskets and Blooms Die, Spellbinders Nestibilities Labels Four Die (non SU), Stickles Star Dust Glitter (non SU), Dimensionals, Tombow Adhesive, 1/4" Hand held Circle Punch, 5/8" White Satin Ribbon, Mini Glue Dots, Clear Acetate (non SU).
Thank you for stopping by today................XOXO


4 comments:
Wow Patti - these shoes are SOOOOO CUTE!!!!!! Great job ;)
Wow! Shoe Week! I have died and gone to shoe-heaven! I thought your designs for Matchbook week were over the top-but these are FAB!
Thanks so much for sharing such great ideas :)
bonnie - so cal
OK now those are just to darn cute. WOW you did a fab job on them....Lovely~~♥~
OMG!!! You are so talented and creative. I've lurked on your site for many months and never posted. These just made me tell you I am amazed!
Post a Comment