The silver "hairy" embellishment used is really yarn! The large snowflakes are punched in Brushed Silver and Card Stock Vellum, attached with a silver brad and double dimensionals (that's 2 dimensionals back to back). Then I added a red snowflake with a adhesive rhinestone.

Here's the top view of the shoe. Insole is also in Brushed Silver.

Close-up view of the front embellishment:
Back of the shoe with small punched Snowflakes with adhesive rhinestones int he center:

The purse is embellished with fancy yarn on the flap. This will hold 4-6 6-1/2"x3-1/4" cards and small open end envelopes (or candy!)

Under the flap: there is a 1-3/8" punch (half way in the center of the purse opening). The closure is a double layered dimensional snowflake (yippee -no Velcro). The flap slips behind the snowflake and is secure!


Close-up of purse embellishment:

Back of the purse:

HOW TO MAKE THIS PROJECT:
The embellishment:
This is the largest snowflake punch in the right proportion - I can't wait for SU's new exclusive Snowflake Punch to be released on July 1st (and there is a matching stamp, too!). Punch both in Brushed Silver Card Stock and Card Stock Vellum, attach with a silver brad, then attach a small red punched snowflake on top with a mini glur dot.

The Shoe: this is the same altered shoe pattern used in yesterday's posting. (Original shoe template can be found at www.paperzone.com/emails/shoe1.html).

This photo shows the curved shape of the back heel area:

As mentioned in yesterday's posting, in order to fit the heel on to the back, clip the back piece as shown and everything will fit nicely.

I also curved the insole but in order for the shape to be retained, more clipping, then attach to the sides.

Here's Crystal Effects that are used to apply the "Festive Fur" yarn.

The heel embellishments (punch a red snowflake for the top of the shoe, too)

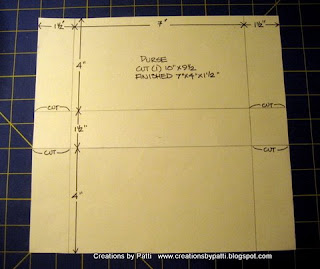
The Purse: Cut (1) 10"x9-1/2" CS, score 1-1/2" on 9-1/2 side. Turn paper and score 4", 1-1/2". Cut as shown. Apply Sticky Tape to complete assembly.

The Purse Flap:
- Handle: Cut (1) handle 7/8"x 5-1/2", score 5/8" each end, use 3/16" corner Punch for all 4 corners.
- Flap: Cut (1) 4"x 7", score on 4" side: 1/2", 2". Note: Photo below shows placement for the edge of the handle to be 1-1/4" away from the flap edge. The brad placement should be 3/8" toward the center. Use 3/16 Punch for 2" flap corners

The assembled handle should now look like the photo below. Add Sticky tape to the 1/2" fold and position to the back of purse.

Using Crystal Effects, apply a small bead along the flap edge (and shoe opening), position yarn on top - allow to dry.

Supplies:
- Stamps: none
- CS: Real Red, Brushed Silver, Card Stock Vellum
- Ink: None
- Accys: Silver Brads, Sticky Tape, Dimensionals, Crystal Effects, 3/16" Corner Punch, 1-3/8" Circle Punch, Small and Large Snowflake Punch (non SU), Yarn (non SU), 1/4" Red satin ribbon (non SU), Red Genstones (Hero Arts), Clear Gemstones (Hero Arts).
I hope to complete these shoes by making another one (the left side) to put into a shoe box........sometime soon! Thank you SO MUCH for visiting this week. Have a great weekend........XOXO


