Wednesday, October 7, 2009

Halloween Treat Boxes to Give

These treat boxes are VERY simple to make with the Big Shot #2 Box die. The die cuts and scores everything and with only a small strip of adhesive for the cover, you are done!!!! The box itself doesn't is really sturdy, too. Ya gotta makes these! Only a small piece of sticky strip and he box is put together within 30 seconds!!!!! Cool, eh? Then use a strip of the Cast-A-Spell Designer Series Paper to decorate and it really is a snap to making this project look very cool! Wrap a co-ordinating grosgrain ribbon provides the finishing touch.

The Fan Folded Flower is made by scoring every 1/2" strip of DS - these flowers are 1" wide so the flower itself finishes 2" in diameter. See the tutorial on Split Coast Stampers for the Fan Folded Flower (http://www.splitcoaststampers.com/resources/tutorials/fanfoldflower/)

Here are the close-up of the boxes: Use Tombow adhesive for the Fan Fold Flower and 2 way Adhesive for the die Cut "BOO"


Supplies:

  • Stamps: Eat, Drink & Be Scary
  • CS: Cast-A-Spell Designer Series Paper, Black, Only Orange, Old Olive, Lovely Lilac, Whisper White
  • Ink: none
  • Accys: SU Big Shot Box #2 Die, SU Exclusive Big Shot Billboard Alphabet Die, 3/4" Circle Punch, 1" Circle Punch, Black Stampin' Wrote Pen, 1/4" Grosgrain in Black, White, and Pumpkin Pie, Sticky Tape, Tombow Adhesive, 2 Way Glue.

Thank you for your visit today................HUGS!

Tuesday, October 6, 2009

Eyes for You

Here's some matchboxes with treats. This is a exclusive SU Sizzix Big Shot Matchbox die - it custs and scores everything and is so easy to do! Each box used some of the leftover Cast-A-Spell Designer Series Paper - Gads, that paper goes a long way. There are some scraps left so maybe a couple more projects ahead............
There's more than one treat: the obvious is candy and the other is an eye that pops out when the box is opened. The photo on the right shows the box slightly opened and tucked inside is a floating eye (which co-ordinates with the box). The eyes are using a 1-1/4" Punch, 1" for the "whites'" of the eye, 1/2" punch for the pupil of the eye. Use a Real Red Stampin' Write Pen to make the bloodshot look. Assemble and attach to a strip of acetate(cut 2" x 3/4"). Position inside box as shown.

Here are the photos of each box and a close-up of the front cover:


Supplies:
  • Stamps: Eat, Drink & Be Scary, Sweet Centers,Holiday Best (level 1 Hostess Set)
  • CS: Cast-A Spell Designer Series Paper, Black, Only Orange, Lovely Lilac, Old Olive, Real Red
  • Ink: Black
  • Accys: SU Exclusive Big Shot Matchbox Die, Scallop Oval Punch, Large Oval Punch, Curly Label Punch, SU Exclusive Mover & Shapers Curly Label Die, 1-3/8" Circle Punch, 1-1/2" Circle Punch, 1-1/4" Circle Punch, 1" Circle Punch, 1/2" Circle Punch, Scallop Circle Punch, Tag Punch, Small Tag Punch, 1/4" Grosgrain in Pumpkin Pie, Black, Old Olive, and Elegant Eggplant, 5/8" Real Red Grosgrain Ribbon, Square Rhinestone Brad, Dimensionals, Sticky Tape, Piercer, Silver Brads, Stampin'' Write Only Orange, Lavender Lace, Real Red, and Close to Cocoa Pens, scrap clear acetate

Thank you for stopping by today......................HUGS

Monday, October 5, 2009

Hello Mr. Bones

Here's my version of a punched Mr. Bones: oooh, lots of pieces to manage so don't sneeze! Very cute when completed. Inspiration for Mr. Bones can be found from Ellen on her blog: www.blinkthinkink.blogspot.com. I didn't add the hat. Finished card size is 3-1/4" x 6-1/2" and will fit in the Small Open ended Envelopes.

Mr. Bones peeking out:

Card Inside:


And the spider is close by:

Close-up Of Mr. Bones. His head is popped with a dimensional.

Coffin template: Cut a piece of CS 3-1/4" x 6-1/2".

After cutting out the coffin and punching the hole, sponge all edges with Craft White ink. Add the Spooky Treat Rub-On to the front, pop with dimensionals, adhere to card front.

Stamp the outside and inside using Craft White ink Itty Bitty Backgrounds. Use the small and large swirls from the Tasty Sweets Stamp set in Lavender Lace ink.

To make Mr. Bones (unassembled in below photo), you will need:
(1) Designer Label Head, Stick one end into 1-1/4" Circle punch
(1) Jumbo Snowflake Punch, use 2 parts for the hands
(4) Small hearts from the Heart to Heart Punch for the joints
(1) Medium heart from the Heart to Heart Punch for the pelvis, use 1/4" punch to snip in for legs
(2) Horizontal slot for the feet
(4) 1/4" circles for ankle and elbow
(2) 1/4" circles in BLACK for the eyes
(1) 1/4" circle in BLACK for the nose, cut in half
Ribs = vertical: 1/8" x 1", horizontal: (1) 1/8" x 1-1/8, (2) 1/8" x 3/4"
Arms = (2) 1/8" x 3/4"
Legs = (2) 1/8" x 1-1/4, (2) 1/8" x 1-3/8"
attach all pieces using 2 Way Glue Pen adhesive.

Supplies:
  • Stamps: Tasty Sweet, Itty Bitty Backgrounds
  • CS: Black, Lovely Lilac, Whisper White
  • Ink: Craft White, Lavender Lace
  • Accys: 1-3/4" Circle Punch. Heart to Heart Punch, 1/4" Circle Punch, Horizontal Slot Punch, Designer Label Punch, Jumbo Snowflake Punch, 1-1/4" Circle Punch, 1" Circle Punch, Small Oval Punch, Large Oval Punch, Dimensionals, Spooky Treats Rub-Ons, Stamping Sponges, Black Journal Pen, Real Red Stampin' Write Pen, 2 Way Glue Pen.

Thank you for stopping by today to visit..................Hugs!

Friday, October 2, 2009

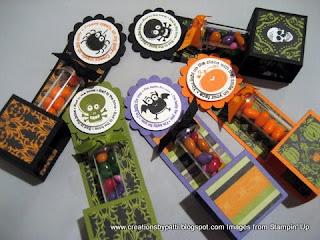
Candy Treat Tubes

These Candy Treat Tubes were really simple to make - measurements at the bottom of this posting. The tubes are 3" x 5/8" Plastic Tubes long and can be found at a local floral supply store. Tie a co-ordinating ribbon around the top and adhere a punched circle on top. These particular tubes are only about 1/2" wide inside. They are filled with Breath Mints and Chocolate Sunflower Seeds. (Note: M&M's and Skittles are too big). Finished project size is 1-1/2" x 5".

Here they are all lined up:

Side view:

Back view of the treat holders: Finish the back with a scallop circle, too.

Here are some close-ups of the treats: Stamp the "Batty for You" messages twice: once in one color and once in another color. Alternate the punching: use the 1-3/8" Punch and the 1" Punch to achieve the 2 colors. Pop with a dimensional. Depending on the size of your tubes, punch a co-ordinating color circle.


And here's the measurements to make this treat tube container: Items needed are:
(1) 1-1/2" x 8" Solid CS

(1) 1-1/4" x 3-3/4" Designer Paper
(1) 1-1/4" x 1-1/8" Designer Paper
(2) Scallop Circle Solid CS
(1) 1-3/8" Circle Punch
(1) 1" Circle Punch
Supplies:
  • Stamps: Batty for You
  • CS: Old Olive, Black, Only Orange, Lovely Lilac, Whisper White, Cast-a-Spell Designer Paper
  • Ink: Old Olive, Black, Only Orange, Lovely Lilac
  • Accys: Scallop Circle, 1-3/8" Circle Punch, 1" Circle Punch, 5/8" Circle Punch (non SU), Dimensionals, Sticky Tape. 1/4" Grosgrain ribbon: Pumpkin Pie, Black, Old Olive.

Thank you for stopping by to visit today........HAVE A GREAT WEEKEND!

Thursday, October 1, 2009

Batty for You

Updated 10/2/09: Bat template can now be printed at full size scale by clicking on it. You will need to change the printing to "landscape" and also increase the margins as far as possible to obtain the full template.
Here's the Bat sleeping - the message on the wings is a rub on from Spooky Treats Rub On. The finished size for this project is 3-1/2" x 5-3/8". When the wings are opened, the card is 10-1/2" x 5-3/8".

Open up the wings.......she is still a little sleepy! Sweet candy corn in the middle.

Here's a close-up: The mouth is hand drawn using a White Gel Pen. For the "OR", on a scrap of acetate, use a Versamark Pen on stamp, apply White Embossing Powder and quickly heat (don't over heat this!). When cooled, use 1/2" punch, adhere using a mini glue dot on top of the Sweet Treat Cup. Want to see how to make the words around the Sweet Treat Cup? See below.


On the left wing: with the Versamark Pen, apply White Embossing powder on "trick" of the stamp.


On the right wing: with the Versamark Pen, apply White Embossing Powder on "treat" of the stamp.


Back of the Bat reveals how to get the Candy Corn: lift up the tab as shown.


HERE'S HOW TO MAKE THIS BAT TREAT:

Today is a Lucky day!!!!! I was able to get my DH (Darling Honey) to scan the template for this Bat. Print it out and it should be "full size" to be used. The original pattern came from Karen at last week's SU gathering: thank you, Karen so much for sharing.

Supplies for Bat:

(1) Cut out the bat using Black CS. Use Circle Scissor Plus to cut out center for Sweet Treat Cup. Tip: If the bat is folded in half, you can use the 1-3/4" punch.
(2) 1/2" Whisper White CS for eyes
(1) 1/2" Basic Grey Eyelids: to be cut in half, sponge with Black Ink
(2) 1/4" Black Circles for eyes, Use White Gel pen (see photo)
(2) Basic Grey "ears" - no template for this (optional), sponge with Black Ink
Supplies for Back Candy door:
(1) Round tab Punch in Black CS
(1) 2" x 2-1/4" pull up door, attach Round Tab to this
(1) 2-1//2" x 2-1/2" Back, use 1-3/4" Punch on this piece

Apply Craft White ink using a sponge to the Bat inside and outside wings

Apply the Rub On to the front left wing


Look what I did - yeek! When I mount my stamps, I wrap the entire piece of wood using Packaging Tape. This allows me to remove the rubber stamp. Well, this is one of those occasions where I did remove the stamp, positioned it in a half circle on a clear acrylic block. Versamark and White Embossing powder was used for the words. It Worked!!!!! A sigh of relief!


Now I need to secure the Sweet Treat Cup - here I applied 2 Way Glue Pen to see if it works:


Well, it didn't work - so I used sticky tape and YES, that worked.


Now for the back: Apply dimensionals to 3 sides of the 2-1/2" x 2-1/2" Black CS as shown after using the 1-3/4" punch.


Ensure the "door" fits after the dimensionals are applied around the 3 sides. Then apply both pieces on top of the Sweet Cup opening..........Single knot a small piece of Pumpkin Pie Grosgrian ribbon, attach with a mini glue dot. Your project is now complete.


Supplies:

  • Stamps: Tasty Sweet
  • CS: Black, Basic Grey, Whisper White
  • Ink: Versamark, Black, Craft White
  • Accys: Spooky Treats Rub-Ons, SU Exclusive Sweet Treat Cup, 1-3/4" Punch, 1/2" Circle Punch, 1/4" Circle Punch or Crop-O-Dile, 1/4" Pumpkin Pie Grosgrain Ribbon, Mini Glue Dot, White Gel Pen, White Embossing Powder, Dimensionals, Sticky Tape, 2-Way Glue Pen, Circle Scissor Plus, Stamping Sponges, scrap acetate (non SU)

Thank you for stopping by today..........................HUGS!!!