









Friday, June 18, 2010

Island Oasis Origami Purse

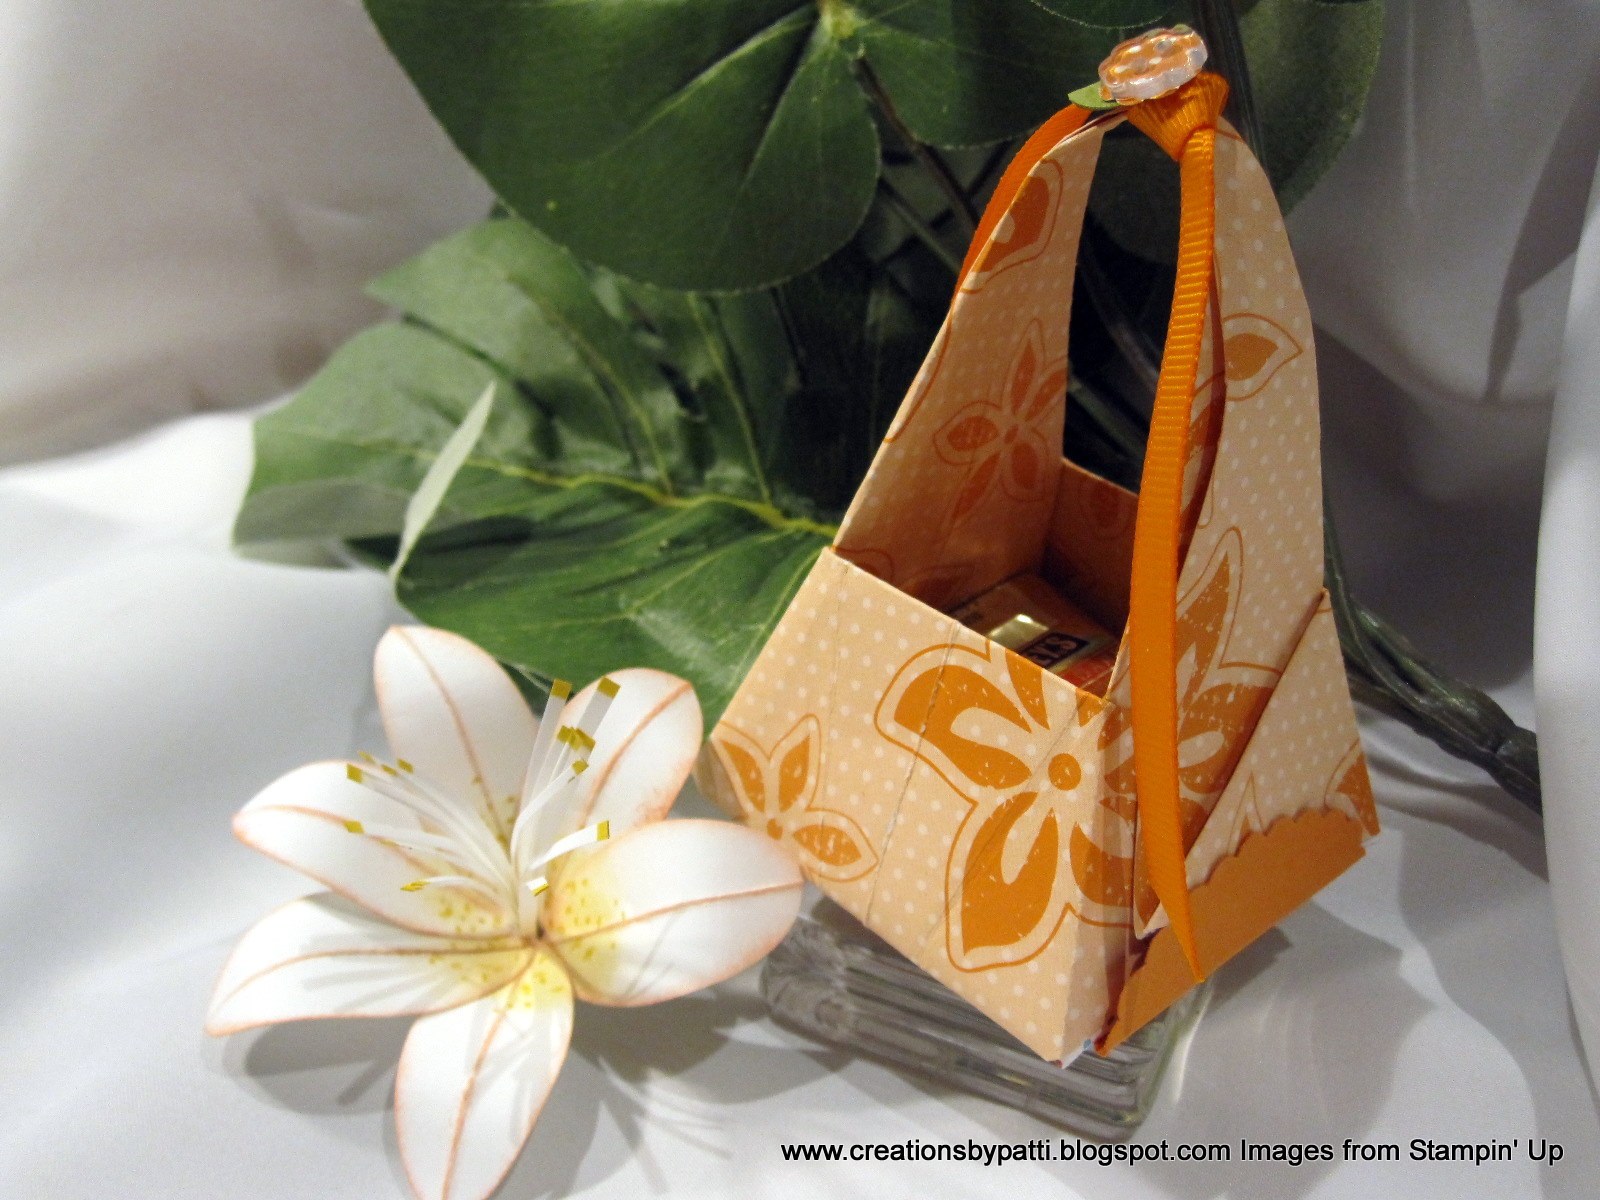
Look what I made today!!! I love both the Origami Purse as well as the Lily - project finished size is 2-1/2" x 2-1/2" x 4" (height is measured to the top of the handle). For this project I used a 7-1/4" square Island Oasis DSP. Any square shape will work. See below for the links to the video for this project. I love it when someone has a video for YOU!!!!

The lily comes out of the purse - revealing some treats. Note: 2 sides of the purse has a scallop oval in Pumpkin Pie to cover up the other side of the printed DSP.
Oh, how I love lily flowers..............Dusty Durango as lightly sponged on the edges and fold lines. So Saffron was used for the center of the lily and dot the center with a So Saffron Stampin' Write Pen. The tip of the stamen is colored with the So Saffron Stampin' Write Pen, too.


Here's a cute little flower at the top of the handle:

The embellishment used for the top of the handle............tie a single knotted grosgrain ribbon, punch flower, adhere with mini glue dot to clear bitty button with polka dots showing. Punch a 1/2" Old Olive circle to make leaves, adhere to grosgrain ribbon with a mini glue dot.
TO MAKE:
  • the Origami Purse: visit www.tethered2home.com posted 4/21/2010 for a video - ya gotta have a video for this one.
  • the Lilly: visit www.valitasfreshfolds.blogspot.com/2010/06/punched-paper-lily.html - whoo-hoo she also has a video to make this and this link will bring you directly to the project posted.

Here's the Lily assembled:

Supplies:
  • Stamps: none
  • CS: Island Oasis DSP, Whisper White, Old Olive, Pumpkin Pie
  • Ink: So Saffron, Dusty Durango
  • Accys: Wide Oval Punch, So Saffron Stampin' Write Pen, 1/2" Circle Punch, Bitty Punch, Bitty Buttons, Bo Ho Blossom Punch, Scallop Oval Punch, 1/4" Pumpkin Grosgrain Ribbon, Tombow Adhesive, Mini Glue Dot, Sticky Tape

Thank you for stopping by today.......Have a great weekend!!! See you next week!!!! :)

Thursday, June 17, 2010

Island Oasis Box #2 Purse

So another purse? I get to make these fun purses I have been seeing around - my turn. Here's my version - quick and not too complicated. I did not add a stamped message............I'll leave that one up to you all to do when you try this project. I didn't want to hand a plain handle so I came up with this handle using the curly label to make it: it's a smaller version of the top note curved shape and turned out better than I expected.

Paper flower:

Top view:


Back View:

Velcro closure:
To make this box:
(1) Box #2 in Rose Red CS
(1) half of Top Note in Rose Red
(1) half of Top Note in Island Oasis DSP
(1) 1-7/8" x 3-5/8" Island Oasis DSP (not in photo) for the back of the box
(1) 1-1/4" strip x 9" Island Oasis DSP for the handle
(2) Large flowers from Bo Ho Blossoms punch using the Island Oasis DSP
(2) Medium flowers from Bo Ho Blossoms punch using the Island Oasis DSP
(1) Old Olive CS punched using small Oval Punch (not in photo)
Trim off the Island Oasis DSP on the "stitch" line, attach to the Rose Red top note, place on top of the Box #2 lid and lightly mark where to score fold for the overhang. See photo below on where to positions ticky tape.

Pierce all 4 layers of the flower and put brad through to hold flowers. Spray a mist of water to crumble the flower, clip in between petals if desired. Allow to dry. Leaf: Use small oval punch on Old Olive CS, fold in half and put through a crimper. (ooops, sorry, forgot to take a photo of this.) Once flower is dry, attach to leaf with a mini glue dot. Use another mini glue dot to attach to front top note.
Using Versamark, randomly stamp flower from the Tropical Party image on the box:

To make decorative handle edge, use curly label punch as shown. Repeat on the other side.

Slip end of handle into the curly label punch for decorative edge. Repeat for the other end. Trim handle to length of 8-3/4" long.

Position brad about 1/2" down centered on the width of the box:

Add sticky tape to Box #2 side tab and lip of lid, as well as back of top note as shown:

Connect handle on the other side:
After connecting the brad to the other side of the handle, finish with Velcro and then your box is complete.
Supplies:
  • Stamps: Tropical Party
  • CS: Rose Red, Old Olive, Island Oasis DSP
  • Ink: Versamark
  • Accys: Big Shot Box #2 Die, SU Exclusive Big Shot Top Note Die, Curly Label Punch, Small Oval Punch, Bo Ho Blossoms Punch, Crimper, Piercer, Silver Brad, Sticky Tape, Mini Glue Dots, Velcro (non SU)

Thank you for stopping by today............hugs!!!

Wednesday, June 16, 2010

Scallop Island Oasis Purses

These purses were really a snap to make if you have the Big Shot Scallop circle die. I have seen these previously posted for a while but never got a chance to make them............on a whim...........why not.......I have the die. I love how they turned out. They are simple right now but can be fully embellished with paper roses and other items. Finished purse size is 3-3/4" x 4-1/2" x 1"....enough room in the box for treats to give. I made a variety of them:


Side view


Individual purse in Rose Red Island Oasis DSP:

Another one:

Pumpkin Pie Island Oasis DSP version:

Close to Cocoa with Square Lattice Embossing Folder texture:


To make this purse:
(2) Scallop Circles
(1) 5" x 5" Solid CS matching the DSP
(1) Scallop Oval Solid CS matching the DSP
(1) Large Oval punch DSP


Here's the main (3) pieces needed to complete this project:


Count 7 scallops and make crease line. Punch a Large oval template to position for the handle. Use a pencil to lightly mark.

Use the Large Oval punch to punch through (2) layers of the scallop circle so they will match.

Apply sticky tape to assemble box:


After box is assembled, add the front and back scallop circles to the box
Optional: add a tag by using the punched large oval DSP and a solid CS Scallop Oval matching the DSP. Punch a 1/8" hole and thread through linen thread. Tie grosgrain ribbon (cut 15" long). Project is complete. Fill with treats of your choice.
Supplies:
  • Stamps: Because I Care (Hostess - Level 1)
  • CS: Pumpkin Pie, Tempting Turquoise, Old Olive, Close to Cocoa, Island Oasis DSP
  • Ink: Black
  • Accys: Big Shot Scallop Circle Die, Square Lattice Embossign Folder, Large Oval Punch, Scallop Oval Punch, 1/4" Grosgrain ribbon: white+Rose Red+Old Olive, 1/8" hand held punch (retired), Linen Thread, Sticky Tape

Thank you for stopping by today....................enjoy your day!

Tuesday, June 15, 2010

Medium Purse for 3x3 Notes

Recognize this? It's the big sister of the Petite Island Oasis Purse posted on 6/11/2010. Petite size was made using a 4" x 4" square DSP. This MEDIUM size purse was made using a 6" x 6" square of CS - PERFECT for a 12" x12" DSP was used - you get (4) purses. This one finishes 3-1/2" x 3-3/8" x 1" and will fit (3) 3" x 3" note cards + envelopes. This is a great project to make because there are limited supplies used......a good thing?

Side View:

Back view:

Purse opened:

Inside: (3) 3" x 3" Note cards with envelopes

How this MEDIUM Purse was made:
Templates below:
(1) 6" x 6" Real Red Solid CS (or DSP), Score 1-1/4" on two sides, turn and score 2-1/2", 3-1/2"
(1) 1-1/4" x 3-1/2" Black Solid CS for Flap
(2) 1/2" X 8-1/4" Black Solid CS for handles
(2) 2" x 3-1/2" Black Solid CS for top of purses, score on the 2" side @1"
(1) 1-3/8" Punched Black Solid CS circle
(1) 1-1/4" Stamped and punched Real Red Solid CS circle
Here's what you should have:

Stamp the purse body with the images as shown. Optional note: no need to stamp the bottom of the purse.
Stamp image using black ink on a scrap piece of Real Red, punch out using 1-1/4" Circle. Punch a solid black 1-3/8"

Fold the purse body - results as follows:
Using a pencil, mark the position of the handles and flap for the back purse top. Use a craft knife to cut slits. Only cut slits for the handles for the front purse top.

Here's what the pure tops should look like - add sticky tape to both sides as shown:

Remove back of sticky tape, position purse body 1/4" into the purse top. Remove the other side of the sticky tape, then secure the other side of the purse top. Repeat for the front purse top.
Adhere a dimensional to the back of the black 1-3/8" circle, attach to edge of flap. Apply Velcro to secure flap closure. Project complete.
Supplies:
  • Stamps: Circle Circus
  • CS: Real Red, Black, Whisper White
  • Ink: Black, Versamark
  • Accys: 1-1/4" Circle Punch, 1-3/8" Circle Punch, Dimensional, Sticky Tape, Velcro (non SU).

Monday, June 14, 2010

Baby Bitty Book

This is one of my favorite projects from this weekend. It's for a sweet baby girl name Kyla. I used one of my favorite products from Stampin' Up: the Bitty Book. I love the chipboard case and the album inside........such a great project to "play" with and decorate. I had given the parents a series of these albums: a bridal shower album, a wedding album, a baby shower album, and to complete the series now: a baby album!!!! I love the spinner message on the album front. Whoo- hoo......cool, eh? This is the best photo out of all that I took - not sure why I always have this problem with projects in pink. This project finished size is 5" x 4" x 1-1/4".


The album and the case:

Here's a better view of the Bitty Book Front Case:


The spinning "welcome Little One" message with a little pearl accent (sooooo glad SU is now carrying those adhesive pearls as of July 1):


Here's the little onesie:


Some charms dangling from the album spine:


Front album cover image:


Album inside:

Album inside left cover:


Album inside right cover:


Many of the supplies used have been retired even though I still love them and they are very appropriate. Supplies are not listed.......this project can certainly be duplicated with any baby type stamps. if you have any questions, please e-mail me. Thank you for stopping by today!
