


Open the card and you will see the stamped spiders of each side, then open the card all the way and another message is revealed. Cool, eh?


Here's what is used to make this card:
(1) 8-1/2" x 5-1/2" Dusty Durango CS, score 2-1/8" each side
(2) 2" x 5-1/2" Cast-a-Spell DS
(1) 3" x 5-1/4 Cast-a-Spell DS
(2) 3-1/4" x 2-1/2" Lavender Lace, score one side 1/2" along the 2-1/2" side.
(1) 2-7/8" x 3-1/8" Lavender Lace
(1) 2-1/2" x 1-1/4" Dusty Durango
(1) 2-1/2" x 1-1/4" Dusty Durango
(1) 2-1/4" x 1" Whisper White
+Scrap Lavender Lace

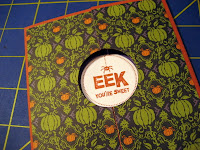
After scoring Dusty Durango, adhere 2" x 5-1/4" Cast-a-Spell DS to each side of the front. Note: DS should be aligned to the front center edge. Next photo: Stamp image using Dusty Durango Ink onto Whisper White CS, trim as shown. Use 1-1/2" punch to punch out "eek". Attach "eek" to punched 1-3/4" Lavender Lace circle. Set aside.


Adhere stamped Dusty Durango image on top of solid Lavender Lace CS. Lightly mark opening with a pencil. Find center of circle and cut, then punch opening using 1-1/2" punch (see photo on the right below). You will NOT be able to use the 1-1/2" Punch - it won't go far in enough.


Place stamped front image on to card front. Lightly mark with a pencil the circle. Then punch with 1-3/4" punch (as shown on right photo below).


Using a pencil (I've used a pen so it will show up), mark opening. Adhere "eek" over penciled circle. The pencil mark will be hidden since "eek" is backed with 1-3/4" Lavender Lace. Close front of card to ensure "eek" is in the correctly centered (see right photo below).


Now these pieces can be returned underneath the DS - be sure to align them with the marked horizontal line that was made.. Remove sticky tape from the bottom of the inside DS. Then remove the sticky tape from the sides of the "moving: parts. Close each side of the card front. Adhere "Trick or Treat Message" inside. Adhere ribbon with mini glue dot outside card.


Add Sticky tape to the back top/bottom of the 3" x 5-1/4" DS. Note: do not undo sticky tape yet. Using a punched 1-1/2" circle scrap (shown in left photo below), close card front and place circle in the "hole". Then lightly mark with a pencil and punch out. Remove top 3" x 5-1/4" DS sticky tape, adhere to card inside. Position the "moving" parts (this is the 3-1/4" x 2-1/2" solid CS pieces). Follow Jan Tink's video for this part of assembly. Lightly use a pencil to mark the horizontal line for the "moving" parts. Be sure to punch the "moving" part edge with the 1-3/4" punch.


With the "moving" part back underneath the DS, use a pencil to lightly mark the center of 1-3/4". Use a stamp-a-mah-jig to correctly position the stamped image -(eek - it just fits!).


Now these pieces can be returned underneath the DS - be sure to align them with the marked horizontal line that was made.. Remove sticky tape from the bottom of the inside DS. Then remove the sticky tape from the sides of the "moving: parts. Close each side of the card front. Adhere "Trick or Treat Message" inside. Adhere ribbon with mini glue dot outside card.

YOU'RE DONE! CONGRATULATIONS!
Supplies:
- Stamps: Eat, Drink & Be Scary, Sweet Centers, Holiday Best (level 1 Hostess)
- CS: Cast-a-Spell DS, Lavender Lace, Dusty Durango, Whisper White
- Ink: Black, Dusty Durango
- Accys: 1-1/2" Circle Punch, 1-3/4" Circle Punch, Stampin' Write Pens: Old Olive, Dusty Durango, Black, Dimensionals, Sticky Tape, 5/8" Old Olive Grosgrain Ribbon, Mini Glue Dot
Thank you for visiting today. I hope you enjoy my version of this magical marquee card...........hugs....XOXO


8 comments:
STINKIN' CUTE! Thanks for linking up!
Your works are really Cool! i always like to make cards myself, thanks for giving me more ideas : )
Happy Blogging
oh, that is sooooo cool! thank you so much for taking the time to post this! i appreciate your blog and you!!
Fantastic card. Thanks for your efforts in sharing and showing us how it's done. Great ideas.
Kylie xo
Talk about taking an idea and running with it...this card is great! Nice job.
Awesome! I can not wait to try this! I love slider cards. I've made the single slider and the double slider (grocery sack). But I love, Love, LOVE this suprise slider! You did a fantastic job on it. Love the colors and stamping and everything about it. I dont' make cards for halloween, but I'm feeling a birthday card with this design!!! =)
Hi Patti!
I saw Jan's video also and thought it was great - wanted to make one of these cards right away! Thanks for putting it into a blog tutorial!
Love your card - a beautiful creation, as always!
Barbara Diane
What a cool card! Gotta make one.
Post a Comment