


Base Card:
1. Cut (1) card stock 7-1/4"X4".
2. Score and fold @2" each side ALL the way up. This is the inside fold of the kimono.
3. Once this is scored, fold toward the center. There is about 1/2" over lap at the front.
4. At this time, with sides folded, cut 3/4" horizontally through 2 layers of card stock (1-1/4" down from the top) toward center of the card.
5. Unfold card. From the end of each 3/4" cut, score down toward the bottom of the card. This is the side of the kimono.

Once card is scored, cut and folded, stamp images. White Gel Pen has been used to accent the blossoms. The above photo is the outside back of the card.
 The above is a bottom view of the card showing the "awkward" shape. (Bad photo!)
 Above is the inside view of the card. Last step for neckline: fold each side 3/4" diagonally to the bottom of the sleeve. This is how the finished card should look (left side) and how the folds should be as shownfromthe bottom of the kimono (right side).


Kimono Girl Book Mark:
- Round Tab (use single layer/one side) in Naturals Ivory for the neck
- Trio Floral Punch in Pixie and Pretty in Pink: Use white Gel pen and Pixie Stampin Write oen for the "center" of flowers. Attach per photo.
- Punch (1)1-3/8" Circle Punch in Naturals Ivory for Face and (1) in Black for Hair. Front of Hair: cut accordingly and put a "part" in it. Back of hair is made by tracing the top of hair front and clipping the bottom of hair.
- Book mark: in Naturals Ivory is 1-1/2"x4"
- Obi Wrap in Pretty in Pink is 3/4"x4-1/4" attached in back using sticky tape.

 Here is the Head and hair assembled. Face features are hand drawn. Slide the Round tab for the neck underneath the face but DO NOT attach to hair - attach to the back of the face.
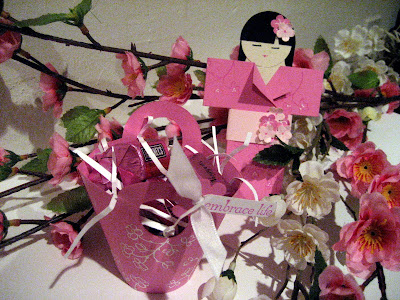
 Adhere book mark on top of neck (round tab) underneath face. Stamp "Happy Hellos" and add one of the punched flowers.
 Slide Book mark into Kimono.
 This is the back of the kimono - this is why the hair can not be glued!
Supplies:
- Stamps: Embrace Life, Lots of Thoughts (Hostess)
- CS: Pixie Pink, Pretty in Pink, Black, Naturals Ivory
- Ink: Pixie Pink
- Accys: White Signo Gel Pen, Black/Pixie Pink Stampin' Write Pen, Sticky Tape, Trio Flower Punch, 1-3/8" Circle Punch, 1-1/2" Circle Punch, Round Tab Punch
Let me know if you have any questions and Thank you for stopping by.


1 comment:
Wow! This is stunning! I can't wait to try it myself! Thanks for sharing this wonderful bookmark and tutorial!
Post a Comment