



Wednesday, June 27, 2012

Sew Crafty B'day Card


For an upcoming birthday, a "Sew Crafty" card using SVGcuts.com Sew crafty Collection using SCAL and my Silhouette machine to cut all the images shown.  There are other fun crafty images in this collection. The original cut file is for a hanging home decor.........it is so simple to re-size all the pieces for a card front using the SCAL computer program.  Paper used is SU Black, Michael's Kraft, and Graphic 45's Bits and Pieces Kraft Reflections Collection. Both Kraft and Graphic 45 paper are sponged with SU's Chocolate Chip ink. Use small color card stock scraps for the thread and "sew crafty" words. The dress form is also popped with dimensionals and the ribbon is single knotted adhered with a mini glue dot at the waist. All images were cut using SCAL. A quickie glue pen or 2 Way Glue pen is handy to adhere many of the small pieces.
Here's a closer look at the sewing items on the top right hand corner of the card: yup, those are separated snaps (adhere using mini glue dots) with a fancy dancy button.
And on the bottom left corner:  some more fancy dancy antique looking buttons. Use a fine black pen to make thread lines on the spools of thread (which are popped with dimensionals). Love the pinked edge detail on this card, too.
Card inside: Vanilla card stock from Michael's. Stamp used is from retired SU It's Your Birthday using SU Chocolate Chip ink. Sponge edges using SU Chocolate Chip ink, too.
This fun card is so easy to make................try it!!!! and have fun, too.

Tuesday, June 26, 2012

Butterfly and Flowers by Jan

I got this ever so fabulous card from Jan Castle aka Jan's Joy (her blog here www.jancastle.blogspot.com) Doesn't it look like a hanging framed photo? There is a shimmery detail to this card.  "Thinking of You" is embossed. A scattering of the tiniest adhesive rhinestones.........yikes, my eyes!!!!........positioned on the center of the flowers and the butterfly as well as for the "nail".
Here's another view: the black card stock used has a shimmery finish.
Card Inside: The punched boarder on the inside fold is a new twist.
Card Details:
  • Stamp: #800-29 from Peddler's Pack in Beaverton, Oregon
  • Ink: VersaFine black.......embossed it with clear embossing powder
  • The top (which looks like a decorative hanger) is a corner die 'B175 J' from Cheery Lynn Designs
  • Tim Holtz Distress Markers used to color, and highlighted a few spots with 'Smooch Illuminate' on the butterfly.
  • Card inside trim is using EK Success Morocco Lace boarder edge punch
Isn't this nice? Thank you, Jan!!!
Have a great crafting day............................

Monday, June 25, 2012

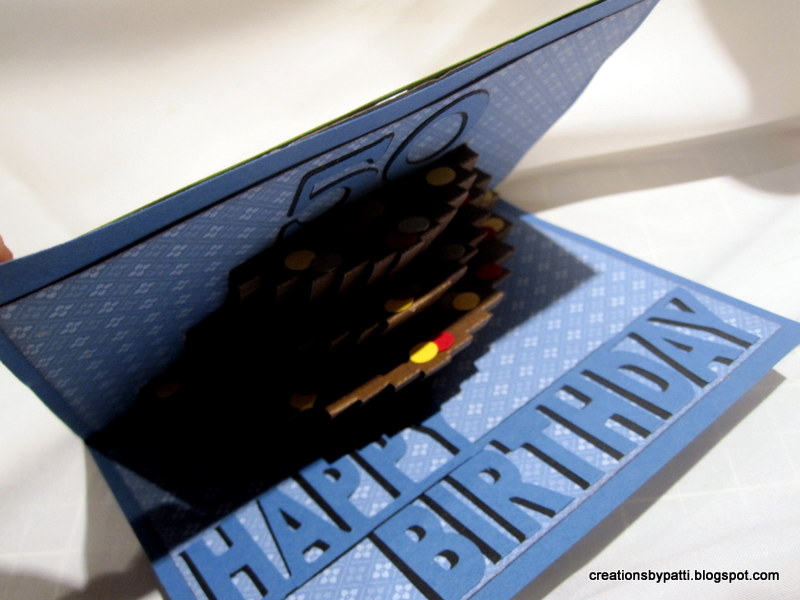
Pop-up Origamic Architecture Cake

update 6/25 9:30 AM: link for cake template corrected

This birthday card was a real "popper". The front of the card selected images were made specially for another cousin Curtis.  Curtis lettering font was done using Liz Display Pro. Background mat is using the Cuttlebug "bricked" embossing folder with inked inside folder technique.  Bicycle image is a SCAL cut from SVGcuts.com cut file Peony Cottage collection/Bicycle Card using my Silhouette to cut. The grass was made using Martha Stewarts punch. I did add the bar across the seat for the boy bicycle and did not use the basket in the cut file.
Slowly open the card to reveal:
The card inside has the milestone year and also the 3-D cake. This cake cut file is from Carol who has a fabrulous blog called Extreme Cards. You can find this free cut file here. There is a video how to make this cake. Using SCAL, I made the frame around the cake using designer paper (not included in the original file but easily created with SCAL). The "happy birthday" was made from SVGcuts.com cut file collection: Premium Pop-Up Cards. Those candy confetti: made using 1/4" hand held circle punch.
And here is the view from the side:
Hope you enjoyed this pop up cake.............have a crafty day.

Friday, June 22, 2012

Musical Birthday Card

For the gal who loves to play (and teach) piano: this card was cute!  The SVG cut file is from My Scrap Chick and can be found here.  I used my SCAL computer program and my Silhouette to cut all the pieces. The original card was portrait, mine is changed to landscape position. Made in my favorite colors: Red, White, Black with co-ordinating mini dots red/black paper. Details of stamped message used below.
Here's a closer look at the crystal gel pen used to outline all the musical notes: for that shimmery look!
Card inside: Notes are also outlined with Crystal Gel pen. Top and bottom board is punched with EK Success scallop boarder punch. Also added 1/4" red and white grosgrain ribbons. "happy Birthday" is cut from SVGcuts.com Happy Birthday to You collection Cupcake Lever Card.
Side view of card:
This stamped message is from retired SU Congrats stamp set:  
This message is from Paper Trey Inc's Big Birthday Wishes stamp set:
To make the pop-up:
Side view of pop-up:
That's all for today.......have a crafty day!

Wednesday, June 20, 2012

Dandelion Mini Stamp Nugget Treats

Aren't these JUST the cutest cutest ever?  They are made from those Hershey nuggets using the Dandelion Designs Mini stamps set. The set is small enough (each image is 1" high") to cover the front of these little purses.  There are 7 stamps in the set - 6 girls and one boy - I didn't think the boy stamp would work with these purses. Simply color the images, cut, then pop with dimensionals onto purse.The finished size for these are 1-1/2" x 1" x 1-1/4" (excluding the ribbon). Washi paper (from your local craft store made by Yasutomo Fold'ems Origami Paper) and co-ordindating Sakura punch added the finishing touch. Sakura flower is popped with dimensionals as well.
More photos:
Side View:
Here's the template:
Components for each purse: Also with above template cut using solid card stock you will need (1) cut co-ordinating 1/4" grosgrain ribbon + 1" x 3-1/2" long cut Washi to wrap the nugget, +(1) 1-1/4" x 5-1/8" Washi Strip.
Wrapped nuggets:
Apply adhesive for the grosgrain ribbon (cut 5" long). Apply adhesive to attach the nugget. Then add half of a clear Velcro closure to finish up the purse.
So cute? eh................have a great crafting day.