





Wednesday, August 11, 2010

Shoebox Swap Event - Part 1

This was a very busy weekend. First Scrapbook Expo and then A shoebox swap...........here are some of the shoebox swaps. I didn't do a very good job this time keeping track if who made what so all I can do is describe the projects. This one I know was made by Sharon using the new Spider Web Textured Impression folder and Dark & Deary Stamp set (also new) from the Holiday Mini coming out Sept. 1. And, oh yes, the Candy Wrapper die is also a Holiday Mini release (September 1).
One of the many prizes was this coffin treat made by Sharon - she did a great job duplicating it from the main Catalog (page 26).
Another prize: This tin made by Carol K contains stamped and punched images from the Perfect Punches stamp set. The DSP is Greenhouse Gala. This is a great hostess gift idea!!!
Demonstrator name unknown......so sorry about that.

Vicki made this one:
Unknown Demonstrator......love those tiny adhesive pearls.........

Denise had these great bookmarks we made using the new colors and using the new ribbon and brad, too:
This Top Note box was created by Lisa: I did not assemble my shoebox so I can transfer it home safely. I ended up sponging the edges and water coloring in the flowers. Added a stamped bird image, too.
Carol K made this really cute card using the new Glass Glitter and Jolly Old Saint Nick stamp set soon to also be available in September Holiday Mini. Love the brad and punched flower detail along with distressed edge on the Kraft CS.
Unknown Demonstrator: love this quick card.........
Unknown Demonstrator - love this card - colors are subtle and soft

Joanne B made this really cute card: the "world" has glitter and Versamark ink used on Kraft (Crumb Cake) CS with dazzling diamonds berries........I love the Cherry Cobbler scallop bottom.
Yay - Another prize! This was my "pink ticket" prize: it's a collapsible garbage from convention!
So this is only half of the cards, prizes and fun things from the shoebox...........stay tuned tom for more..............thanks for stopping by today.

Tuesday, August 10, 2010

Welcome Scallop Banner

Here's is a project that was inspired by ???? (I;m so sorry, I didn't write down the site) with a pull out banner in a box. If anyone knows what I am talking about, please let me know and I will gladly give them credit. It was made at a convention event. I took a couple notes and used the "Love Letters" DSP to make this project. I made 2 of these as door prizes and they went to fellow Stampin' Up Demonstrators at a shoebox event this past weekend. One additional one went to a special Blog friend. Finished project size is: 4-1/2" x 2"

side view:

Top view:

Here's a close-up of the top rosette: tutorial for this scallop flower was by Meg Loven (a fellow demonstrator - see her blog www.lovenstamps.com - she has a video posted 8/6/10..way to go Meg!!!!). I learn how to make the flower center from attending a recent Scrapbook Expo in San Jose. It was taught by Melissa Frances (love her!!!!) - more photo details below.

When the lid to removed, the 1st scallop tag is revealed:

Whenever I attempt to take photo of a banner..........it never turns out so hopefully this is a better way to show it off. Total length of banner is 37" long.

Want to make one? It's not to difficult.
To make the box, here's what is needed:
(2) 5" x 5" Chipboard

(3) 5" x 5" Solid Black CS
(1) 2-1/2" x 12" Solid Black CS, score along the 12" side @1/2"
(1) 3-3/4" Circle in Solid Black CS
(1) 5" x 5" Love Letter DSP
(1) Scallop #2 (3-1/2") Love Letter DSP
(3) 2-3/8" Extra Large Scallop Circle in Love Letter DSP - these are the flowers
1-1/4" wide Striped Ribbon

For the Inside banner:
(9) 3-1/2" Scallop #2 Circles in Solid Black CS
(9) 3-1/2" Scallop #2 Circles in Love Letter DSP
(5) 2-5/8" Circles in Solid Black CS
(4) 2-5/8" Circles in Solid Cherry Cobbler CS
(4) 2-1/8" Circles in Solid Black CS
(5) 2-1/8" Circles in Solid Cherry Cobbler CS
(9) 1-3/4" Circles in Very Vanilla - Stamped with the Welcome words + Fleur image
(1) 39" cit 1-1/4" wide striped grosgrain ribbon (not shown in photo)

Top Lid and bottom base: Apply adhesive to each side of the chipboard - adhere Love Letters DSP and Solid Black CS. Use Scallop Circle Big Shot Bigz die to cut.

After cutting, use a Black Stampin' Write pen to conceal the chipboard edges - set aside.
To make the flower on the lid: follow Meg Loven's video. 3 scallops were used to make a fuller flower. Apply adhesive to connect all 3 sections.

To make the center of the flower: single knot a 5/8" wide black grosgrain ribbon. Thread both ends of the ribbon through the center of the flower (Thank you, Melissa Frances for showing me this trick!)
This is what your flower should look like after the ribbon is threaded:
Adhere complete flower on top of the 3-1/2" Scallop Black Love Letter DSP with adhesive. Add dimensionals to the black DSP - set aside. Make a lid template and mark the center. Use a Big Bite (this is the mother of the Crop-o-dile) to punch the center of the scallop lid. Thread through one end of the 39" 1-1/4" striped grosgrain ribbon through the hole - apply adhesive to the end. Cover the ribbon end on the lid with the Black Love Letter DSP.
Now to make the Banner Holder, clip the 12" strip 1/2" section as shown. Wrap around the 3-3/4" solid Black Circle. Apply adhesive to secure. Add sticky tape to the edge to finish the circle. Adhere this section to the scallop chipboard.

Finished base should look like this:
Now to make the banner:
Position each 3-1/2" Scallop Circle along the striped grosgrain ribbon. Adhere a 2-5/8" solid CS, apply dimensionals on the 2-1/8" circle. Then add the stamped images. Repeat for all the other 8 sections.


The back of the banner is solid black CS

Supplies:
  • Stamps: Lovely Letters Alphabet
  • CS: Black, Very Vanilla, Cherry Cobbler, Love Letter DSP
  • Ink: Cherry Cobbler
  • Accys; Bog Shot Scallop Circle Die, Big Shot Scallop Circle #2 Die, 1-1/4" Riding Hood Red Striped Grosgrain Ribbon (retired), 5/8" Black Grosgrain Ribbon, 2-3/8" Scallop Circle Punch, 1-3/4" Circle Punch, Circle Scissors Plus, Dimensionals, Sticky Tape, Anywhere Glue Stick., Big Bite (non SU).

Thank you for stopping by today.................

Monday, August 9, 2010

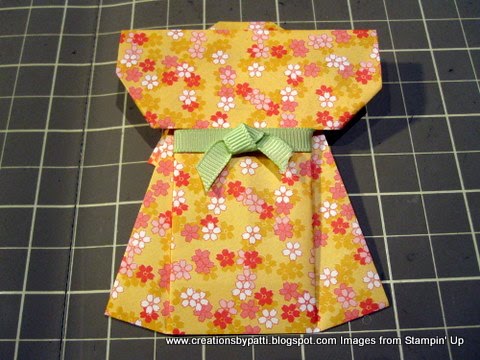
Kimono Tutorial

There are A LOT of photos ( a total of 26!) taken to make this Kimono. Washi is suggested due to the lightness of the paper. FYI: SU solid paper will be difficult to fold as it is more dense and thicker. Try SU DSP, which may work since it is thinner. Use copy paper to practice....................here goes:
Left Photo: Start with a 6" x 6" Square piece of Washi.
Right Photo: Fold diagonally, crease as shown.

Left Photo: Open, fold diagonally, crease as shown
Right Photo: Open, fold bottom corner to center, crease and unfold

Left Photo: Fold top corner to the fold line created (above right photo). Pencil line is marked to show the fold line.
Right Photo: Unfold, then fold top corner to the crease line just created on the left photo. Pencil line is marked to show the fold line. The center of the 6x6 is lightly marked with a pencil.

Left Photo: fold right side, match edge of top corner as shown
Right photo: fold back the "wing", matching the edge to the side

Left Photo: repeat for the left side
Right photo: Fold up the bottom point to meet the center

Left Photo: fold top edge toward the center (that's why there is a pencil mark for the center line) - see pink arrow
Right Photo: unfold,
take top corner to fold up toward the top

Left Photo: fold down the top corner - this is the kimono collar
Right Photo: to create the sleeve, this is the side view. Do a "pleat fold" - this is the Kimono sleeve. Note: The width is 1-1/4".

Left Photo: view after "pleat fold"
Right photo: make a triangle, fold down the corner - see green arrow

Left Photo: Origami verbiage called the next fold a "swivel fold and squash fold" Translation: fold back the left side toward the center.
Right photo: See green arrow - press down the triangle.

Left Photo: repeat fold for the left side
Right Photo: Pull out Kimono bottom at an angle and fold - see green arrow

Left Photo: Pull out the inner layer - see green arrow (this is the small piece)
Right Photo: Fold toward the side - See green arrow
Left Photo: Fold bottom corner of sleeve up
Right Photo: Flip Kimono over, this is what it should look like.


Left Photo: 3/8" wide grosgrain ribbon is a added embellishment. Tuck under the fold with a mini glue dot.
Right Photo: Complete grosgrain to the right side with a mini glue dot. Finish it off with a single knot also attached with a mini glue dot. KIMONO IS COMPLETE
Thank you for your patience...................let me know if there any questions. I look forward to everyone making this Kimono.
Embossing folders used for previously posted Kimono Cards - please e-mail me for the info.