Friday, August 6, 2010

More Kimono Thank Yous

Made more cards with the folded Kimonos.........I love how they turned out. Each one has a different spin of color............the color is selected from the colors in the Kimono. Each card also has a different embossed Asian impression. The difference from yesterday's card and today's is the use of 3/8" wide grosgrain for the "obi" which was easier to secure with mini glue dots. Instructions: when you purchase a packet of Origami paper, the instructions are in the packet. I will work on a photo tutorial and post next week so stay tuned.
Here's the first one with Real Red, Pumpkin and Very Vanilla:
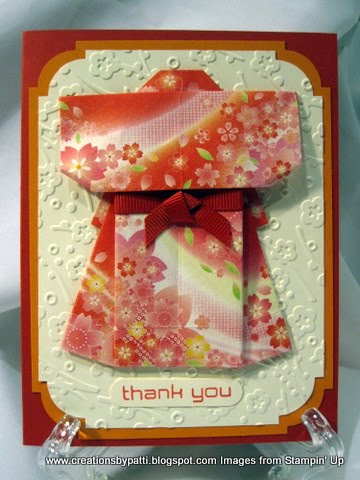

Here's the Brilliant Blue, Certainly Celery, and Very Vanilla:


And here is the Black, Real Red and Whisper White version:


Supplies:
  • Stamps: non SU
  • CS: Real Red, Pumpkin, Very Vanilla, Whisper White, Black, Certainly Celery, Brilliant Blue (retired)
  • Ink: Real Red, Certainly Celery
  • Accys: Ticket Corner Punch, Word Window Punch, Tag Corner Punch (retired), 3/8" Grosgrain Ribbon in Real Red and Certainly Celery, Domensionals, Mini Glue Dots, Embossing Folders (non SU)

Thank you for stopping by this week............have a GREAT weekend!

Thursday, August 5, 2010

Kimono Thank You

This is a quick Thank You card. The kimono is folded using origami 6x6 paper. The Vanilla background is embossed. Punch those corners with the ticket corner punch - and how easy is that? I did decide to add a small piece of Gold with a gold knot on the waist (the obi?). Stamp the image in Lovely Lilac, punch using the word window and back with Real; red using the Modern Label Punch. The kimono is attached with dimensionals to the card.

A closer view:
There are more cards that can be made since I folded about 12 of these kimonos.

This is what was used to make this card:
(1) 5-1/2 x 8-1/4" Lovely Lilac CS (retired), scored @ 4-1/4 on the 8-1/2" side
(1) 4" x 5-1/4" Real Red CS

(1) 3-3/4 x 5 Very Vanilla CS
(1) folded Kimono (made with 6x6 Origami paper

Thank you for stopping by today........................

Wednesday, August 4, 2010

Sheri's Mini Book

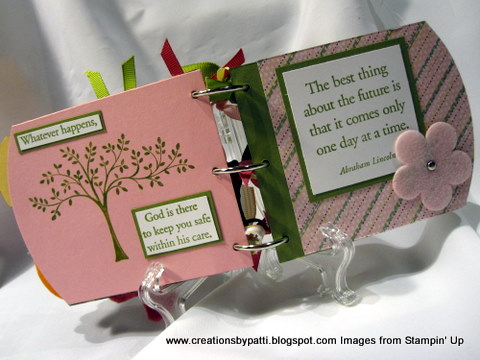
LOOK at this wonderful and fabulous mini book swap made by Sheri Petrucci for the 2010 SU Convention. Well............I didn't go but I had an opportunity to see some swaps from convention and begged to keep it from a dear friend who did attend Convention this year. I got Sheri;s permission to post this project on my blog - it has so many wonderful details and techniques on each and every page. The book came in a cute Bright Pink shopping bag. The size is 4-3/4" x 3-5/8". There are a total of 10 pages (including the front and back chipboard covered covers). You will recognize many of the DSP even tho they are now retired.

There are 3 metal loose rings to hold this album together along with many multi colored ribbons to adorn the rings.


The side view of the pages - LOVE those tabs!!!!! Instead of using the Round tab double layered, Sheri used the the rounded side and hand wrote the category for each section. Don't you just love this?
Here's the top view:

Page 1, 2 .love the same stamped image on the DSP............

Pages 3, 4: Love the small punched scallop corner on Page 3. How about the same boarder punch for page 4? And the Flower punch used with sponging on the edge....love the details on these 2 pages.


Another clever detail on Page 5: can you see how the vase was made using the Designer Label Punch. The ticket corner punch with sponging used for the stamped message and a white gel pen to highlight the flowers.
Page 6 also does not disappoint: Various size of punched circles with a sponged message
Page 7 shows off the Scallop boarder punch and corner scallop trim corner punch, stapled grosgrain and popped circle stamped with a crown. Much more details such as sponged edge and also ticket corner punch used.
Page 8 has various embellishments, too including a flower brad and stamped images in chocolate chip to go with this DSP.
Page 9: Felt embellishments and message is distressed and sponged.
Page 10: this one is way cool with the striped grosgrain ribbon along with orange vellum and a removable tag....love the small jewelry tag with a small stamped tea cup - tag is lightly sponged. I love the Lemon popped on the vellum, too. The entire page is sponged.

Page 11: I love this stamp set and it looks so great in a variety of colors
Page 12: Here's another punch technique used for the stamp message along with a square rhinestone brad and grosgrain ribbon.

Page 13: Another fun technique used for those daisy's - ink up the daisy's and stamp onto your page. Love the sponging on this page, too
Page 14: Can you see the same color orange grosgrain on the side? This pages is sponged with various colors of orange and the edges in Chocolate chip. Brads are used on the sponged edge and stamped message.

Page 15: the photo does show this: on the tree, Sheri has painted the leaves with the champagne ink and the glimmer is oh so subtle.
Page 16: a punched felt flower with a silver brad adorns this stamped message.

Page 17: how fitting!!!! A Scallop circle punch
Page 18: and bears colored using both markers and aqua painters. Ticket corner punch also used.
Didn't Sheri do such a fabulous job on this book..............so so so many details and inspiring combinations. Thank you Sheri, for allowing me to post this great project of yours. If anyone has any questions about this project, contact Sheri @ sherisehc@yahoo.com And if you are in the PA neighborhood, check in with Sheri for some Stampin' Up product! Thank you for stopping by today.....................

Tuesday, August 3, 2010

Helen's Purse of Sweets

This little purse is an inspiration from a really creative blogger friend Helen (see her blog site: www.helenmade.blogspot.com ). This is her original design....way to go Helen! She had posted a whole bunch of these little purses on 2/22/2010 and I have had this on my list of 'to do" for a looong time - so now I can check it off but will probably make a bunch of these. Project finished size is 3" x 4" (measured to the top of the handle)


Side view: note solid CS used

Back view:

Inside purse hold exactly 2 Hershey kisses: empty quickly to hold paper clips later...........

This is what you will need:
(1) Little leaves in Old Olive - attach to the front flap using a mini glue dot.
(1) set of Flower Fusion ........clip about 1/4" in between the petals, then curl using the piercer . Attach them all together. Adhere an adhesive rhinestone in the center. Pop with a dimensional onto the leaves.


Here is the template (which can also be found on Helen's site as well):
(1) 3" x 5-1/2" Purse Body in Melon Mambo DSP. Score on the 5-1/2" side 21-1/4", 2-1/4" 3-1/2", 4-1/2". Score on the 3" side 1/2" down only to the 2nd score line and 2-1/2" down to the 2nd score line. See the template for diagonal score lines needed for the sides of the purse.
(2) 1" x 2-3/4" Melon Mambo for the sides of the purse, score along the 2-3/4" side @ 1/2", 1-1/4"
(1) 5/8" x 5-1/2" Melon Mambo Solid CS for the handle
(1) Little Leaves in Old Olive Solid CS.
(1) set of Flowers from the Flower Fusion Die using scraps

Cut pieces should look like this:

Main section of the purse should be trimmed 1/2" on each side as shown (see pink arrows):

Apply Sticky tape to both ends of the handle, top and bottom side of the pieces for the side of the purse, the triangle sections of the purse:

Place the 1/2" section of the side purse piece to the purse bottom:

Remove sticky tape on the triangle section of one side of the purse to adhere to the side as shown:

Then remove the stick tape off the 1" section and fold down inside. This will make the purse more stable.

Purse handle: use hands to "curl" the handle. Remove the sticky tape, adhere to inside about 1/2", crease at the purse flap edge. Last step is to adhere the Velcro as shown.

Supplies:
  • Stamps: none
  • CS: Melon Mambo DSP (retired), Old Olive, Pink Pirouette DSP (retired)
  • Ink: None
  • Accys: SU Exclusive Floral Fusion Sizzlit Die, SU Exclusive Little Leaves Sizzlit Die, Mini Glue Dot, Dimensional, Rhinestone Adhesive, Sticky Tape, Velcro (non SU).

Thank you for stopping by today................

Monday, August 2, 2010

Kimono Kids Double Slider

This is my version of a Double Slider card which uses the new Kimono Kids stamp set..........not sure how this happened but I did end up using all the images from the stamp set. Don't worry, there is a video tutorial on Split Coast Stampers (under resources section-card styles are listed alphabetically) which is really helpful. I tweaked the measurements for this card. Project finished size is 5-1/2" x 3-1/2" so it will fit into a A2 (regular size) envelope (Yay!) But you know what I love most? It only uses 1/2 a sheet of 8-1/2 x 11 paper!!!! Hah!

Here are the tags inside pulled out:

Left Tag:

Right Tag:

Closer view of the fan tab:

Want to see how I design this card? I start with a idea and placement of the images. Had to also adjust this style of card to fit the images for this stamp set......and yes, I used every simple stamp in this set.........so this project has a lot going on...................but it sure is cute!

Here is what is needed: (oops, forgot to take photo of items used)
(1) 4-1/4" x 10-1/2" So Saffron CS, score along the 10-1/2" side 1/2", 4", 7-1/2"
(3) 3-3/4" x 3" Real Red CS
(3) 3-1/2" x 2-3/4" Natural Ivory
(2) 1-3/4" x 2-1/2 strips of Natural Ivory for the tabs
(1) 1-1/4" x 8" long clear plastic strip
Stamp the round Tab punch image on Naturals Ivory CS first, then stamp the fan in desired direction. Use the Round Tab Punch out. Repeat for the 2nd tab.

To achieve the soft fan color, press down on the ink pad lid so when it is opened, there is a pool of ink residue. Use the aqua pens to paint the dresses - a little goes a long way.............test a small scrap first.

Stamp the Kimono Kids image about 1/2" from the cut edge (to accommodate the round tab) Use Stampin' Write Pens to color the flower details in the dress, hair, face, and shoes.

Use the aqua pen to achieve the soft pen color for the background of the dress. Adhere to the Red CS, then attach the Round tab for the pull.
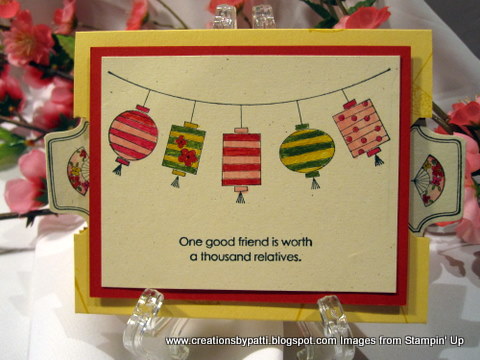
Position BOTH the string of lanterns and message on a clear acrylic block to stamp at one time. Color lanterns with Stampin' Write pens in any color combination of your choice. Mount on Real Red CS, pop with dimensionals. Set aside to adhere to So Saffron card front later.

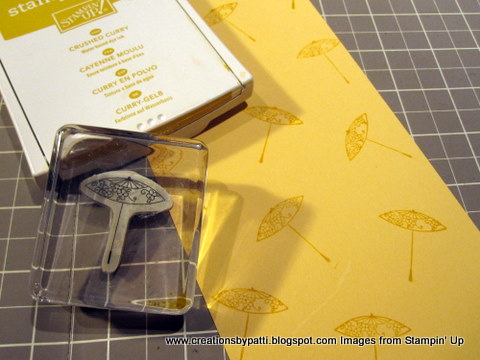
Use the umbrella stamp to randomly stamp using Crushed Curry ink:

Use a 1-1/4" Square punch centered on the first section as shown. You'll see that the round tab width is about 1-1/2" wide across the bottom so you will need to use the 1-1/4" punch to punch twice. (I didn't have a 1-1/2" punch). The use the Round Tab punch centerd on the 2nd and 3rd section. See the pink arrows..................next: apply stick tape along the 1/2 extension as shown.
So this is the part that will be tricky to make the slider and I really suggest a review of the video. You will need to take a 1-1/4" strip of clear plastic to wrap around the 1st section (that's the section with the square punch). Apply sticky tape to one end and loosely connect - I would suggest cutting off any excess so it does not get in the way of the sliding action. Position the connection toward the top near the punched square. Place another piece of sticky tape across the width of the clear plastic, remove and place one of the panel/tag on top to secure. Be sure the stamped image is in the correct position.

The 2nd panel/tag is completed in the same way but is attached facing up as shown. Place a 1" strip of sticky tape across the width of the clear plastic, then position the panel/tag on top. This is a GOOD time to test the slide to be sure it works.................cross your fingers............YES!!!!

The over view of the card should have the layers as follows: be sure to slip the 1/2 extension with the sticky tape as shown in the photo, otherwise the cards will not pull out and "slide". If all works, then you now can remove the sticky tape and secure card.
Supplies:
  • Stamps: Kimono Kids, Perfect Punches
  • CS: So Saffron, Real Red, Naturals Ivory
  • Ink: Staz-On Black, Crushed Curry
  • Accys: Round Tab Punch, 1-1/4" Square Punch, Stampin' Write Pens in Real Red, Blush Blossom, Old Olive, Crushed Curry, Pixie Pink (retired), Aqua Pens, Dimensionals, Sticky Tape

Thank you for stopping by today!!!