Wednesday, November 13, 2013

Dandelion Treats in an Altoid Box

Today I finally altered a Altoids tin box. I had been wanting to make one of these for a while. Lo and behold ----  a cut file in the  Silhouette Store.  Whoo - hoo. It makes it soooo simple to cut and cover the Altoids box - what a breeze to do!!!!! You have to try it!!!! Gotta love the on line Silhouette store!!! For the image, I used the Dandelion Designs Stamp set MC-17 Girl's Day and words " to: you, from: me" also by Dandelion Designs Stamps on the inside cover. The Dandelion Designs Blog can be found here. for lots more inspiring ideas. Look how cute the finished project looks!!! Decorative paper is from Crate Paper Pink Plum Collection.
See how the cut file cuts out the notches so perfectly............Metallic Pink textured card stock and some Dark Brown card stock used for this project.
 Here's the front of the tin..............just love it............it fits so perfectly................
 Stickles Star Dust added to the fans on each girl and also around the decorative paper.
 Open the tin to show inside................LOVE this!!!!
 Here's the lid with a popped up stamped message and Stickles Star Dust around the edge:
 And here are eight foiled Rolos with the stamped images punched out using a 3/4" circle punch. Inside is covered with metallic pink textured paper.
Here are some of the pieces cut for this project.....just add some sticky tape and you are on your way to a great gift for someone...................
Thank you for stopping by today and hope you enjoy this cute little project.

Monday, November 11, 2013

Kimono Marci Bendi Birthday Card

This birthday card was for two different friends who had birthday's in the month of October. It started out as a simpler card but oh well, it turned out a bit more complex than I planned but results are still good.  Card style: Bendi card. Tutorial from Emma Fewkes found here. There is also a tutorial on Splitcoast Stampers found here. Acetate was used for the right and left "arms". I wanted the back scenery to show more clearly. So that meant I needed to consider doing a mirror image for the grass and the tree. That means cutting double grass pieces for each acetate arm and positioning the tree properly. Main image is from La-la Land Crafts. Kimono Marci found here and Grass Die found here.

Copic colors used to color Kimono Marci: R24, R81, R85, E27, E55, E77 BG96, YG17, G21
Hair: W1, W4, W6, W7, W8, W10
Face: R20, E000, E00, E01, E11

 Side view:
 Overhead view
Papers used for Marci's dress is from My Little Shoebox Cherry Delight - Serenade. Other card stock used is scraps of pink and brown.
Open the right side of the card:
Memory Box Arboscello Tree die cut in Neenah White card stock so it can be colored  front and back using Copics so when the left acetate "arm" is opened, the backside of the tree is also the same as the front............and the Memory Box Floating Mound (flowers) die cut in a dark pink and a light pink card stock.
This photo shows both sides of the acetate arms open:
Taylored Expressions Build a Scene - Swirly Clouds die found here. Happy Birthday message on cloud is a Starform sticker
Here's a closer look at the tree in the background:
You can see the paper used for the front and back mat better in this photo which is from My Little Shoebox Lovely Day - Easy Breezy. For the stamped message, Ink used is Versafine Onyx Black with Clear embossing powder. Papertrey Stamp set: Big Birthday Wishes
Thank you for stopping by today and I hope this inspires you to make something fun, too
 

Friday, November 8, 2013

Retro Marci Fancy Album

OMG - is that day really here? This is the last project from the La-la Land Retreat. If you missed any of the projects that have been posted in detail, you can go back and start from 10-28-13 or just click on "older post". And, how perfect is it to end on a spectacular project by Irina. Irina is a creative and talented woman who comes up with the most detailed and amazing projects for our eyes to enjoy. 

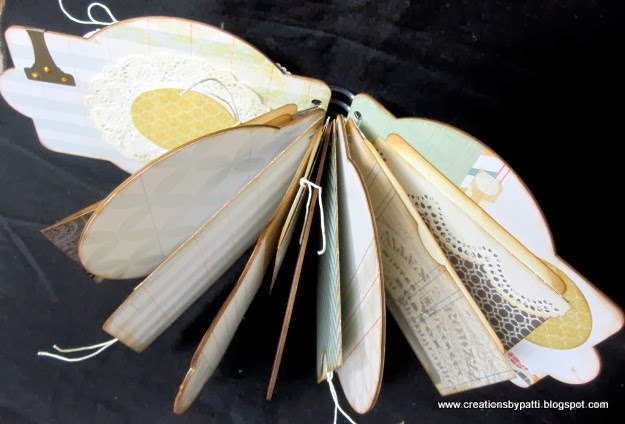
The project is using the Retro Marci image which can be found here. The album is the Fancy Pages Album kit can be found here. Dies used for this project are: Binding Boarder Die, Booktab and Labels Die, Heart Doily Boarder Die, Open Leaf Flourish Die, Rolled Rose Small and Medium Die, Bird Cage Die, Eiffel Tower Die, large Flourish Die, Stitched Scallops Boarder Die, Butterflies set 1 Die, and Decorative Corner Die --- they ALL can be found here. This project is not a "cookie cutter" type of album - there are various page shapes and inserts that are interactive..............album size is 7-1/2" x 6-1/2".  There are six paper board pages and various card stock pockets in between the pages. Binding method used is a clear coil.
 And here's Retro Marci in my favorite red colors:
I also  added a natural hemp tie to the top of the birdcage. I love how the booktab wraps around to the inside cover.
The butterfly is double layer: bottom layer is flat and second layer is curled. I used the Sakura Crystal Gel Pen on the butterfly, too.  On the smaller pattern butterfly, 3 Viva Gold Pen dots used.
 Love those rolled roses and the metal tag with "live, laugh, love" message:
 Album back:
On her glasses, I was so tempted to make them red color but decided to use Sakura Crystal Gel Pen for some shine............
 For her purse, add some Glossy Accents for shine:
Here's an overhead shot of the album:
Are you ready for some pictures of the pages inside with the pockets?  They are self explanatory.  Tags are sponged with Ranger Vintage Photo on the edges and have natural hemp twine.

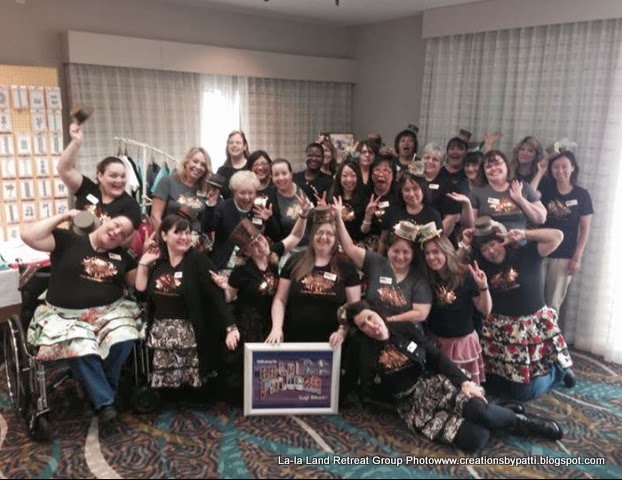
I am so happy to have had the opportunity to share my projects with all of you and hope it will inspire you to go out and make something fun! Sigh............in completing my projects, I was able to live the whole La-la Land Retreat all over.  I remember all the wonderful friendly Crafters who become new found friends. A BIG Thank You to Irina and all her "behind the scene" helpers who made this retreat event possible. To her Design Team members: Sandie, Debbie and Sue - no words can thank them for their patience, humor, and guidance on all the projects we made.  Hope to see them all next year at the next La-la Land Retreat.  We all had a great time so I will end the retreat with this memorable funny photo Irina took of us - we are such a happy bunch!!!! It was so sad on our last day to say good-bye to friends.....................boo hoo!
XXOOO!!!!!

Thursday, November 7, 2013

Gorgeous Holiday Card and a Waterfall Album

On the second day of the retreat we made this wonderful and gorgeous Holiday Card using the image from Christmas Ornament Marci found here.I absolutely LOVE the colors in this card and the colors used for Marci, too.  They are festive and "yummy". My absolute favorite colors!!!! Card size is 5-1/2" x 5-1/2".  Embellishments used on the card are from the Frames and Shapes on line Store at La-la Land Crafts found here. Additional dies used are the Open Leaf Flourish Die and the Pretty Poinsettia Die which all can be found here.
 A closer look at Christmas Ornament Marci (as a Brunette);
I fell in love with my newest embellishment tool: Viva Gold Pearl Pen used on the Poinsettia centers and berries.
 See the Viva Gold Pearl Pen used here, too:
 Card inside is great, too:don't you just love all that great layering?

This Heart Key Marci Waterfall Album was a wonderful project as a class by Design Team Leader Debbie (her blog here). I absolutely LOVE the paper used for this project.  Dies used for this project include: Open Leaf Flourish Die, Rolled Rose Small and Medium Die, and Decorative Corners Die which all can be found here. Finished album is 5-1/2" x 5" x 1/2" Heart Key Marci was originally suppose to have Blonde hair but since I am a Brunette - she got to be in the Brunette club, too.
 A closer look at Heart Key Marci:
For the key - I used the Sakura Crystal Gel pen around the edges.
And, I absolutely love the idea of having glass glitter in the center of the Rolled Roses. Way to go, Debbie - LOVE this idea..............THANK YOU for the inspiration!
Inside: some of the page layouts. With the extra cut paper pieces, "use it or lose it", right? So this is how I used them on these pages. I added a panel for a separate mat that can be slipped underneath.
You can also see the pocket made with a separate mat tucked in the pocket.
Because these pages were sort of a solid shade of brown, Floral card stock was layered and tucked on each side along with a strip in the front which can also hold additional mats, too.
Open each side to reveal...............................
Not finished yet: I still had a smalls trip with some lace: made another pocket and a floral mat:
Thank you, Debbie for this fun project!!!!
 
The third project being posted today is a Halloween Treat bag (it should have posted it on Halloween.......sorry about that): Bag size is 4" x 5-1/4" x 1-1/2".  Dies used for this bag are: Pumpkins die, Spider Web Boarder Die, Spooky House Die, and Eerie Bats Die which all can be found here.
Here's a side view (where the treats are suppose to be):
See the Spooky House? I sponged it with some white ink and also used a white gel pen to accent the house shape. And don't you just love the "gauze" as an embellishment?
Pumpkins are sponged with some Ranger Vintage Photo Ink. Spiderweb Boarder is also sponged with some white ink, too
The Eerie Bats are randomly flying around the sponged moon. The orange seam binding was spritzed with water, then crumpled and allowed to dry.
Now tom will be the last project from the retreat................seeing the finish line.................so stay tuned.