Monday, February 28, 2011

CHA - Enjoy The Moments Album

Updated Info on Suzy's Blog - see updated info in red
Wait 'til you see this gatefold style album. This class was conducted by fun and flamboyant Suzy West (www.suzywest.blogspot.com) at CHA. Suzi teaches at local scrapbook stores (and all over the world) so check yours to see if she on the roster and which project she will teach! This class really opened my eyes to so much more than scrapbooking. There are so many elements in this mini book..............finished project size is 10-1/2" x 6-1/2". The layout is exactly as Suzi taught in her class except the them is Friends instead of Family - I ad libbed the backside of each page since I really wanted to utilize all the paper received for this class............am happy to report I have very little scraps left over. The front cover is chipboard scallop boarder covered with Bella Blvd. decorative paper. Flowers and dress are cut, crystal effects added where desired. I added the hand written "always" using a Sakura black gel pen. The Sakura pen was also used to add detail "dot" to the scallops.

Here's the back side of the front cover. This page was added from the original class. Crystal effects added to the drinks and center of the flower. Handwritten "Awesome" on the tag using the Sakura black gel pen. Again, "dots" along the scallop bottom.

Right side front cover: with the leftover paper, mats are cut for future photos slipped into the pocket made. I love this decorative "curling" detail - closer photo below. The button center is a clear button on top of a decorative circle and popped with a dimensional. "friends" was made using sticker letters.


Here is a closer view of the 3 layers of "clip & curl" detail

Right side inside cover: is created using the left over scrap and punch outs from the kit. Original tag is "Dance Party" which I chose to cover with a strip of strip scrap. The dress is covered with crystal lacquer and the word "fabulous" is hand written on the tag peeking out.

Page 2 left/right side: it's a canvas page with pockets and tags!!!! Note the curling detail at the top of the pocket. The tags are part of the Bella Papers. Words are made using sticker letters.

Page 2 left side inside: another pocket with sentiments: "My friends" and removable tags with a calendar tag, too

Page 2 right inside: also pockets with mats for photos along with the curling detail at the pocket top. "Us" is made with sticker letters.

Page 3 left/right side: yet another medium: clear acrylic pages to decorate!!!! Crystal effects added to the flower centers, flowers popped with dimensionals. All words are sticker letters.

Page 3 left inside: scraps used to make this page:

Page 3 right inside: scraps also used to for this page

Page 4 left/right side: was suppose to be corrugated board which never arrived in time for the class (oh well,) so I used kraft colored chipboard: spritzed with Shimmerz Spray and edged sponged - worked fine! Words on the left page is hand written using the Sakura Gel pen. Right side "January" is made from sticker letters. The large flower is hand cut from a larger sheet of Bella Blvd. paper and popped with dimensionals.

Page 4 left inside: using the left over stickers and calendars, this page is created. "Remember" is handwritten using the Sakura gel pen.


Page 4 right side inside: left over scrap for this page, too used. "Memories" his handwritten using that Sakura black gel pen. Crystal effects added to the drinks.

Back page is corrugated board, partially torn at the bottom and sprtized with Shimmerz Spray: Those large drinks have crystal effects added to them. The drink strip at the bottom also has crystal effects added, too. Note the bottom turquoise strip is "gathered" at the right side..........when I though I couldn't learn yet another thing, Suzi throws this in............well, you can gather ribbon like this, why not paper, too? Just fold and secure with sticky tape.

Here's a closer view of the drinks:

This is the back of the album: Sprayed with Shimmerz
Holes for the album are punched using the Big Bite, then metal rings hold all the pages together.

I hope you enjoyed this album - there is so much detail to it and even more elements than I could have imagined. Even if you don't make this album, there are some great details to incorporate into a card or any other project.

Resources:
Punky Sprouts: Mixed Medium Albums
Bella Blvd.: all papers, sticker, and die cut pieces
Epiphany Crafts: all epoxy and buttons
Crystal Effect: Stampin' Up
Glue Arts: Tape adhesive
Shimmerz: Spritz
Clearsnap: red ink pad
Saukura: Black Gel pen

my best to all...............................

Sunday, February 27, 2011

CHA - Finally!!

Gads, has the year been hectic or what?????
I finally recovered from...............yup............LOOK where I went!!! The famous CHA show in Los Angeles. I have Gina T. to thank for this great opportunity of a life time!!! See her blog http://www.ginataylor.wordpress.com/. This event happened early February and I just had time to get it all together. Here's the sign outside the convention center that greets everyone in the morning:

This is the first class I took: it was called Beautiful Banners with Jennie Bowlin. The photo below is the 1st project and original design presented to about 50 class attendees.

The 2nd project was a 12 x 12 scrapbook page:

We got enough paper and embellishments as shown below to make these two projects. The leftovers? We got to keep them.

Here's my version of this project: The banner top is DSP supplied by Jennie. The bottom chipboard strips are sponged with red ink. The accordion rosette is placed in the center instead of the right side. The words were changed from "o-p-e-n" to "l-o-v-e". I also chose not to attach the children photos.

Here's a close-up of the rosette with a chipboard button (sponged edges), plastic decorative button (inked with red ink on the "dots"), and solid 4 hole button in the center.

Here's a close-up of the banner itself: The sunburst is stamped and cut. Layer on the chipboard button with sponged edges, another chipboard sponged edge button, then a star sticker, and lastly, a alphabet sticker.

Here's a closer view of the silver/foil-like rub on randomly applied on the strip, then inked again with red ink. This project has a real Americana feel................

Stay tuned for more projects to be soon shared. There projects are out of my comfort zone but I thoroughly enjoyed every new aspect of them. It's good to always learn something new.

Sunday, February 20, 2011

Thank You Stampin' Up

This is a note to all of you who have been following me for the last 2+ years on my blog. I have decided to leave Stampin' Up and will no longer be a demonstrator. My blog now reflects this change that has been made. While my time with Stampin' Up has been nothing but joyful and happy opportunities, I felt it is now time to grow and move on to other areas. I started this blog to share my projects with my friends.....................this remains the reason why I have this blog. So once in a while I will still have some fun projects and classes.

In the last 2+ years, I have made many friends through my blog and got the chance to meet some of you! What does the future hold? There will be posts that will be projects close to my heart: still will include Stampin Up products, some Asian and some scrapbooking about my parents and their heritage, and once in a while maybe even a card or two. Change is always good.

Many of you may not know I am a 4th generation San Francisco Chinese American. I will be taking pride in scrapping the historical timeline when my fraternal Great Grandfather came to the US in the 1860's. Some extensive research was done a couple years ago and it is time to get back to completing this very personal task. I hope you will take this journey with me.

my best to all and again, thank you!!!
Patti

Thursday, February 3, 2011

Celebrating Chinese New Year

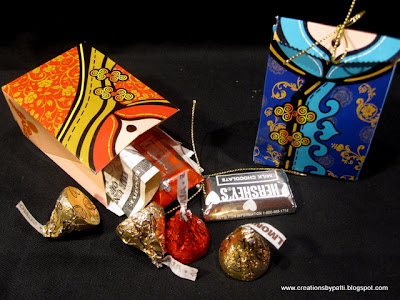
Today is the first day of Chinese New Year (the lunar calendar). This year, I thought I would be totally "out of the box" and not use the traditional red envelope (called "Lai See" or Lucky Money envelopes). I wanted to utilize these cute little boxes which are printed with the traditional Chinese Dress. They are very similar to the 2-4-6-8- box but of course, with them being printed, they evoke more conversation!!!! Their size is petite: 2" x 1-2/2" x 3". These "gifts are usually given to the "unmarried" from a married couple.................yes, even if you are 40 years old, you would get Lucky Money due to the single status.

The Female and Male version close-up:

This is what you get inside: Crisp lucky money and sweets!!!
I hadn't seen these cute little boxes anywhere here in the US - they are from Shanghai, China so if you know anyone going, get them them to purchase themf or you at the local retail market!!!
And, a Happy New Year of the Rabbit to all!!!!

Tuesday, February 1, 2011

Year of the Rabbit

This is my Year of the Rabbit card: I love using that Calendar Cricut Cart with the "Chinese New Year" message (again cut at 2"). It fit perfectly into this area. I pulled out my favorite retired SU Artful Asian stamp set and randomly stamped the coins using black ink on the Real Red mat. The Year of the Rabbit is a special stamp ONLY made in Hawaii by Stampettes.

This view has less glare?

The Year of the Rabbit is embossed in Black and then lightly colored - his cheeks are a little smudged: wonder where I picked up that dirt.dirty rabbit. Pop the image on dimensionals on top of the knotted Gold Organdy Ribbon.

Inside message: I'm so glad I got this $1 stamp during the holidays, I knew I would be able to use it. The Asian words are not a direct translation - they say wishing you luck!

Supplies:
  • Stamps: Art of Asia (retired), "Happy New Year" $1 stamp from your local store, Asian words from Chinatown Local Store, Year of the Rabbit: Stampettes of Hawaii
  • CS: Black, White, Real Red, Natural Ivory, Gold (non SU)
  • Ink: Black, Real Red, Versamark
  • Accys: 1-1/2" Circle Punch, 1-3./4" Circle Punch, Gold Organdy Ribbon (non SU), Dimensionals, Black Embossing Powder, Calendar Cricut Cartridge, 5/8" Gold Organdy Ribbon

Thank you for stopping by today......only a couple more days before the Chinese New Year begins