Friday, February 26, 2010

Noodle Bowl Fancy Favor

Now I couldn't make a Rice Bowl Fancy Favor featuring a girl without a big Brother Noodle Bowl Fancy Favor - no those aren't really noodles. They are some sort of cereal that looks like noodles (I thought they were perfect for this project!). Refer to the previous posting on 2/22/2010 for the instructions on how to assemble the box and handles, make the character, measurements, and create the bowl effect.

A closer view of the front: for the chop sticks, I found some short skewers that worked great!!! The sleeves were sponged with Black ink.

See the side view where the hands are on top of the Sweet Treat and the shoulder part is on the box?


Wow - This certainly was my quickest posting! Gotta run...................
Supplies:
  • Stamps: Embrace Life, Circle Circus
  • CS: bashful Blue, Blush Blossom, Old Olive, Black, Brilliant Blue
  • Ink: Black, Versamark, Old Olive, Pretty in Pink
  • Accys: Sweet Treat Cups, SU Exclusive Fancy Favor Box, 1-3/4" Circle Punch, 1" Circle Punch, Trio Flower Punch, Black and Real Red Stampin' Write Pens, Sponge Daubers, Stamping Sponges, Silver Brads, Mini Glue Dots, Dimensionals, Sticky Tape, Piercer.

Thank you for stopping by today.................HUGS!!! and Have a great weekend.............

Thursday, February 25, 2010

Butterfly Green Tea Holder

This is another Version of the tea holder previously posted on 2/19/10.........refer to previous posting for instructions:
  • on covering the tea pot chipboard
  • on applying the branches to the tea pot
  • on creating and applying the flowers
  • on assembling the holder

The front and back of this tea pot was stamped using the bamboo image using Versamark Ink from Embrace Life. Inside Very Vanilla CS is stamped using Certainly Celery ink. The sponged butterflies give this tea pot dimension and texture.

Close-up view of the front:

Side view of holder:

The tag is tied to the handle: Tag is from the SU Exclusive Matchbox die. The Large Oval Punch is used and the alphabets are from the SU Exclusive Big Shot Billboard Die, applied using 2-Way Glue pen.
Here's the tea tag: There were 6 of these

To make the holder: below measurements again from 2/19 posting:

To make the Butterflies: First, use a Q-tip to apply Crushed Curry ink to the center
Add Old Olive next


Add Red:

Add Black around the edges:


Finished Butterfly should look like this. Shape the wings with your fingers. Adhere to front with dimensionals.

Reverse side of the Butterfly:


For the tags: add Linen thread for the loop, sponge the tag edges, stamp bamboo with Certainly Celery ink:

Supplies:
  • Stamps: Embrace Life
  • CS: Certainly Celery, Very Vanilla, Pretty in Pink, Old Olive, Chocolate Chip, Old Olive
  • Ink: Versamark, Certainly Celery, Crushed Curry, Old Olive, Red, Black, Pixie Pink
  • Accys: SU Exclusive Beautiful Wings Embosslit Die, SU Exclusive Two Tags die, SU Exclusive Matchbox Die, SU Exclusive Big Shot Billboard Alphabet Die, Big Shot Birds & Branches Decorative Strip Die, Trio Flower Punch, Large Oval Punch, White Gel Pen, Crop-O-Dile, Mini Glue Dots, 2-Way Glue Pen, Anywhere Glue Pen, Linen Thread, Sticky Tape, Stamping sponges, Stamping Daubers, dimensionals.
Thank you for stopping by today to visit...............HUGS!!!

Wednesday, February 24, 2010

Year of the Tiger Personal Post-its

These cute little Post-it Notes on a loop are not a new project to the stamp world. There have been many tutorials on these. I thought I would use the "Year of the Tiger" as the main image for this project to give out during this celebration. The Post-it Notes used are the "small size"
Here's a closer view of the Real Red and Black ones:

See the Post-it Note inside?

Small amount of supplies needed to complete this project:
(1) 3-1/4" x 2" Black or Real Red CS, score at 1-9/16, then 1-11/16
(1) 2" x 2" Naturals Ivory CS scrap for the front main image
(1) Black or Real Red Scallop Circle
(1) Black Plastic loop
Here's a little story on the 3/4" Black Loops used: I got these from a large hardware retailer - they are to be used for keeping your paint chips all together when selecting paint. That means: they were FREE.

Use a piercer to make little holes in the scallops (note: gold CS replaced the red and black circles)


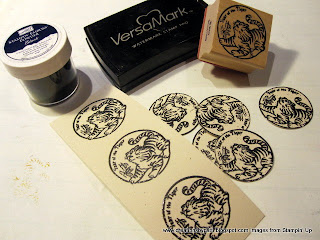
Stamp and Gold Emboss the covers as shown:

Stamp "Year of the Tiger" using Versamark ink, then emboss in Black.

Color the tiger using the More Mustard Stampin' Write Pen and Old Olive for the grass.

Apply dimensionals to the back of the scallop circle:

Here are all the completed Post-it Note books....aren't they cute?

Use the large hole in the Crop-o-dile and punch through all layers. Thread ring through, tie 5/8" ribbon on ring. Apply the front Scallop Circle to the front.

Supplies:

  • Stamps: Embrace Life
  • CS: Real Red, Black, Gold (non SU)
  • Ink: Versamark
  • Accys: 1-1/4" Circle Punch, 1-3/8" Circle Punch, Scallop Circle Punch, Gold Embossing Powder, Black Embossing Powder, More Mustard and Old Olive Stampin' Write Pen, 5/8" Real Red Grosgrain Ribbon, Piercer, Crop-o-dile, Dimensionals.

Thank you for stopping by today.....................HUGS!!!

Tuesday, February 23, 2010

Rice Bowl Fancy Favor Tutorial

Here is the tutorial for the Rice Bowl Fancy favor posted yesterday...........lots of details and photos to help you complete this project on your own.

Here's what you will need:
(1) Fancy Favor in Old Olive CS - note: actual die is longer in length. I cut my paper 5" x 11" and there remains a 1/2" overlap to complete the box. No need to use 12" x 12" paper.
(1) 3" x 1-1/2" Old Olive CS for the front bottom (second large square from the right side). You will need to trim the front bottom flap, leaving 3/8" allowance. This will allow the 1-3/4" punch (rice bowl) to be used in the correct placement.
(1) 1-1/2" x 11" Old Olive CS strip as shown below:
In order to obtain the decorative edge on both sides, position the strip as shown. Finished width should be about 1" wide.
As mentioned above, center and push the the 1-3/4" punch as far into the front panel.

Place the sweet treat cup into hole and fill with uncooked rice. The backing to cover the sweet treat is Pretty in Pink. Remove the adhesive backing from the sweet treat cup, place backing on top. Firmly secure closed. Set aside.

I decided to make a 6"x6" Punch page for the front. You will need:
(1) 1-3/4" Circle punch in Blush Blossom CS for the face
(1) 1-3/4" Circle punch in Real Red CS for the Bowl, shape the top of bowl with scissors.
(1) 1/2" x 7/8" Real Red CS for the bottom of the bowl
(1) 1-3/4" Circle punch in Black for the Hair, cut in half, clip part for hair.
(2) 3/4" Circle punch in Black for Hair buns
For arms, first punch 1" circle in Pretty in Pink, followed by punching (1) 1-3/4" Circle punch slightly off center. This will be cut in half and 1/4" taken off each half.
(2) Punched flowers from the Trio Flower Punch in Blush Blossom, cut away 2 petals for hands
(2) Punched flowers from the Trip Flower Punch in Pretty in Pink, clip in between each petal, scrunch up after sponging in Pixie Pink.
(2) hand cut 1/8" x 2" tapered Naturals Ivory CS for the Chop Sticks

Use sponging daubers to sponge the flowers and also the arms in Pixie Pink ink :
After assembling the Hair, sponge the cheeks using a dauber with Pixie Pink ink. No need to re ink on the pad, use remaining ink from sponging the sleeves and flowers. This is a good time to draw in the eyes and lips, apply the flowers with a mini glue dot and Rhinestone adhesive for the flower center. Set aside.

Cut the bowl shape, then stamp the cherry blossoms from the Embrace Life stamp set in black ink:

Start to assemble to front:
-Place the chopsticks in position, apply snail at the bottom half.
- Adhere the bowl bottom on top of the chop sticks and on top of the sweet tweat
- Use a mini glue dot to adhere the sleeves to each side of the bowl
- Use a mini glue dot or snail to adhere the hands.
- Apply dimensionals to the back of the head.
- for next steps, see next photo................
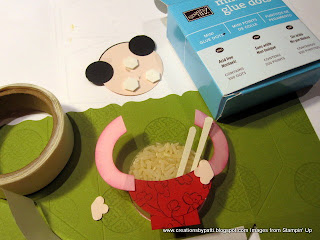
Place a mini glue dot on the top of each sleeve to secure to the front Fancy Favor box. NOW, the head can be positioned right on top in between the sleeves. Hint: Positioning the head with a slight tilt is cute and expressive

Before completing the Fancy Favor box, piece a hole for one side of the handle. Complete the box and pierce a hole for the other side of the handle.
To complete the bottom: adhere the 3" x 1-1/2" Old Olive CS as shown.
Before closing the box bottom, cut away the corners to match the back bottom flap. Then remove sticky tape and secure.
The finished girl is 4" x 2-1/2" which means she can easily be used for a card front.............hmmmm.......now that may be an idea..................hope you are able to make one of these. I would love to see your version! Thank you for your patience and thanks you for stopping by today................HUGS!!!

Monday, February 22, 2010

Rice Bowl Fancy Favor

I have been thinking about this project for a couple days and it finally came together. ANOTHER use for Sweet Treat Cups!!!! Uncooked rice is used instead of candy. Rice is a staple food in the Asian culture (and many other cultures). It is important especially for the Chinese New Year because it is always a wish to have plenty of food and a rice bowl that is full. I didn't think I should put cooked rice in the cup..........hmmmm......maybe I should see if that works. Recognize the box?: it is the SU Exclusive Fancy Favor Box. The handle: it is also cut from the Fancy Favor Box (so it all matches!!!)

Here's a closer view of the little girl:
Her sleeves and flowers in her hair are sponged using a dauber on Pixie Pink ink. The cheeks are also by using a dauber - no re-inking necessary to create those rosy cheeks. Don't forget to put that bling from the Eggcellant Eggs Kit for the flower center.

Isn't she cute?

Side view of the box with gold brad:

Here's a top view of the handle:
Supplies:
  • Stamps: Circle Circus
  • CS: Real Red, Naturals Ivory, Pretty in Pink, Black, Blush Blossom
  • Ink: Versamark, Black, Pixie Pink
  • Accys: SU Exclusive Fancy Favor Big Shot Die, Sweet Treat Cups, 1-3/4" Circle Punch, 1" Circle Punch, Trio Flower Punch, 3/4" Circle Punch, Black and Real Red Stampin" Write Pens, Stamping Sponge, Sponge Daubers, Mini Glue Dots, Eggcellant Eggs Kit, Gold Brads, Piercer, Dimensionals, Sticky Tape

Thank you for stopping by today......ran out of time today so stay tuned for the tutorial tom..............HUGS!!!

Friday, February 19, 2010

Chinese Tea Holder

In my craft room, I found a bunch of tea pot chip boards which was the perfect thing to make into a tea bag holder. My color inspiration is the Book pictured. It is called Five-Fold Happiness and is a collection of traditions in the Asian Heritage. This finished project size is 6" x 4-1/2" x 2-1/4".

Another view of the Chinese Tea Holder: The "TEA" is attached to the front with dimensionals.

Side view: the contianer is not stamped.


The back is stamped using Versamark ink:

Overview of the tea holder: you can see the stamped tags and the stamped inside tea pot.

Here's the closer view of the tea pot front: the birds are popped with dimensionals and their tails are curled up.


The tea bags...................

To make this project:
Trace the chipboard on to Crushed Curry CS and also on to Very Vanilla CS:

Stamp Crushed Curry CS using Versamark ink. Stamp the Vanilla CS (inside of tea pot) using Crushed Curry Ink. Using the Anywhere Glue Stick, adhere the cut tea pot pieces to the chipboard: make sure the inside (Very Vanilla CS) are adhere to the correct tea pot positions. Using a sanding block if needed to trim some spots.

Tea bag container measurement:
(1) 6" x 6-3/4" Crushed Curry CS, score along the 6-3/4" side, 2", 2-3/4". Turn paper, score 2"
Cut along solid lines to make container. Use sticky tape to secure.

Here are some of the pieces needed to complete this project:
(1) Tea bag container in Crushed Curry CS (measurement info above)
(1) Close to Cocoa Branch
(1) Chocolate Chip Branch
(2) Old Olive Branch to cut for leaves
(2) Pixie Pink birds
(3-5) Pretty in Pink Flowers - (I ended up using a total of 5 in this project)
(1) Pretty in Pink Large Oval
(1) Bermuda Bay Scallop Oval
T-E-A letters in Pixie Pink alphabets
(1) strip Pretty in Pink Scallop Trim Boarder
(1) strip Pixie Pink Scallop Trim Boarder
(1) 1/8"" strip Bermuda Bay Trim
(6) Very Vanilla CS Tags
(6) 4" long cut linen thread for tags

After attaching the front/back covers of the teapot chipboard, assemble the tea holder using sticky tape. Proceed to attach the back of the tea holder. Set the front aside to first complete the embellishments.

Cut the leaves from the Old Olive branch, attach to the Chocolate Chip branch using 2 way Glue Pen. Do the same process for the Close to Cocoa branch. If necessary, use tweezers to pick up the leaves. Position the finished branches and attach to front using 2 Way Glue Gen

Punch (3 - 5) Pretty in Pink flowers from the Trio Punch. Cut small slits in between the petals. Use a sponge dauber to sponge real red ink along the edges, use a white gel pen for the flower center. Fold up for that dimensional look - randomly attach flowers using a mini glue dot.

Stamp tops of the tags with crushed curry ink using the flower stamp from Embrace life. Attach tea bags with snail adhesive. Cut & Tie linen thread through the hole and place in container.

Supplies:
  • Stamps: Embrace Life
  • CS: Very Vanilla, Crushed Curry, Pixie Pink, Close to Cocoa, Chocolate Chip, Old Olive, Bermuda Bay, Pretty in Pink
  • Ink: Crushed Curry, Versamark, Real Red
  • Accys: SU Big Shot Birds & Branches Die, SU Exclusive Big Shot Two Tags Die, SU Exclusive Big Shot Billboard Alphabet Die, Trio Flower Punch, Scallop Oval Punch, Large Oval Punch, Scallop Trim Boarder Punch, Linen Thread, Sponge Daubers, White Gel Pen, Dimensionals, Sticky Tape, 2 Way Glue Pen, Mini Glue Dots, Anywhere Glue Stick, Sanding Block

Hope you enjoyed seeing this project.................Have a great weekend.............HUGs!!!