Wednesday, December 31, 2008

Asian Stationery Set

Updated info on 5/6/09: Instructions for this can be found on Jackie's blog: www.jackietopa.typepad.com from her post on 5/24/08. I replaced a stamp holder with a calendar and paper clip holder.
Here is a set that I made for my niece's Birthday using an Asian theme. I put in a calendar and 2 paper clips. There are 3 cards, 3 gift cards, and 3 gifts tags.

This view of the box closed. The flowers have dimensionals and are slightly "curled" under.


This is the top and side of box.


This is a closer view of the notebook inside: also stamped.
Supplies:
  • Stamps: Eastern Blooms, Sincere Salutations.
  • CS: Black, Real Red, Brush Gold, Whisper White, Naturals Ivory
  • Ink: Black, Real Red, Gold Encore, Verasmark
  • Accys: Gold Embossing powder, Gold Eyelets, Dimensionals, 1-1/2" Circle Punch, Black grosgrain ribbon, Gold Brads, Spritizer.

Thank you for stopping by.

Tuesday, December 30, 2008

2009 New Year Favors


Here are 2009 New Year party favors to hand out to friends. I made these for a Cousin who is married to someone who is Japanese. Why not use both Chinese and Japanese scrapbook paper? The small printed designs turned out very cute and I LOVE using my new Spellbinders Tag Trio - love that tag shape!

A close-up view of the 2 pillow boxes.

Supplies:
  • Stamps: Studio G Clear Stamps (from Michael's)
  • Ink: Black, Rose Red
  • Paper: Design Paper (Chinese and Japanese Travel)
  • Accys: Spellbinder's Ribbon Tags Trio, 3/8" Satin Ribbon, Sticky Tape, Big Shot Pillow Box die

Saturday, December 27, 2008

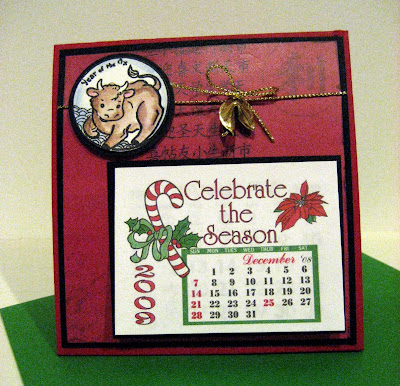
Year of the Ox Calendar

To make this desk top calendar, you will need:
  • (1) piece CS 4-1/4" X 11"
  • score using Score-Pal on the long side 1", 5-1/2",10"
  • continue to score on the long side by moving CS over 1/8" on your Score-Pal and score 1-1/2"
  • To have the calendar stand up: On the short side, make a horizontal clip at 2-1/8" (middle of card) 1/4" long into the card
  • Decorate.

This calendar card is going in the mail to a friend.

This is the side view of the calendar.

Here's a close-up view of the water coloring and Fortune Cookie charm. I used the Aqua pens and took the ink right off the pad.


Supplies:

  • Stampettes (from Hawaii - non SU)
  • CS: Real Red, Black, Design Paper (old hoarded Asian paper)
  • Ink: Staz-On Black, Pretty in Pink, Bashful Blue, Close to Cocoa, Gold Cord (retired), Fortune Cookie Charm (from Hanko), 1-3/8" Circle Punch, 1-1/2" Circle Punch, Aqua Pen, Dimensionals, Calendar (from Vippees)

Thank you for stopping by

Friday, December 26, 2008

One Sheet Pocket Tag Book Gift

This is a gift for a friend. The "K" is with glitter and is attached using mini glue dots to the Designer Paper. This is made from one sheet of design paper. Instructions for this book can be found on www.angelstamper2.blogspot.com or dreamcreateandshare.blogspot.com
I added a front and back cover.
Inside the 1st page of the Tag Book.

Here are the pocket tags inside each section. These tags are large enough to hold wallet size photos or small hand written notes.
Supplies:
  • Stamps: Make it Count (retired hostess), Letterpress Numbers (retired)
  • CS: Retired Designer paper, Whisper White, Bashful Blue, Green Galore, Real Red, So Saffron
  • Ink: Black, Versamark
  • Accys: Round Tab Punch, Flower Punch (non SU), 5/8" O Wires, Bind it All, Sticky Tape, 1/4" Circle Punch, Glitter "K" Alphabet (non SU)

Thank you for stopping by

Thursday, December 25, 2008

Christmas Decoration Finale


Right outside the dining room, in a corner before entering the living room is this little display of bears sitting on an antique Chinese Wedding Cake box.
This wreath is hung above the living room fireplace. Of course, it is decorated with Steiff Bears - what else?
On the coffee table sits a felt "tray" of assorted small 3" bears that were collected throughout the years.
In one corner of the living room, the top of a chest id decorated with both old and contemporary beats..........of course.
Then, there is this 2nd (of 3) 3 foot Bear Trees sitting on a table with guess what: another dessert stand (even though it looks like a peppermint).
This is the 3rd three foot Bear Tree and sits in the living room behind one of the couches. There are a variety of old and new bears.
Ahhh...........finally - the TREE! Before entering theliving room, there is a arch of bears. The tree is 10-1/2 feet tall.....and Yes, that is Muffy Angel Bear at the very top. The tree has over 1,200 mini multi color lights and over 800 ornaments of which 80% are guess what! bears! Yes.........most I had made and some store bought and some were gifts. The tree was decorated with mini multi colored lights at Thanksgiving. Between Thanksgiving and Christmas, the magic of tree transformation happens. It takes 4-1/2 hours to completely decorate this tree and every available branch and limb has an ornament. I am proud to present this to the family every year.
Here is a close-up of the tree with the bears. See the white color "door" - this ornament signifies when we bought the house so it always is hung front and center of the tree.
It is truly a BEARY CHRISTMAS every year. The house throughout has bear decor............I have lost count of how many bears there are. They will go into hibernation after the holidays. I hope you have enjoyed these photos.
Thank you for stopping by on Christmas..........I hope you all had fun today!

Wednesday, December 24, 2008

Christmas House

I've been really busy decorating the house for the Holidays. My Dining room is ready for the crowd...there's another 8' table downstairs also in the family room and also a tabale in the breakfast room............expecting 55+ family! Thank goodness it is pot luck! See all the dessert stands!
Here's a closer view of the table decor: Gold sprayed pine cones, garlands that were cut apart to be used as sprinkles, and gold netting.
This is one of (3) 3 foot Bear trees. This one is in the dining room corner on a round table which welcomes you to take your plate and utensils.
Continuing with the Bear theme, a Steiff Train decks out the buffet area. Hot trays are a must for this crowd. The grand finale tomorrow...............stay tuned and thank you for joining me on Christmas Eve


Tuesday, December 23, 2008

Quick Money Pouches

These really were so simple and quick to make - inside NO! No candy - it's money!!! No gift cards.


Supplies:
  • Stamp: Holiday Collection, Snowflake (2001 retired), All About Ocassions (retired)
  • CS: Kraft, Riding Hood Red
  • Ink: Craft White, Craft Real Red
  • Accys: Big Shot Pillow Box die, Tag Punch, Small Tag Punch, 1/16" punch, Red Organdy Ribbon

Thank you for stopping by

Monday, December 22, 2008

Bird in the Snow Ornament Tutorial

  • To create the "tent", start with a 5-3/4" long piece of paper.
  • The base of the "tent" is rounded and indicates 1/2" from the horizontal line. (Note: the 1/2" is part of the 5-3/4" - it is not in addition).
  • Each side of the "tent" is 5-1/2" long
  • Use this single template to connect 2 more for a total of 3 triangles. You will need 3 triangles for this project.
  • Add 1/4" to one side of the "tent" to keep the "tent" closed.
  • Clip, at an angle the top and bottom of the 1/4" extension as shown.
  • Center the 1-3/4" Circle Punch at the bottom of the "tent", push punch as far as possible and punch all 3 sections.

  • Apply sticky tape to extension (not shown in photo)
  • Stamp and decorate outside of "tent" now.

  • After die cutting (2) birds, sandwich a 4-1/4" long thread in between the bird's body (red/white twine is used in this photo so it will be visible).
  • Punch the very top of one of the triangles using 1/8" punch (this will allow space at the top for the cord to be hung). Note: photo does not show this step.
  • Apply a mini glue dot to the thread at the top of tent to suspend bird.
  • Cut 5" long cord and knot, apply mini glue dot to top of "tent"
  • Close "tent" by peeling the sticky tape off the 1/4" extension.

That's it..............let me know if there are any questions. Thank you for stopping by.

Bird in the Snow Ornament

This is a tri-fold scallop ornament. Original inspiration was from a Martha Stewart template which was reduced 25% for an ornament - Martha's template was for a table tent. Two birds are used and is suspended using a white thread sandwiched in between each bird.
This close-up view of the bird suspended on the thread. All 3 sides are using the 1-3/4" circle punch. 1/16" punch is used at the very top of the tent for the silver cord. Attach mini glue dots for the cord and thread to hold in place to suspend the 3-D bird. Finished size: 5-1/4" x 3-3/4" excluding cord. One sheet of 8-1/2 x 11 paper will yield 2 ornaments.
Snowflakes are on each side attached using mini glue dots in the center.
supplies:
  • Stamp: Merry & Bright (background)
  • CS: Real Red, Whisper White
  • Ink: Craft White
  • Accys: Silver cord (retired), thread, 1-3/4" Circle Punch, Sticky Tape, Big Shot Snowflake #2 die, Big Shot Birds & Blooms die, 1/16" circle punch.

Thank you for stopping by

Saturday, December 20, 2008

Holiday Ornament Packages

Here are the ready made brown bags to hold the ornaments made (see posting on December 17) They are ready to go.........I LOVE this retired snowflake set......


A close up view of the bag. The tags are made using Kraft paper
Supplies:
  • Stamps: Snowflakes (SU retired 2001)
  • Ink: Craft Real Red, Craft White
  • CS: Kraft (for the tag)
  • Accys: Purchased Brown Bags, Corner tag punch, 1/4" hole punch, Organdy Red Ribbon

Thanks for stopping by.

Friday, December 19, 2008

Asian Iris Folding

OMG - here's another FABULOUS item I bought from the craft fair from the same artist who made the red notebook. The colors are just for me! Shades of Red Washi Paper with Gold accents. In the center, Red glitter paper - How perfect is this! I will have to have this one framed.

Sorry for the shadows in the photo.
Thank you for stopping by.

Thursday, December 18, 2008

Asian Notebook

I got this FABULOUS note book from a recent craft show - I just love the colors used (surprise: it's red with Gold embossing). It is very cleverly made. Big Kuddos to the artist! I had one in Black previously but now I have one in RED!!! Yippee. See the photos showing the inside, too.


Fabulous Washi paper used to decorate the inside! A really nice surprise.
Thank you for stopping by.............I have one more fabulous item from the craft show tomorrow to show!
Thanks for stopping by


Wednesday, December 17, 2008

Holiday Ornament Kits

So finally!!! I completed my 2 kits from SU: On Board Trinkets and Star Bright Kit. Both are from the Holiday Mini Caty. There's enough ornaments to definitely cover a tree! I am saving the words (Joy, Love, Pece, Hope, Believe) for another project so they are not pictured. At first, I wasn't too excited about this kit but after it is completed: WOW! Yippee: an automatic family gift to divide up! Here's a group shot:

I decided to take the stars and make them triple dimensional (puffy). The smallest star (in the middle) has a dimensional in the center underneath. In this photo the dotted star layer also has a dimensional in the center and is then attached to the 3rd star. Then the 3rd star is attached to another large star by using mini glue dots only at each point to give it that "bloated/puffy" look.

You can see this side view of the completed star inside.

This is the top view of the star: which is the same front & back.
Supplies:
  • On Board Trinkets Ornaments Kit, Star Bright Designer Series Paper Ornaments Kit
  • Accys: Dimenstionals, Crop-o-dile (to punch holes for strings through Ornaments), 1/16" Hand held punch, Tombow Multi Purpose Adhesive. All other accys used were provided in the kits.

Thanks for stopping by.

Tuesday, December 16, 2008

Elegant Holiday Bells

See Tutorial on December 13.
This Holiday Bell Ornament is made using Card Stock Vellum and White embossing powder.
This one is made with Card Stock Vellum and used Dazzling Diamonds Glitter. The glitter doesn't show up too well in the photo. See below.
Yippee - This photo shows the glitter!!!

Supplies:

  • Stamp: Holiday Collection
  • CS: Card Stock Vellum
  • Ink: Versamark
  • Accys: Heat & Stick Powder, Dazzling Diamonds Glitter,White Embossing Powder, Silver Cord (retired), Pretties Kit beads, Mini Glue Dots.

Thank you for stopping by.

Monday, December 15, 2008

More Holiday Bells

See tutorial on December 13.

This one is made with Red (surprise) stamping.
I likes this so much, I made 2!
Maybe I like this one the best: it is Real Red CS with Gold Embossing!
Supplies:

  • Stamp: Holiday Collection
  • CS: Whisper White, Real Red
  • Ink: Real Red, Versamark
  • Accys: Gold Embossing Powder, Mini Glue Dots, Silver Cord (retired), Gold Cord (retired), Pearls from Pretties Kit, Gold Beads (non SU)

Thank you for stopping by..........I'll have a couple more Holiday Bells tommarow


Saturday, December 13, 2008

Holiday Bell Ornament Tutorial

Here's my 1st tutorial attempt for the Holiday Bell Ornament posted on December 11:
Cut paper 6x6.
Stamp or emboss before scoring and folding.
The Black lines in this photo show the score lines @3", turn paper, score @3".

Then score diagonally at each corner as shown in the above photo.
1st Corner fold: fold up the left bottom corner to the diagonal fold line.

Fold down the top right corner to the diagonal line. One corner is complete.

2nd corner fold: This photo shows the bottom right corner folded up to the diagonal line

Fold down the top left corner to the diagonal line. The 2nd corner is complete. This process will need to be done for the 3rd and 4th corners.

After all folds are completed, you should be able to press in the sides as shown above.

Push down the center of paper and push in the sides a little more. At this time, if you want to add a "tassel" or anything dangling, use a piercer.

Once the sides are pushed up, it should look like this. Mini glue dots are holding together 3 of the "arms" at the top of the point and one of the arms shown is loose.

Place mini glue dot on the last "arm" at the top point and your ornament is complete.

Let me know if there are any questions.

Thank you for stopping by.