This teacup birthday card is the perfect card for Gail - she got the 3D Letters posted yesterday. It was made using the SVG cut file from SVGcuts.com called Edisto Island Cards: Teacup and Saucer Shaped Card. Cutting was done using my Silhouette. All cut pieces are sponged with Brown ink. The teacup is popped with dimensionals. The butterfly is using vellum card stock. Finished card size is 6" x 5".
Here's a closer look at that die cut butterfly (using the Joy Crafts die from Ecstasy Crafts - found here) which was also used on the 3D Letters. Add Stardust Stickles to the edges as well as the center. Adhere with Glossy Accents, leaving the wings to flutter about the teacup.
The flowers on the teacup are popped with dimensionals:
Inside the card: Inside mat was not included in the SVG cut file but easily made using SCAL3 cutting with my Silhouette Machine. Stamped messages are from Papertrey Inc: Think Big Favorites #13 Stamp Set and Tea for Two Stamp Set. See the lightly stamped tea pot using SU's Pink Pirouette ink?
Here's a closer look at that teapot:
Have a great crafting day..................
Monday, April 30, 2012
Friday, April 27, 2012
Happy Birthday Gail
I made this birthday present for my friend Gail. It was made from SVGcuts.com's 3D Letters which can be found here. You will need SCAL3 and the Silhouette to cut the SVG file. Chocolate Brown card stock was used for the sides and back. The letters are backed with a Pink Card Stock and the decorative paper is from Crate Paper/Pink Plum Collection. I love this paper (have been hoarding it) and I know Gail does, too so it was perfect to use for her gift. The 3D embellishments used are dis-assembled floral rope, along with pink silk flowers adhered using a glue gun. Various sizes of vellum butterflies from Joy Crafts (can be purchased here) embellished with Stardust Stickles on the edges are randomly attached to each 7" high letter. Each letter is filled with sand to keep them upright.
Here are more photos of each letter:
Back of the letters:
I have a great time making this for Gail: HAPPY BIRTHDAY TO A GREAT GAL!!!!!
Here are more photos of each letter:
Back of the letters:
I have a great time making this for Gail: HAPPY BIRTHDAY TO A GREAT GAL!!!!!
Wednesday, April 25, 2012
Stamp Out Cute #6: Lady in the Flower Garden
This is the last of series of ladies from Stamp Out Cute. Image design #33B. Copic colors used: YR31, Y38, Y13, Y15, Y19, R83, R81, G24, V04, BV00, E21, R20. Gold smooch used for her dress detail and earrings. SU Pretty in Pink card stock used for the Mat and SU retired Lovely Lilac used for the card base. The Asian border is from Paulo and can be found here if you have SCAL3 and a cutter (I have a Silhouette). Finished card size is 4-3/4" x 5-1/2". attached photos will show further detail of the image.
This was the last of the ladies that I have to stamp - I believe I have the whole series. I hope you enjoyed seeing them all in color. A happy crafty day to you!
Monday, April 23, 2012
Stamp Out Cute #5: Lady in the Avairy
Here is the fifth Lady stamp from Stamp Out Cute. Design image # 23B. Copic colors used for this card: E21, R20, E55, Y19, B24, B41, B32. Gold Smooch used for her hair ornaments, Moonlight Smooch used for the birds. Card stock is SU Bashful Blue and Gold card stock is from Recollections. The Asian boarder is from Paulo and can be found here. Finished card size is 4-3/4" x 5-1/2" Attached photos will show more details.
one more lady to be reveal so stay tuned...........and a happy crafty day to you!
Friday, April 20, 2012
Stamp Out Cute #4: Lady Reading
Here is the fourth image from the series from Stamp Out Cute. Image is Design #8A. Copic colors used: E21, R20, R46, Y19 Y38, G24, W1, E42. Card stock used is SU Real Red and Black Recollections. Everywhere you are seeing Yellow is touched with Gold Smooch. Moonlight Smooch is used for her white sleeve. Again, Asian boarder is SVG cut file from Paulo which can be found here if you have SCAL3 and a cutting machine (I have a silhouette). Finished card size is 4-3/4" x 5-1/2". Detail photos attached.
stay tuned for the fifth lady in this series of ladies..........a happy crafty day to you all!
Wednesday, April 18, 2012
Stamp Out Cute #3: Lady Amongst Peonies
This card is the third card in the series of the Stamp Out Cute stamp company. This is Image Design #9B. Copic colors used: E55, E21, R20, R81, RV10, R85, W4, Y19, V17. Gold smooch used on her head. Purple smooch used on her dress. Card is SU Pretty in Pink and mat is a Dark Purple color. The Asian boarder is from Paulo which can be found here. Finished card size is 4-3/4" x 5-1/2". Instead of being repetitive, attached photos will show more detail.
I do hope you are enjoying this series of images...........stay tuned for more and a happy craft day to everyone!
Monday, April 16, 2012
Stamp Out Cute #2: Red Lady Relaxing
Here is the second stamp posted from a company called Stamp Out Cute (image design #33A). They are located in California but their web site seems to be down so a link can not be provided at this time. They do occasionally participate in A Stamp in the Hand Rubber Stamp Shows (www.astampinthehand.com) within California. Contact Kat for further information about this company. This image is using Copics:W4, W1, B00, E29, E55, BG49, G07, R59, R27, V06, V04, Y18 Gold Smooch is used, too. Card stock is SU Real Red and Gold from Recollections. The decorative edge is a SVG cut file from Paulo - see blog posting yesterday (or here )for the link. Finished card size is 4-3/4" x 5-1/2"
Hmm..it doesn't look like I fixed this photo...so sorry about that. Gold smooch used on her crown, front dress ribbon and jewelry:
Here's where Gold smooch is sparingly used: peacock feathers?
Closer look at the dress:
Card inside:
Stay tuned for the next card in this series...........and a very happy crafty day to you!
Friday, April 13, 2012
Stamp Out Cute #1: Lady Enjoying the View
I've had this stamp for a while and finally decided it was time to ink it up. It is from a company called Stamp Out Cute (image design #15A). They located in California however their web site seems to be down so a link can not be provided at this time. They do occasionally participate in A Stamp in the Hand Rubber Stamp Shows (www.astampinthehand.com) within California. Contact Kat for further information about this company. This image is very sophisticated and is the first of a series of 6 images that will be posted. Copic Pens used for coloring was the best way to bring out all the features. Colors used are: RV10, R81, G24, G21, G99, E55, E27, B41, W5, W1, W3, R20, E21, Y19. Moonlight Pearlized Smooch and Gold Smooch used as accents. Image is framed with SU Pretty in Pink CS and card is SU Chocolate Chip CS (even tho the photo shows it's a black color). The decorative edge is a SVG cut file from Paulo which can be found here. It is called A Fancy Asian Border. My SCAL3 computer program was used and my Silhouette was used to cut the file. Finished card size is 4-3/4" x 5-1/2".
Yellow (Copic Y19) areas are dotted with Gold Smooch:
Those cranes are actual shimmery with Moonlight Pearlized Smooch but doesn't show up in this photo:
Mountain coloring and tree top details:
the "rolling greenery" and rock formation coloring:
card inside with a decorative border
Stay tuned for more images from Stamp Out Cute..............have very happy crafty day!
Wednesday, April 11, 2012
A Panda Surprise in the Mail
A nice card received from a fellow blogger: Jan Castle (see her site here): This is such a cute card. Do you see the cute details? OK - I'll point them out to you. The Main image is cut out using the Spellbinders Postage Stamp die and popped with dimensionals - I love how she highlighted the inside with a light green. You can only get the embossing and also sponge in the area as shown using Spellbinders while the die is on the paper. The edge of the postage stamp is enhanced with pink smooch - notice the stamped image also has some pink smooch accents. The panda, swirls, and message is using Versafine Black ink with clear embossing powder. "Feel Better Soon" stamp is from Sparkle and Sprinkle. Finishing touch for this card: adhesive pink rhinestones.
And, here is a closer look at the postage stamp edge with the pink smooch:
I love Jan's creative work. Hope you also enjoyed it, too. Have yourself a very happy crafty day!
And, here is a closer look at the postage stamp edge with the pink smooch:
I love Jan's creative work. Hope you also enjoyed it, too. Have yourself a very happy crafty day!
Monday, April 9, 2012
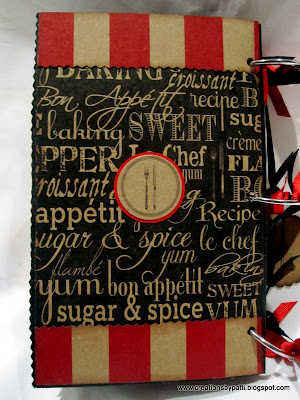
Bon Appetite Recipe Book
This is the best recipe book I have ever made!!! The colors are so PERFECT!!!! This is a kit from Archivers on line store call Bon Appetite Recipe Pocket Book made with medium size shipping bags. This kit can be purchased here. The photo instructions are very clear and easy to understand. I've added some of my own twist to the front: red/black grosgrain ribbon to the rings and also added the fork/knife hanging "charms" from the left over paper. There's always lots of paper left over. I did decide to sponge all the edges with brown ink for that "aged" look.
I added a Hero Arts Spoon/Fork Stamp using black ink on the red envelope.
I added a black brad which swivels to enable the recipe card to be removed from the pocket.
I also made the corrugated band to hold the recipe card which slides out. This is different from the original instructions. Note the burlap tag with black mini clothespin which was included int he kit.
Here's the center of the recipe book.
And with the tags and recipe cards removed:
Another band holding the recipe card. Note the canvas tag with a mini black clothespin.
All the tags and recipe cards removed.
Here's another page where a brad was added so the recipe card can be removed after the messaged is "swivelled" upwards.
Back of recipe book: I added the fork/spoon image with a red mat.
each section is part of the medium size shopping bag shown here:
Hope you enjoyed this pocket book. A very happy crafting day to all of you.
Subscribe to:
Posts (Atom)