Monday, March 18, 2013

Travel Mini

I am so happy to be able to recently complete a few mini books. This one is a quick mini made for a friend who has a brother (he's a pilot by profession).  She has the option to keep this book and make it a travel memorabilia mini or fill it with photos of her brother. I will leave it completely up to her. Mini was completed using about 5 sheets of 12x12 paper along with various embellishments from my stash...........boy, I was so excited to be able to use some of my travel stickers and embellishments.  The pre-made Kraft mini book is from The Button Farm, size is approximately 6-1/2" x 4".  Original Kraft mini had a right side flap from the back with a string closure - it was cut off.  The inspiration for this mini was originally from the Button Farms Hot Air Balloon Collection papers. I wasn't able to locate chipboard embellishments from the Button Farm Hot Air Balloon collection so the theme for this mini changed to airplanes. Papers from the newly released Teresa Collins Far and Away collection also used in this mini.  Here is the cover:
 Airplane and Camera from my stash.
How do you like the blue "A" initials cut using the Sizzix Serif Alphabet letter die. The tag is from my stash: original size much wider and larger, it was cropped down, a custom brad made, scraps of paper used from the mini (Copic  #E55 used to "discolor" the paper to match the mini), Ball chain also shortened appropriately.
Hot Air Balloon tag is from Teresa Collin Far and Away Paper Collection as well as the Globe and "Far Away" words. The luggage tag is from my stash.
On the right side, Teresa Collins Far & Away paper flap made. Copic #E55 pen - matched well!

Here is the flap opened:
Another page with a side pocket and tags: Globe and middle embellishment is using Copic #E55 color.
The first of  three policy envelopes. Camera sticker from my stash.
Papers used here are from the Button farm Hot Air Balloon and also from Teresa Collins Far and Away papers:
"via air mail" from my stash - aged using Copic #E55 to color
Are you loving this world map? - arrow is from my  stash.  Map aged using Copic #E55.  Stamp is from and airplane sticker from my stash. "Far Away" words from Teresa Collins Far and Away paper collection.
The second of three policy envelopes.  My favorite Memory is using Copic #E55 to age and small embellishments from my stash.
Here's another page with pockets and lots of tags. Stamp is from my Stash. 
And on the the opposite side, another pocket with more tags.  "Journey" tag is from Teresa Collins Far and Away paper collection.
Next page: from my stash, a photographic camera (aged using Copic #55) and partially adhered to page so a post card can be inserted behind the camera.  "Day Trip" sticker is from my stash.
The last policy envelope has a calendar with lost of arrows showing potential departure dates.  Also a tag with a map is adhered behind the calendar. Compass sticker from my stash.
This page can be left for journaling or a photo.  Stamps are from my stash.

Last page in this mini: Post card is attached on two sides to allow a tag to be inserted behind. Postcard is from Teresa Collins Far and Away paper collection.
Did you like this mini?.....it turned out so well. I am happy to make it for my friend and I know she will enjoy it whether she keeps it for herselff or gives it away.

Friday, March 15, 2013

Year of the Snake Calendar

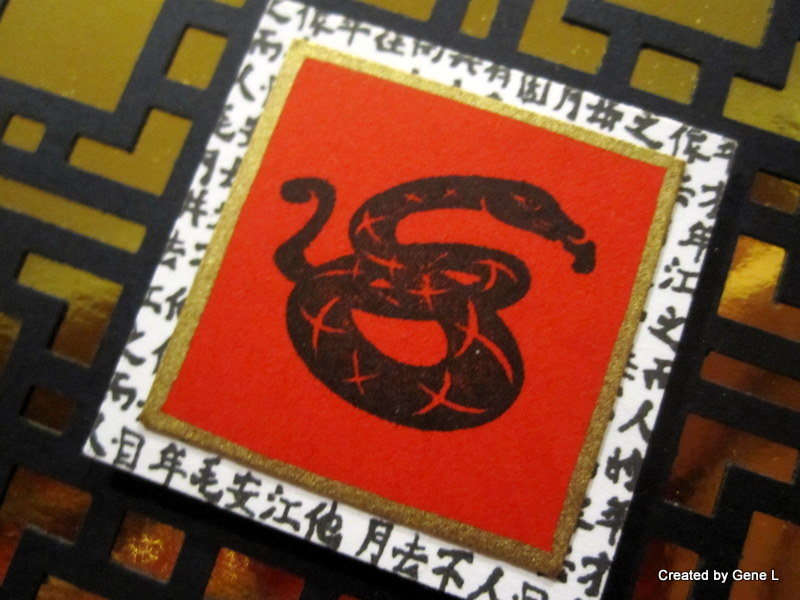
So here is a great card received in the mail from my Stamp pal Gene L who lives in Las Vegas.  I love getting surprises from her. She does such creative Asian projects. One of the most memorable project she sent me is posted here. This one is also quite cool, too.  The words stamped and embossed on t he right side of the card say "Happy New Year" in Chinese. geeeze............I don't even have that stamp.  The black punched background is a Martha Stewart Modern Cube punch........nice, eh?  And, of course, love the shiny Gold background behind the black punched screen.
Snake stamped image with Black and white calligraphy paper for the mat:
Easel up revealing a calendar..............
Back view and you can see there is a spot to write a note, too:
Thank you Gene, for sending me another great inspirational Asian creation!!! 

Wednesday, March 13, 2013

Rocket Ship Treat Holder

Update 3/13/2013: just found out this cut file originally found at the on line Silhouette Store has been removed due to difficulty in assembly (huh???). It was from Snapdragon.
 
What to make a 10 year old?  How about a Rocket ship card and a 3D Rocket ship treat container?  Yup, that worked out well. The Card is a SVG cut file from My Scrap Chick and can be found here. The 3D Rocket Ship Treat Box is from the Silhouette on line store. Three different embossing folders were used both on the card and treat box: Lifestyle Crafts Twirl for the flames, Tim Holtz Alterations Diamond Plate used on the mid section of the rocket, and Tim Holtz Alterations Riveted used for the main rocket ship. A White Gel pen also used to highlight some of the areas in the rocket. Brown ink used to sponge all the  folded areas in the card and treat box.
The card finishes 3" x 6-1/2":
Card inside: has the birthday year with candles. It is a FREE SVG cutting file from SVGcuttingfiles.com called Birthday Numbers.
The Rocket ship with the cover removed shows rock treats inside. They are actually chocolate that look like actual rocks..............cool, eh? Finished size is 5-1/4" x 6-1/2".
Here's another view:
A closer look at the body and the flame section:
This is what the screen looks like when the pieces are arranged on the mat. Pretty cool and easy to arrange to be cut using my Silhouette............so easy.............and quick.
Thank you for visiting today..................happy crafting.

Monday, March 11, 2013

All Hallows Eve

OK - I know it's not Halloween yet. I did have some left over projects from 2012 to start/finish and I just gotta tell ya that it feels GREAT to complete projects that weigh on my shoulders.  This project actually turned out better than I had expected although I liked it as the original way from the instructions. This is a kit from Embellish It On Line  and can be purchased here. Finished album size is 6-3/4" x 6-3/4". I believe the album is made by The Farm House. The paper collection used is from Carte Bella and can be seen here. When you purchase the kit, everything is included to finish this album............and, I mean EVERYTHING! Also included in the kit are very detailed photos and instructions to follow. Of course, I chose to tweak the layouts just a little. Here's the cover with chipboard embellishments along with those creepy brads.  Just enough orange glitter is on the title around the skull and circle. I also decided to sponge all the edges with Black ink. Love it!
Inside the first pages: fold back brad corner and some chipboard elements
Simple decorative amt and more chipboard embellishments:
The paper is gorgeous - the ribbon band on the right side is lose to enable a photo to be slipped underneath.
Another corner brad and a pocket with a tag.  The Pixie chipboard is attached to the ribbon and is lose to enable a photo to be slipped underneath as the previous page.
Another pocket on the left page with tags and another page with chipboard embellishment and again able to slip a photo underneath. hmmm.....I should have changed that a bit.
Again, instructions only had one flap but I decided to make a flap on both sides with a overhung tag.
I also tweaked the left page with a flap that flips up to hold journaling or a photo. On the right side is a pocket with a tag.
On the left side, I added a pocket with a tag (made from using the Carte Bella packaging).
Back of the album is left plain.....................this was a fun and quick mini to make . It can be completed within a few hours.  Finish it off with the black wire ribbon wrapped around the spine.  I love this and hope to be able to insert my favorite Halloween photos this year.

Friday, March 8, 2013

Tropical Paradise Mini

Yup, another mini. This one is from Pine Cone Press using Graphic 45's Tropical Paradise paper. I got this kit last year.  Started it and it sat for a few more months unfinished.........well, it is because I totally re-configured the mini from the original concept.  I needed to purchase additional paper because I made so many changes, even on the cover. You can purchase the original mini from Pine Cone Press here. Finished album is now 6-1/2" x 8. I love the passport in the front along with with chipboard floral stamps.
Here's a close-up of the top right corner. I added some small shells from my own stash and adhesive rhinestones along with some ruffled up burlap (which came in the kit)
Here are the floral stamps which were backed with lightweight chipboard and popped with dimensionals.  More small shells and rocks from my stash added.
I love the inside of the passport - it really looks like some old vintage country immigration stamps.

Here's the inside of page 1 and 2. Photos can be slipped underneath the flowers.
Pages 2 and 3: lots of small and a couple larger size floral stamps. Those shiny squares?  They are repositionable tape so I can move them around once the photos are in place. I love having the flexibility to do that.
On each page, flip up the larger floral stamp to reveal a small place for a photo and a place for a larger one, too.

This is the blue page: Love those women ...so from the deco era..........they are flaps that open......
When each side is flipped open, a place for two additional photos.
These pages are decorated with chipboard embellishments and places to slip photos or journaling.
These pages have "pockets" to slide photos into........
Another blue page: pockets with lots of fun embellishments and photo mats
Another Green page with floral bands with photo mats inserted
Here are the last 2 pages: to make these different, I made some higher pockets to hold the photo mats.
Yup, flip each of the pockets up to reveal a place for a smaller photo and a larger one, too.
The kit came with one 12 x 12 sheet of floral stamps............after finishing this album, I still had 1/4 sheet of floral stamps............wow!