Tuesday, September 27, 2011

Posh Wedding Card

This card was made for a recent wedding. Like the little Madam Alexander Dolls? They came from those "happy" meals (years ago) and this was such a great opportunity to include them as part of the Best Wishes to the couple. The color theme for the wedding was Pink, Silver, and Black so I chose Teresa Collins Posh Collection Designer Paper. Love her paper - I saw the collection early this year at CHA in January and was so happy I was able to make a project with it. And, I was able to purchase the collection in single sheets at my local craft store - that way, I only got what I needed (dah...............why? I love this paper so it is OK to hoard it just a little).

Here's the little darlings....................yes, their eyes do open and close.

The right bottom of the card is embellished with three adhesive flat back pearls.

The words "Celebrate" was cut using the Provo Craft Tie the Knot Cricut Cartridge on Silver Card Stock. About 3 layers of white card stock are behind the silver to resemble a chipboard embellishment. Adorn with 1/2" Pink Organdy Ribbon to finish off the card.

Inside, a simple stamped message with a strip of Posh Designer Paper:

Supplies:


  • Stamps: Cloud 9 design Clear Stamps: Simple Thoughts - Wedding

  • CS: SU Pixie Pink, Black, White, Teresa Collins Posh Designer Paper, Silver

  • Ink: Black Staz-on Black

  • Accys: 1/2" Pink Organdy Ribbon, Provo Craft Tie the Knot Cricut Cartridge, Flat Back Adhesive Pearls, Dimensionals

Stay tuned tomorrow for the posting of the Wedding Album which co-ordinates with this card.


Thank you for stopping by to see this card.................

Monday, September 26, 2011

Chocolate Latte Paper B'day Cake

OK - I got a few days notice to make this project.............it turned out well for a "quicky". Yikes...such pressure!!! Us crafters, we no like pressure......we like having fun!. This project was made for someone special who turned 94 years young!!!! He deserves this cake, for sure. This cake is suppose to resemble a cake from a Chinese bakery which does have lots of creamy roses. Because this is a masculine cake...........way too many roses would be too much. In the center of the cake is a hand made wooden "shou" which means Long Life in Chinese. His brother made this special carving by hand (he's a carpenter by profession). In fact, these cake carvings were made for their mother at her 100th birthday as party favors...............long life genes, for sure. And, they come in very handy to use at birthdays. Each cake slice measures 4-3/8" x 2-1/2" x 3-1/2" to make a finished 10" cake with 8 slices: oh yes, "8" is a lucky number, too in the Asian culture so this worked out so well for the occasion........whew!!!


Three 10" cakes on cake stands:


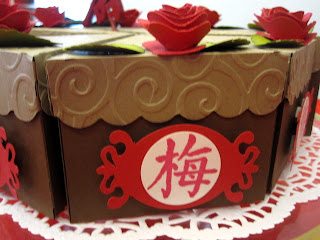
An individual slice of cake: and yes, the Sweet Tooth Cricut cartridge even cut the scallops for the lid. The swirls were made using a embossing folder.


Side of cake slices:


Remove the lid:


Inside are (2) fortune cookies:


No photo of the cut cake lid and bottom -oops...........to make the (3) cakes, 24 lids and bottoms were made. The lids were embossed with Cuttlebug Swirl embossing folder. The cake bottom was left "plain". Only the sides were embellished with a punched Asian Word: last name "MOY". This stamp was customs made while I was in Shanghai a couple years ago. Punch it out with a 1-1/4" circle punch, attach to the cut Spellbinder fancy Tag. Pop with dimensionals and add to cake...........love it!!!


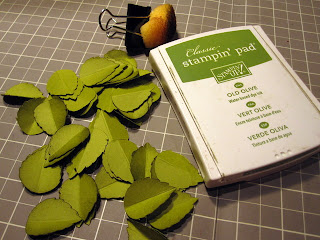
Leaves are cut with SCAL (Sure Cuts a Lot) program and PDC Spiral Rose cut file which also includes the Rose (photo below). PDC is for Penny Duncan Creations .After cutting them out, sponge with SU Old Olive ink, fold in half, adhere to cake lid.

The roses: Cut using the PDC Spiral Rose SVG cut file. After cutting, use a Slotted Quill twirl "thingy" to create the roses. This was the fun part. Secure with a mini glue dot at the end, apply wet adhesive in the center, allow to dry. Then adhere to cake lid.


Supplies:


  • Stamps: Custom Made Last Name

  • CS: Red, Green, Brown, Vanilla, Kraft

  • Ink: SU Old Olive, Momento Red

  • Accys: Cricut Sweet Tooth Cartridge, Spellbinders Fancy Tag Die, Cuttlebug Swirl Embossing Folder, 1-1/4" Circle Punch, Dimensionals, Sticky Tape, Wet Adhesive, Mini Glue Dots

Thanks for dropping by today.............

Saturday, September 24, 2011

A Fabulous Gift Card Holder

Another birthday card to share..........that's what I thought..........it's a gift card from a great friend: Gail W. She used one of my favorite stamps from Judikins. And I just am in love with THAT paper, too.

Gail did a great job on coloring "Dancing Girl" from Judikins. I love the stickles on the fan and the bling on the butterfly.


Untie the organdy ribbon closure to reveal:


Open more.............I love the Martha punches she used.....they're my favorite.


Look how clever she tucked the gift card in the pocket: use the Sakura punch as the pull tab.........love this!!!


I am so happy to have been able to share this great card with this.............so sorry for the delay and hope you enjoyed it!

Friday, September 23, 2011

Birthday Telescope Card

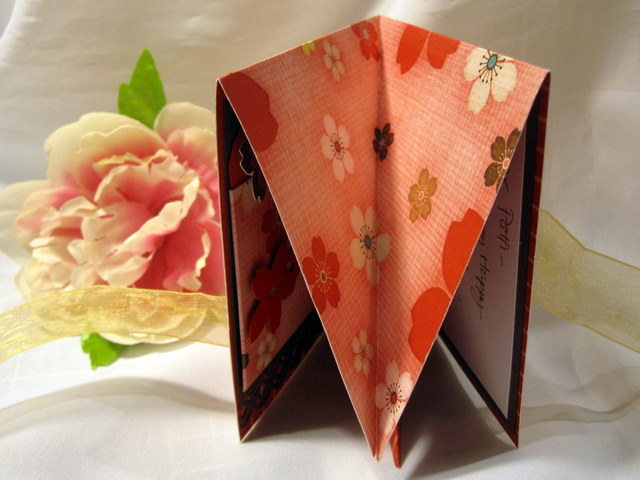
I received a very nice surprise by "snail" mail for my birthday from a dear friend (Gene L.). Gosh, I hadn't realized I had not posted it to show it off. Last year I had the pleasure of meeting her for the first time In Las Vegas. She is truly talented and as nice as can be.........a great friend indeed for always. And, she remembered it was my birthday, too............now that is remarkable in itself! I believe this type of card is called a "telescope' card.................nice!!! The Big Shot sure came in handy for this card. It came "collapsed":

Unfurled to reveal the second layer:

Unfurled to the last layer: cute, eh? I absolutely love it.

Here are some close-up photos of each layer:
Layer 1

Layer 2


Layer 3


The colors are so "happy". I believe all Stampin' Up products: paper, exclusive cupcake punch and stamped message was used to make this card.................Great job, Gene on this one!!!


I am glad to finally be able to share this with you all out there................hugs, P

Thursday, September 22, 2011

Ayako Thank You Card

A great surprise today from a friend. I am so happy to share this with you today! The card is in a vellum envelope and I can see the shadows of the beautiful card inside.................it's really yummy.

And here is the card: It's Ayako from Sister Stamps (their 2nd release). She is Copic colored in shades of red. This photo just doesn't do it justice.

Here's a close-up of the gorgeous outline - I think it is using the Jelly Roll Pen. REALLY REALLY REALLY gorgeous looking. Note the dragonfly charms on the bottom right corner..........a really nice finishing touch!

Here is a top view of the card:

Here is the card "flattened" when the sides are pulled.................see the Asian message that was tucked behind Ayako's umbrella? It translates to "thank you". Very clever indeed...............love this card!

NOW this is a great card..........................don't you think so? thank you for stopping my today to enjoy this wonderful card.