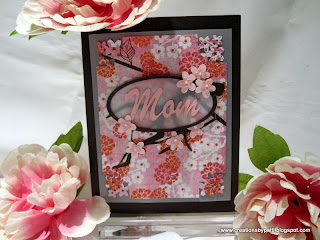
Here's a closer view of the front: The Cherry blossoms are dotted with Star Dust Stickles in the centers

See the corners of the Crate Paper Pink Plum: punched using the Martha Stewart Cherry Blossom corner punch:

Wha-la.............open the card to reveal: Lanterns, cherry blossoms, fans, and a Happy Mother's Day banner

Top view:

Here's one of the lanterns attached with a antique brass brad, popped with dimensionals. Using a white gel pen to make the creased fold lines for lanterns.

Back of the card: a special stamp (from Stampmajick: Chinese Sayings)

Details how this card was made:
(1) 5-1/2" x 8-1/2" SU Chocolate Chip CS
(1) 5-1/2" x 8-1/2" Crate Paper Pink Plum Collection/Very Berry
(1) 3-3/4" x 4-3/4" SU Card Stock Vellum
(1) 3-1/2" x 4-1/2" Crate paper Pink Pum Collection/Very Berry
(1) Oval 1-1/2" x 3": SU Card Stock Vellum
(1) Oval Frame: 1-1/2" x 3" SU Chocolate Chip
Mom: SU Pretty in Pink CS using SCAL 1" x 2" Brushscript Font using SCAL
(3) Cherry Blossom Branch from SVGcuts.com in SU Chocolate Chip CS
(27) Small and Medium Cherry Blossoms from SVGcuts.com in SU Pretty in Pink and SU Pink Pirouette
(2) hand cut banners: (1) plain and (1) stamped message
(1) Small Oval Punch in SU Really Rust CS, cut in half,pop with dimensionals
(1) Small Punched Oval in SU Really Rust, Cut in half, pop with dimensionals (not in photo)

Template for card inside: solid lines are cut lines, dotted lines are score and fold lines

After folding, top view:

another top view:

SU's 2 way Glue Pen was used to adhere the frame and the words. Mom was cut using SCAL (sure cuts a lot) with my Cricut machine. The font style was from my computer library: Brushstrokes.

Here are the Martha Stewart Cherry Blossom punches used:

Hero Arts: Good Fortune Stamp set using the lanterns and fans are stamped and colored using my Copic pens. Banner and sentiment is from Stampmagick (Chinese sayings).

Pop the lanterns, fans, and oval with dimensionals:

Attach oval to the front of the card over the cherry blossom branch. The blossoms are randomly positioned and attached using Tombow glue. Adhere punched cornered front to the Vellum, add dimensionals, then attach to the Chocolate chip card front.

Card inside: before pierce top of lantern for brad

Use a thicker thread or dental floss for the banner. Double stick tape is put down first, then the string, and the other side of the banner. Attach securely with either mini glue dots or tape to the "mountain" section on the underside of the card center.

Apply sticky tape to the inside card as shown (sorry about the photo):
Resources:
- Stamps: Hero Arts: Good Fortune, Stampmagick: Chinese Sayings
- CS: Neenah White, SU Chocolate Chip, SU Pretty in Pink, SU Pink Pirouette, SU Really Rust, SU Card Stock Vellum, Crate Paper Pink Plum Collection: Verry Berry
- Ink: Momento Black
- Others: SU Small Oval Punch, Martha Stewart Cherry Blossom Corner and Edge punch, SVG Cherry Blossom Free Cut file from SVGcuts.com, SCAL Oval Custom cut, SCAL Brushstroke Font, White Gel Pen, SU 2 way Glue Pen, Star Dust Stickles, Antique Brads, Tombow Adhesive, Sticky Tape, Dimensionals, Copic colors RV21-RV10-E27-YR07, Piercer
Thank you for stopping by...........................................


7 comments:
Beautiful cards, Patti.
Stunning Patti!!!! Love everything about your card...thanks too for the tutorial!
Jan
Such a wonderful pop up card mechanism. Such a delightful creation.
I am becoming a follower.
Cheers from Bangalore ,India
Dr Sonia S V
ENT Surgeon and Avid Crafter
http://cardsandschoolprojects.blogspot.com
WooHoo,Patti! These are AMAZING Mothers Day cards...beautiful with the vellum in the front embellished with blossoms, & what a fun pop-up surprise inside. Gonna hafta check out that svg site you've been using...thanks for the link!
OK, how much does your MIL love you, right?! I'm sure she thinks you're the most talented DIL ever! Hugs~
I love this album! Okay-I need to buy the paper ASAP-I have a grandson on the way any day now?
Thanks for sharing! Blessings.
thanks for the pattern - may give it a try!
Post a Comment