Showing posts with label Matchboxes. Show all posts

Monday, September 3, 2012

Dress Form Paper Clip Matchbox

Update 9-16-2012: the Dress Form paper clips are from Maya Road  and can be found at your local scrapbook craft store or here. Maya Road also makes Hanger paper clips, too.

Here's a little matchbox dressed up with of course, a dress form! Paper used for this project: Graphic 45 paper, Recollections Black, Recollection Kraft. I love that Maya Road Mini Yardstick, those Vintage buttons, and the SVG Cut file for Dress Form from SVGcuts.com. The matchbox is a SU Matchbox die. The finished size is 2" x 2-3/4". This is the top view.
On the side of the box: SVGcut.com words from their Sew Crafty SVG Collection:
 And on the matchbox pull out: a vintage button used.
 Another view:
 Inside the box are metal dress form clips with red card stock used to line the bottom!


Hope you enjoyed this project - it was easy to make.  Have a crafty day................

Wednesday, December 2, 2009

Wicked Challenge #2 Matchbox Tag Holder

Welcome back again today for the 2nd December Wicked Challenge #WKD1209B. Post your versions of this box to the Split Coast Stamper. I made this project (finished size 5"x 5") which contains (4) drawers with tags. The drawers can also be used for candy treats, too.
Here are the tags in each drawer:

Side view of project:

Underside showing wooden feet:

How the project was made:
(2) 5" x 5" Real Red CS: top/bottom of box
(1) 4-3/4" x 4-3/4" Whisper White CS for top of the box
(1) 4-5/8" x 4-5/8" Christmas Cocoa Flocked DSP for top of box
(4) Matchboxes: Real Red CS for covers, Whisper White CS for drawer

Below shows the position for each completed matchbox: the drawers are marked with "*"
Assemble the Real Red CS Covers: Be sure to use sticky tape

Assemble drawers except for one end. Pierce center of drawer, push through Rhinestone Brad. The inside of brad prongs will be concealed with the drawer tab.

Position the (4) completed matchboxes, apply sticky tape as shown. Place (1) of the 5" x 5" Real Red CS on top.
Using Mini Glue dots, adhere 12mm red wood beads to each corner.

Top of box: Apply Tombow adhesive to the "cheer". Adhere Flocked DSP to Whisper White CS.

To make bow: Cut enough ribbon as shown for the width of the top as well as for the bow. The Jumbo Brad will be positioned on top of the bow, with the prongs wrapping around BOTH the bow and the one across the width to create a "tied" look. Last step: adhere the completed bow to the back of the 2 layers (Whisper White and flocked DSP using snail adhesive. Add dimesionals to the back, then adhere to the Real Red CS. Complete the box by applying sticky tape on top of the matchboxes, then push down the top and the box is completed.

The Tags:
The front of the tag is shown on the left and the back which is co-ordinating "to/from" tag is on the left. By adhering these two tags together, they are more sturdy than being single layer CS.
(3) of each tag as shown is needed for each drawer. Use silver elastic cord for the string. Cut a 5-1/2" long silver elastic cord, knot, thread through 1/16" punched hole at top of the ornament.

Supplies:
  • Stamps: Delightful Decorations, Christmas Punch (Level 2 Hostess)
  • CS: Real Red, Whisper White
  • Ink: Real Red, Chocolate Chip, Old Olive
  • Accys: Su Exclusive Matchbox Die, SU Exclusive Join in The Cheer Sizzlits Decorative Strip Die, Fire Square Rhinestone Brads, 1" Double Stitched Real Red Grosgrain Ribbon, White Jumbo Brad, Sticky Tape, Dimensionals, Silver Elastic Cord, 1/16" Hand Held Punch, 3/4" Circle Punch, Boho Blossoms Punch, Scallop Oval Punch, Tombow Adhesive, 12mm Round Mini Glue Dot, ed Wood Beads (non SU)

Thank you for dropping by today......stay tuned for the 3rd Wicked Challenge tom..............HUGS!!!

Friday, May 8, 2009

Matchbox Week: A Box for Her

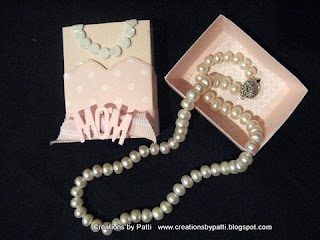
There are 2 versions of these boxes: one for any other event and one with "Mom"


Inside contents: WOW - a string of pearls!

Here are the pieces to make this project:

The "dress" was hand drawn - a template was made and used to cut the dress.

For the dress, use 2 way glue pen on the edge. Apply Dazzling Diamonds - allow to dry.

With a pencil, draw a light line to follow for the necklace. Place the round dimensionals dots along the line. DO NOT glue down the dress yet.....wait until the box is put together!

Here's a photo of the adhesive dots. The shape of the necklace is completed. Discovery! Wow - simply add the dazzling diamonds to the dots because it already has glue on it!

Complete the basic matchbox cover. Add adhesive to the dress and start to wrap around the matchbox cover. If you try to apply the dress before this step, you will find some "bubbles" -so don't do that! Lastly, add the ribbon
Supplies:

  • Stamps: none
  • CS: Blush Blossom, Pink Pirouette Pattern Designer Paper
  • Ink: none
  • Accys: Big Shot Matchbox Bigz XL Die, Big Shot Billboard Alphabet Die, Tombow Adhesive, Dazzling Diamonds, 2 way Glue pen, 5/8" Striped Grosgrain Ribbon, Sticky Tape, Round Dimensional Dots (non SU)

Thank you for stopping by................next week we will take a little break from the matchbox category.

Thursday, May 7, 2009

Matchbox Week: A Box for Him

This matchbox is for "him".

Inside the box is an old watch. This is the kind you wear in tour trousers in the "old" days. This one, in fact, belongs to my DB (Darling Boyfriend) Grandfather. This box can easily be changed into a Tuxedo for a wedding event.

Dimensionals are added behind the collar and tie. I added another layer for the knot in the tie. A Close-up:

Here are the components to make this project:

Pierce, then apply Rhinestone Brad to tie.

Supplies:
  • Stamps: none
  • CS: Whisper White, SAB Designer Paper (retired), Bashful Blue, Ballet Blue
  • Ink: none
  • Accys: Big Shot Matchbox Bigz XL Die, Big Shot Naturally Serif Alphabet Die, Rhinestone Brad, Tombow glue, Sticky Tape, Dimensionals

Thank you for stopping by today...................."she" version tom........so stay tuned.

Wednesday, May 6, 2009

Matchbox Week: Faux Alligator Clutch

This uses the "faux alligator skin" technique which is on Jackie Topa site: http://www.jackietopa.typepad.com/ Be sure to also visit my friend Deb at http://www.heydeb.blogspot.com/ who also has a couple samples of this technique posted 4/27/09. This is the front of the clutch - remember it's also a matchbox.

The back of the clutch:

Inside content:

Use sticky tape for the flap and front:

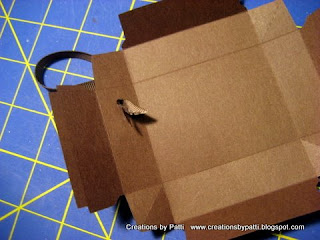
The pieces to make this clutch (Alligator texture already completed):

Attach ribbon: Thread through 1/8" hole (1 layer only). Apply adhesive to ends.

Supplies:
  • Stamps: none
  • CS: Chocolate Chip
  • Ink: Versamark
  • Accys: Big Shot Matchbox Bigz XL Die, 1/4" Chocolate Chip Grosgrain Ribbon, 1/8" Hand held Punch, Clear Embossing powder, Bone Folder, Filigree Designer Brads, Piercer, Dimensional, Sticky Tape.

Thank you for stopping by today.............Hugs!

Tuesday, May 5, 2009

Matchbox Week: Camera Matchbox

I used my own camera for inspiration! The front: (2) 1/4" Circle punches on the left side of the lens (which are 1-1/4" + 1-1/2" Circle Punch). The "flash (5/8" x 1/2")" has a dimensional behind it and "view finder ( 3/16" x 3/16") are hand cut. Top of camera: 3/4" punch + 1/2" punch used along with 1/4" punch positioned as shown.

Yes, even the back of the camera has a display (1-3/4" x 1-3/8", use corner punch on each corner. The button is a 1/2" Circle Punch + (2) 1/4" punches. The Slot punch is in the upper right corner. The "view finder" is the same size as the one in front of the camera.

Here's what's inside: Photos!

Here's the accordion folded Black & White photos. It is 2-1/2"x11", score @1-7/8". Edges are sponged with black ink. The Pink hearts complete the project.

The project supplies:

Yes, sponge the edges using black ink:

Make a template (shown in pink) to ensure even lines using a white gel pen.

Supplies:
  • Stamps: "Say Cheese" (non SU) unknown supplier
  • CS: Black, Going Grey, Basic Grey, Brushed Silver, Pretty in Pink
  • Ink: Black
  • Accys: Big Shot Matchbox Bigz XL Die, 1-1/4" Circle Punch, 1-1/2" Circle Punch, 1" Circle Punch, 1/2" Circle Punch, 1/4" Circle Punch, 3/16 Corner Rounder, Horizontal Slot Punch, Heart to Heart Punch, White Gel Pen, Stamping Sponges, Dimensionals, Sticky Tape.

Thank you for stopping by today.............hugs!

Monday, May 4, 2009

Matchbox Week: Chanel Bag

MORE MATCHBOXES - WAY TOO MUCH FUN WITH THIS DIE!
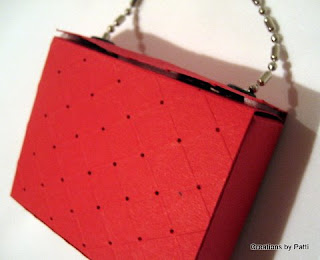
Here's my version of a small "faux" quilted bag I had to try. The flap on the bag is for looks only - it is not functional. This matchbox die amazingly looks larger in a photo but the finished size is 2" x 2-3/4" x 3/4".

Inside contents:

Chain is threaded through eyelets at the top of the flap:

Back of purse is also "quilted".

To make purse:
-cut chain: 7" long without the "connector" as shown.
-Cut Lid: size is 3" x 2-2/4", score 3/4" along the 2-3/4" side. Punch with 3/16 Corner rounder on 2 corners.
-Score both the lid and the Matchbox Cover 3/8" apart at a 30" angle. The Score-pal was used.

Here is a photo of the scoring and piercing template I made.

Using a piercer, piece through intersections.

-Use Large Black eyelets and position 1/4" from edge. (oops, forgot to pierce in the photo!)

-Thread chain through eyelets. Secure chain "connector" with glue dot on to the lid so it is not visible after flap is secured with dimensionals.

-Complete matchbox cover, then adhere lid.
-To keep the purse flap down, add dimensional (photo is missing this step).
-Use Designer Label punch + 1" Circle Punch for the Chanel Branding.
- Use 2 "C"s from the Big Shot Natural Serif alphabet die.
Supplies:
  • Stamps: none
    CS: Real Red, Brushed Silver, Black
  • Ink: None
  • Accys: Big Shot Matchbox Bigz XL Die, Big Shot Naturally Serif Alphabet Die, Designer Label Punch, 1" Circle Punch, Dimensionals, Sticky Tape, Piercer, Chain (non SU), large Black Eyelets (non SU), Crop-o-dile, Mini Glue dot.

Thank you for stopping by today..................