Showing posts with label Cakes and more Cakes. Show all posts

Wednesday, November 20, 2019

Mickey Pop Up Birthday Cake Card

This A2 size Pop Up cake card is using Karen Burniston Cake Pop-up Die. Papers used for this card are from my stash: all Disney color inspired! 

Front cover: Mouse hat with sentiment is an Ali Express die cut 3 times, stacked to create a chipboard effect embellishment. Mickey balloons are a SVG cut file from Miss Kate Cutables using my Silhouette.  The Mickey balloons were used but the curly strings were from another cut file. Use a white gel pen to highlight the ears and balloon sides.
 Open the card slowly to reveal:
 Here it comes:
 It is a pop up cake!
 A better view:
Bottom layer of cake is red card stock, middle layer is black card stock, and top layer is white card stock. Mickey hands, shoes, and hat are dies from Ali Express. They are cut twice to be more sturdy.  A 4" paper doilie is under the cake. 
 The "wish big" message and name is cut using the free Walt Disney font. 
 A Mickey balloon:
Bottom right side with another Mickey balloon and name cut using the free Walt Disney font.
 card back: a punched Mickey 
 Thank you for stopping by today to visit. Have a crafty day.


Monday, November 4, 2019

Happy Birthday Cake Pop Up Card

Made this pop up birthday card for a special birthday. Paper used from my stash.   
Dies used:
La-la Land Die: Balloons (and swirls)
Karen Burniston Cake Pop-up Die used to make this card A2 size card. 
Happy Birthday die from Ali Express
This is the card front:
Slowly open the card to reveal a cake in the center fold:
Card opened:
A closer look at the cake: Cuttlebug Swiss Dots embossing folder used for the cake sections.
Wish Big word: made using my Silhouette
Balloons and swirls on the top left corner:
"ray" name made using Quickutz dies (retired). Gift Box border die from Ali Express.
Thank you for stopping by today to visit. Have a crafty day.

Monday, October 7, 2019

Baby Boy Shower Cake and Banner

This project was fun to execute. A Animal Diaper Cake and baby themed banners decorated the room.Of course, there were blue and white balloons, too. 

Cut images: from the Silhouette store. Size approximately 2-3/4" high.
Pig: used Stampin-Up Pretty In Pink card stock. Recollections Black, Pink Collection.
Dog: used Core-dinations Chocolate Lovers shades of Brown. Scrap Blue card stock.
Tiger: used Recollections Grey Kraft, Black,Orange, and Melon card stock.
Lion:  used Recollections Gold, Orange, Black, and Lt. Orange from my stash.
Hippo: used Recollections Grey Kraft, Black, and Neutral Pack, Stampin-Up Basic Grey
Monkey: used Core-dinations Chocolate Lovers shades of Brown.
Giraffe: used  Core-dinations Chocolate Lovers shades of Brown, Recollections Orange and Pastel Yellow.

Welcome Banner:
Baby bottle cut file from the Silhouette Store. Bottle size: 6"x10-1/2". Words are using Ariel Font. Size approximately 3-3/4" x 4-1/4", double mat with foam tape to pop them. Each side of the bibs have the parent's Asian Horoscope Animals: Dog and Pig.  String the banner using 3/8" grosgrain ribbon.

Bib: SVG file was altered as shown.  Double matted.  Size 5-1/2" x 5-1/2".  Animals used are from the Silhouette store.  Size approximately 2-3/4" high. Add a tied blue grosgrain bow.
Here's a closer look at the baby bottles and the baby embellishments from the Silhouette Store..
On the right side banner is the pig image.
Baby Boy Banner:
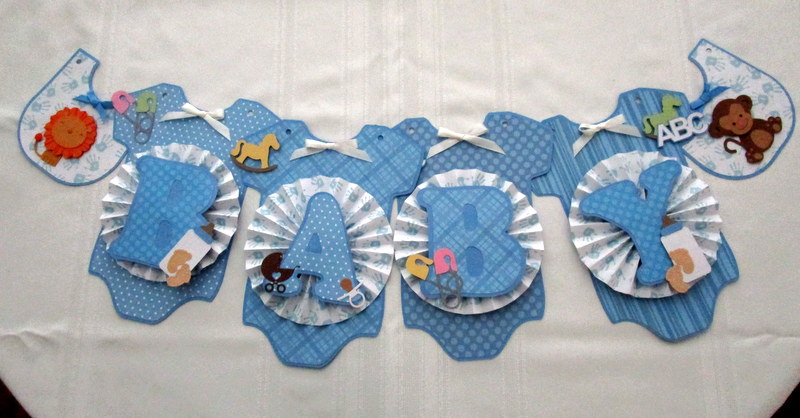
Onesies and Bibs are cut files from the Silhouette Store. Solid blue paper from Bazzil Wildberry Pie. Designer papers used: Core-dinations Lt. Blue Plaid, Lt. Blue Large Dot, Lt. Blue Small Dot, Lt. Blue Stripe and Darice Lt. Blue Large Dot. Onesie size 8-1/4"x 10-1/2". Designer paper pinwheel are made with (2) 3" x 12" strips using Joann's open stock American Crafts Baby Hands, scored every 1/2", attached together, then hot glued onto the onesie.  Letters are included in the Baby Things cut file from the Silhouette store are hot glued onto the pinwheel. Letter size: 4-1/2" x 4-1/2".  String the banner using 3/8" grosgrain ribbon.
Cake: a total 78 rolled Pampers New Born diapers used for a 12 round chipboard base. Pampers is totally white with no decorations except at the waist which is hidden when rolled.  1-1/2" wide gingham ribbon around the cake layers is from Michael's.  There are many You Tube videos on how to make these cakes.  Blue Baby Rattles were purchased from the Dollar Store. Front of the cake bow centers have important Asian Horoscope animals: Pig (for the child), Pig for the Mother, Dog for the Father. Newborn size socks (purchased from Ross) are rolled to become flower buds, then scattered on top of the cake edge.
Back view of the cake:
Cake topper is a cut file from Miss Kate Cutables: print and cut the file instead of cutting the pieces separately. Secure to cake top using short wooden skewers being careful not to puncture the diapers. Crochet Bear on top of cake purchased from Target Stores.
Water Bottles: Computer generated using light blue ink, then punched using 1-1/2" Circle EK Success Punch.  Scallop mat is using CC Designs Scalloped Circles Die CC004.  Designer paper is from Joann's open stock American Crafts Baby Hands paper cut 1-1/2" wide strip around the bottle.
Edible Rice Krispi Bears: add a hand cut white card stock diaper using sticky tape and tie a 3/8" wide blue ribbon around the neck as the departing party favor.
Posting the Crib Baby Card soon.  Thank you for stopping by today to visit. Have a crafty day.

Monday, December 18, 2017

Birthday Cake Explosion Box

This project was previously posted on my blog on April 14, 2014. The Birthday Cake Treat box is a SVG cut file is from SVGcutting. Papers used are from my stash. Lid is 2" x 6" x 6". Finished box size 6" x 6" x 6".  Stamp used on tag is from Lawn Fawn Just for You 
Side view of lid:
Here's a closer look at the bow: EK Success Slim Scallop punched "ribbon" width is 1". Bow is made using 3 loop sections and one loop for the center. Each layer is stapled, then attached using glue dots.
Remove the lid to reveal a paper cake inside:
Paper hat has a computer generated name.  Ribbon Ruffle around hat is gathered using a needle and thread. Final touch: a pom pom at the hat tip.
"Happy Birthday" is computer generated to be positioned around the cake tops.
Remove the cake to reveal some Hershey kisses with stamped messages from Jaded Blossom Birthday Candies.
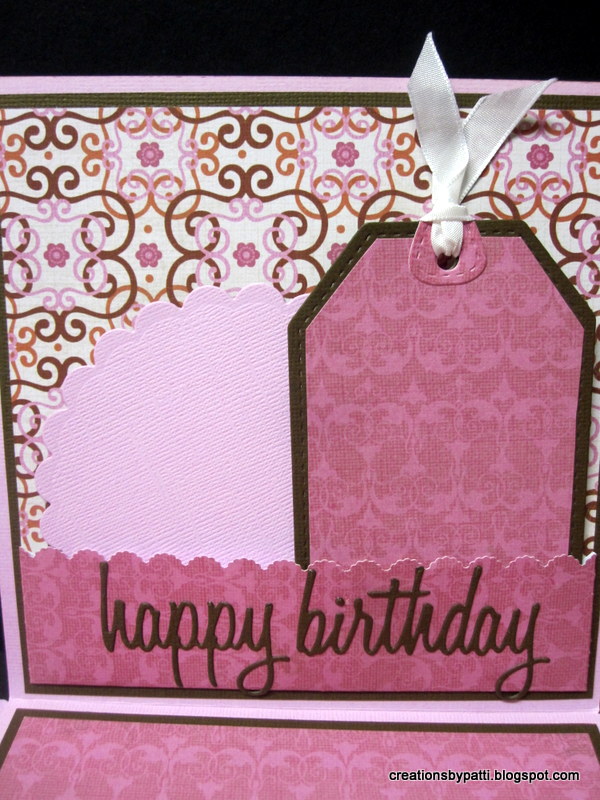
Photos of the inside pocket with tags and die cut message: EK Success Slim Scallop punch used for the pocket tops. Each pocket has a 4" Scallop circle, a tag.  
Dies used for inside pockets:
La-la Land Crafts Stitched Tags die
Sizzix Celebration Words: Script
Sizzix Adventure Words: Script
Jaded Blossom Stitched Circle Dies
Lawn Fawn Scalloped Circle Stackables
Cake underside with wooden feet:
Thank you for stopping by today to visit. Have a crafty day.

Friday, July 18, 2014

Frozen Explosion Box

I had made a Frozen themed project "Are you Ready to Make a Snowman" previously posted hereThis one is an explosion box style.  Finished project size if 4" x 4" x 4" - that means it uses (1) sheet of solid card stock and (1) sheet of decorative paper (for the inside). The lid was made slightly larger (+1/8") to accommodate the thickness of the inside embellishments. Simple popped up double mat on the lid is a good finishing touch.
Lid top, double mat with some blue and silver card stock - this is that inexpensive thick stuff from Michael's.  An adhesive rhinestone is in the center.
Computer generated message. Label is made using Stampin-Up Framelits Label Collection. The lined with some Star Dust Stickles
 
Remove the lid to reveal: a cluster of blue balloons in the center:

Remove the balloons to reveal that Silver chipboard snowflake:

Start to unfold the various layers, starting....................to reveal..................
Olaf has very small googlie eyes which were the perfect size.  These eye gave him so much character and fun! Isn't he cute?
Keep unfolding the sections: 
Third section: 
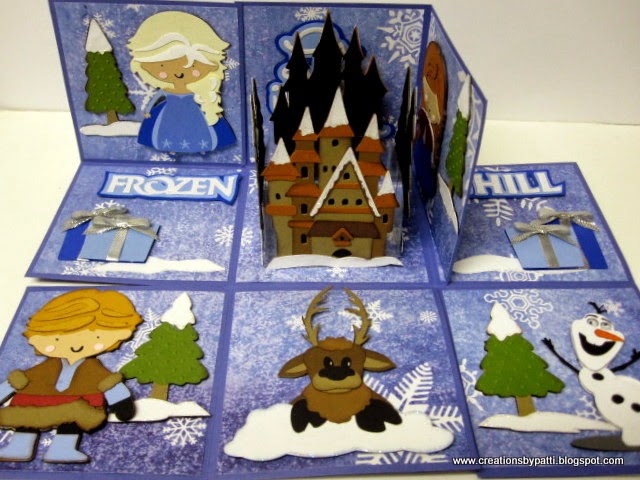
Here all the flaps are unveiled to reveal all the 3-1/2" tall characters.............looks great!!!! Especially cool is the Arendelle Castle which is held up with a actetate lid that has magnetic tape. The acetate really gives it a 3D effect. To hold the acetate box in place, there is also a small magnetic square in the underside of the snowflake (so it is hidden) and on the center section.
When all the characters are removed, the magnetic strip is seen here.............very ugly.  But this way, the characters can be position on any metal surface (like a refrigerator). Cool? The only elements that do not have magnetic strips are the presents.
So I finally figured out to cut the backs with black so the magnetic strip is not so "ugly" - well, forgot to do that to the blue ones......oh well.
Here you can see the acetate box created to hold the Arendelle and the trees. Magnetic strips are attached to the acetate box and in the center of the lid is that famous snowflake where all the fun skating is done in the movie. Yes, the castle also has black card stock backs.
This is the outside of the box with some randomly placed card stock glitter snowflakes:
Thank you for visiting today and I hope you are inspired to make a Frozen project of your own......details on how this box was made:
Sizzix Snowflake #3 Original Die
Recollections Silver Glitter Card Stock
Snowflake pattern paper was found in a clearance bin - reference not noted.
SVG Cut files used:
Lettering Delights Ice Princess Cut It Set and Ice Princess Party Cut It Set found here.
Olaf is from PPBN Designs SVG cut file called Happy Magic Snowman found here
Sven is from Treasure Box Designs SVG cut file called Let It Go found here

Paper: Card base and envelope cut using Core-dinations Canvas Texture Oceanic, Bazzil textured Lt. Blue, Recollections White and Kraft..........balance colors used are scraps from various Recollections color packs.

Ink: Brown and Lt. Blue - any brand will be OK

Star Dust Stickles
Magnetic 3/4" tape by XyronEK Success
Cuttlebug Swiss Dot embossing folder