Showing posts with label Hero Arts. Show all posts

Friday, June 14, 2013

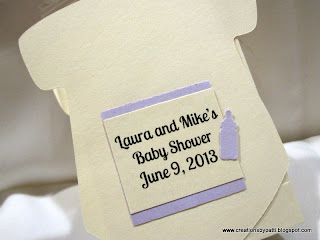
Onesie Party Favors

Updated 6/16/13: see below in red
A quick and easy party favor for the family. I made 28 of these.  Finished size of this treat is 3-1/4" x 3-1/2" x 1-1/4" and will hold (1) individually wrapped Madeline cookie and (1) Ghiradelli Chocolate Square. Since we did not know if she was having a boy or girl: pastel colors are chosen in Lavender (Recollection's Purples), Yellow (SU Barely Banana), Light Green (SU Certainly Celery) Memento Black ink and Hero Arts Stamp & Cut Onesie.  Th cute little punch and embossed teddy bear is a Martha Stewart Punch that is popped with foam squares and embellished with 1/8" satin ribbon..................fun to tie a bow so small. The bows are attached using Glossy Accents.
 Here's the treats in the box: yummy
A closer look at the lavender one: each onesie is embossed with Cuttlebug Swiss Dots Embossing Folder. Base of the treat box is Recollection Vanilla card stock.
 The Lt. green one:
 The Lt Yellow one:
 Back of the treat box: Computer font used is "Lobster 2" and  a Marvy punched baby bottle
To make the box (middle section): here's a side view photo.  Cut a strip of card stock 2-1/4" wide x 7-1/4" long.  On the 7-1/4" side, score 2-1/2", 4-3/4". Rotate paper, then score on the 2-1/4" side 1/2" , 1-3/4".   You will need to cut slits at the 2-1/2" score line to make a "u" shape for the box.  Apply tape or glue to the 1/2" sections. Attach the onesie to the "u" shape.

A look at the Hero Arts "Stamp and Cut Onesie " Set used:
Updated 6/16/13: note the stamp+ die was purchased from a recent warehouse sale at Hero Arts. It was made exclusively for Archiver's.
Hope you are inspired to turn any of your stamp sets into treat boxes...............just create that "middle section and you are well on your way................happy day to all!

Friday, January 28, 2011

Chinese New Year Card - a RED one

On Wednesday, January 26, I posted my first "Sliding Pop-Up" card and this is now the RED version. I like both colors. This one I decided to give the "base" a little more stability by cutting a black Matt on top of the real red (see photo below) and I added a 5/8" wide Gold Organdy ribbon. I followed the colors int he Washi paper scraps I had to make this card. Experimenting with several Copic colors was key to co-ordinate the clothing colors. Gold Smooth was added to the flowers and to the boy's hat/buttons (very subtle and does not show in the photo). Instructions for this card are on Kim Score's blog (http://www.paperaddiction.com/) or on Split Coast resource section.

Here's a closer view of the two children.....................


Slide out the back to reveal stamped message on Real Red with a Gold Modern Label punched piece. (I would have used "celebrate" but had some trouble trying to find the stamp........urgh!!!! I know i have one around here somewhere). The back piece is black card stock with gold flower embossing.


Side view:


Copic colors used:

The same "tools" were used from the card posted on 1/25/11: Calendar Cricut cart cut at 2", Cuttlebug Asian Embossing folder, 1" circle punch, Word Window punch, and "enjoy" from the SU On Your Birthday stamp set. and the doll images are from Hero Arts. The Flower is from Oriental Trading.
So I hope you enjoyed this RED version, too.....................have a great weekend. More Asian themed cards coming soon.....................

Wednesday, January 26, 2011

Chinese New Year Card

A quick posting:
Here's a great card for the 2011 Chinese New Year. This card style is called "Sliding Pop-Up Card" - see the video tutorial on Kim Score's blog (http://www.paperpunchaddiction.com/) or at Split Coast Stampers in the Resource section for all the specific details. Certainly Celery and Lavender Lace (retired SU) card stock was used because it co-ordinated with the colors in the Washi paper. The words "Chinese New Year" is from the Calendar Cricut Cartridge cut at 2". The Certainly Celery is embossed using the Cuttlebug Asian Folders.

And, when the card is pulled forward: reveals the stamped flowers using Versamark ink (stamp from Oriental Trading) and the message to "enjoy" the celebration. The Modern Label Extra Large Punch and Word Window Punch were used..stamp "enjoy" in Black ink. The 1" circle punch is used for the "pull".

And here is a close-up of the two images. They were colored using Copics. Some Gold Smooch was painted on the center of the flowers in the little girl's hair, the flowers on her dress, the front of the boy's "frogs" and his hat. I forgot to keep track of the colors used - sorry about that.
I do hope you enjoyed this posting and will hop on over to Kim's tutorial or Split Coast Stampers.
Gotta run..........................off to make a red (of course) version.............so stay tuned.

Wednesday, July 1, 2009

Fan Fare!

This project was inspired by a couple fellow bloggers: Barbara ( www.whimcess.blogspot.com) for her fan card and also Lysa ( www.Lysaq.blogspot.com) for her many cards using the Hero Arts Asian Dolls stamp set. Here is the fan card opened (finished 5-1/4" x 9"). I really love love love this one...............

This is the fan closed: Finished fan size: 5-1/4" x 2-1/2" (fan closed).

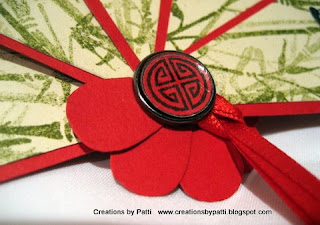
Close up of the fan embellishment - it is SU's Build-a-brad. How to use the build-a-brad? Stamp the image, use a 1/2" circle punch, apply mini glue dot to the punched image, apply the clear disk on top - done! Doesn't it look great (and expensive?)?

Some details:
  • Fan template: free from Victorine Originals (http://www.victorineoriginals.com/)
  • Below photo shows the printed template. Cut one in card stock (Yellow color) and one smaller for the "lining" (Pink color)
  • (5) fans and (5) fan liners were used for this project
Stamp all the Naturals Ivory card stock using the Bamboo background. Old Olive SU ink used, There is a 2nd and 3rd generation (stamping off) to obtain the lighter color effect.

Stamp Asian Dolls - (5) are needed...........(1) boy.
Here are the Asian Dolls all colored using Copics. Gold "Smooch" was used sparingly on the dress flowers and flowers in the hair. It is a nice touch! This special "Smooch" can be purchased from Krazy Creations in Novato, California (http://www.krazykreationsstudio.com/).
Here is a list of the Copics used:
Supplies:
  • Stamps: Asian Dolls (Hero Arts), Asian Symbol used in Build-a-Brad(unknown), Bamboo (unknown)
  • CS: Real Red, Naturals Ivory
  • Ink: SU Old Olive, Momento Black Tuxedo
  • Accys: 1/8" Red Satin Ribbon (non SU), Build-a-Brad, Mini Glue Dots, 1/8" Circle Punch, 1/2" Circle Punch, Gold "Smooch" (non SU), Copics (non SU)

Thank you for stopping by today for this fun project.......XOXO.........

Friday, May 22, 2009

Asia Week: Chinese Girl

Have a great weekend everyone!

This one is my absolute favorite - she's all decked out in red! My favorite color! In fact, I have one of these outfits that my Mom saved and it is still in great condition! I only wore it once. Again, Copic Markers used to color her.

A Close up: Back ground of card is using clear embossing powder. The 2nd layer of Red is using black ink for the flower. Dimensionals are behind the Black and Whisper White card stock. Those Summer Sun flowers have crystals for the centers attached by using Tombow glue and are randomly placed on the card. Note W1 Warm Grey Copic is used to outline this girl. So sutble.

Copic colors used for this project:

Supplies used:
  • Stamps: Hero Arts Asian Dolls, "Happy Birthday" is from SU On Your Birthday, Eastern Blooms
  • All SU CS: Real Red, Black, Whisper White, Summer Sun
  • Ink: Momento M-900 Tuxedo Black, Versamark
  • Accys: Clear Embossing Powder, SU Trio Flower Punch, Nestibilitities Tag Die, 3/8" Red Satin Ribbon (non SU), Gold Crystal sparklies (?), Dimensionals.

Thank you all for stopping by today and I do hope you enjoyed these Asian cards. I love how they turned out. I will work on better photos of them.

Asia Week - Chinese Little Sister

Copic Markers used to color this Little Sister. She is so cute. I didn't have pink Copics so she is in shades of Purple. She still is cute!
Close-up showing the outline of the Little Sister using W1 Warm Grey. The Cherry Blossoms are stamped using Black ink. Dimensionals are behind the Lavender Lace, Black, and the Scallop Oval.

Close-up of the message. The punched red flower has a sparkly purple center to match the sparkly in her hair.

Copic Markers used for this project:

Supplies Used:
  • Stamps: Hero Arts Asian Dolls, SU Eastern Blooms, SU On Your Birthday
  • All SU CS: Lovely Lilac, Lavender Lace, Black, Whisper White, Real Red
  • Ink: Momento ME-900 Tuxedo Black
    Accys: SU Oval Scallop Punch, SU Large Oval Punch, SU Trio Flower Punch, Dimensionals, Tombow Glue, Lavender crystal sparkly (?)

Thank you for stopping by................more to come.........stay tuned for another card..............

Asia Week - Chinese Boy

Copic Markers used to color this little boy.Textured Tempting Turquoise background required sticky tape to be used to adhere to the black card stock. Dimensionals are added behind the Summer Sun and Whisper White card stock.
Here is a close-up. W! Warm Grey was used to outline the boy - it is perfectly subtle!

Copic Colors used:

This is a detail photo of the Tempting Turquoise background. Cool - huh? It is made by "Ten Seconds" and is a "Big Daddy" embossing plate made for metal but I used it for paper - the design is similar to the boy's hat.
Edited 5/22/09: The Big Daddy 3 embossing plate can be purchased from Krazy Kreations www.krazykreations.com

Supply info:
  • Stamps: Hero Arts Asian Dolls, "happy birthday" is from SU Birthday Whimsy (retired)
  • All CS SU: Black, Tempting Turquoise, Summer Sun, Whisper White
  • Ink: Momento ME-900 Tuxedo Black
  • Accys: Dimensionals, Sticky Tape, SU Photo Corners Punch, Ten Seconds Studio Embossing Plate purchased from Krazy Kreations.

Thank you for stopping by................more to come.......