skip to main |
skip to sidebar
Are you ready for the final 8 awesome projects from Day 3 of the LLC Retreat held early November 2015? This was the 3rd Annual La-la Land Craft Retreat held in Pacifica, California. The 2014 LLC Retreat projects were previously posted on my blog starting on Friday, January 23, 2015. Continuing with the theme "Life is Sweet", overwhelmed and exhausted, we still dug into our projects for Day 3.
This is Project #19 for Day 3 of the LLC Retreat: This is a pull out card designed by Debbie Pamment. Her blog is called Debbie P's Place and can be found here. Finished card size is 5-1/4" x 5-1/2".
Fully opened: card finishes 10-3/4" x 5-1/2".
Chickadee Marci is popped with foam squares and of course, her hair is now black (was originally planned with Brown hair). Love the texture created by using Copic markers for the ear muff sand top of boots .
Overhead view:
Front top left side with the Snowflake die and Winter Branches.
On the back card edge: die cut Snowflake Border with added adhesive rhinestones.
Details: All stamps and dies can be purchased on the LLC site here.
Stamps used: Chickadee Marci
Dies used: Stitched Elements, Lattice bracket, Lattice Corner, Small Snowflakes, Snowflake Border, Winter Branches, Celebrate (Club Die)
Thank you for stopping by today to visit............stay tuned for Project #20 from Day 3 of the LLC 3rd Annual Retreat.
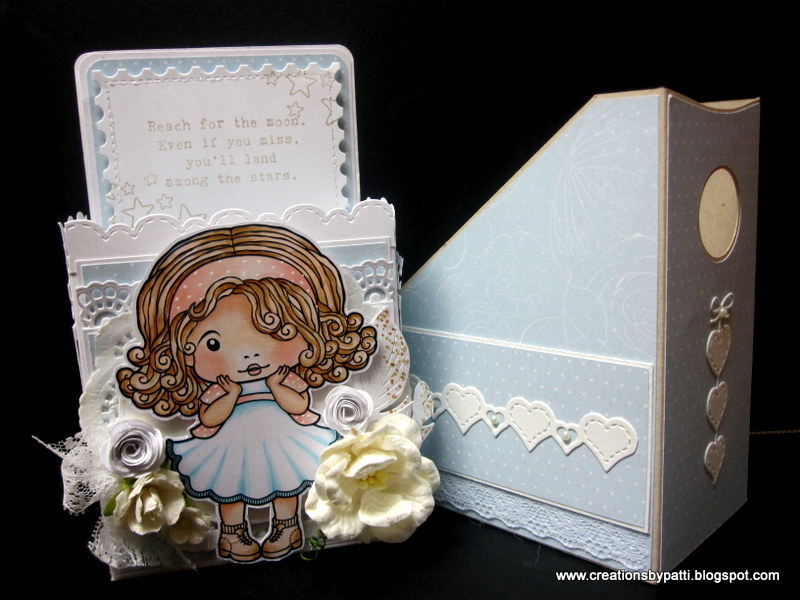
These are the final two projects (Project #17 and Project #18 for Day 2 of the LLC Retreat: A Making Wish Box and Stamp Storage Box shown here both designed by Tamara Potocnik. Her blog Handmade by Tamara can be found here.
Making Wishes Box finished size is 3-3/" x 2" x 6-1/2" - use this box to hold many wishes or packaged treats.
Side view:
Shy Marci colors to use were given to us at the retreat using Distress Markers. Copic Colors used in place of the Distress Markers as follows:
Sweater, hairband, Socks: R11, R20
Dress: B00, B01
Hair: E01, E31, E35, E37
Shoes: E01, E31, E35
Use a Sakura White Gel Pen to make "dots" on her hair band and sweater.
Box inside is lined:
Left side: Stardust Stickles added to the paper flower and die cut Rolled Rose. Tuck a lace bow underneath the paper rose.
Right side: Stardust Stickles added to the paper flower and die cut Feather and Rolled Rose.
The stamped message is popped with foam squares:
Stamp Storage Box showing stamps stored. Finished size is 4-1/4" x 2-3/4" x 5-1/2"
Side view:
Back view:
Box inside:
Details: All stamps and dies can be purchased on the LLC site here.
Making Wish Box
Stamps used: Shy Marci, Sentiment "Reach for the Moon" and Stars (January Club Kit)
Dies used: Postage Stamps, Snow Globe, Feathers, Small Lacey Border, Mini Scallop Border (April Club Kit)
Stamp Storage Box
Stamps used: none
Dies used: String of hearts border, Hanging Hearts & Love Word, Stitched Elements
Thank you for stopping by today to visit............stay tuned for the final seven Projects from Day 3 of the LLC 3rd Annual Retreat.
Day 2: Project #16 Capture Memories Tag Album designed by Sandie Dunne. Her blog is called The Paper Cove and can be found here. Finished project size is 5" x 3-3/4" x 1-1/2".
The cover is embellished with die cut film strips in black and white card stock with a photo square as a mat. There is also a black card stock die cut camera. The stamped message on the flag is oh so appropriate. Die cut two layers of the heart and word "smile", adhere for that finished chipboard look on the flap. The flap has a magnetic closure and slips behind popped Marci image.
Marci is popped with foam squares. Original design is a black and white coloration. I chose to Copic color Marci for this projects. Color details used:
Hair: W2, W4, W6, W8
Hat, Shoes, Purse: E37, E31, E35, E41
Face: R11, R20, E000, E00, E11
Top: BG000, BG45, BG49
Skirt: W0, W2, W4
Back view:
On top of the project is a crushed vanilla seam binding and twine embellishment. Use a Crop-o-Dile to punch holes through all the layer of paper.
Slide open the magnetic closure flap:
........to reveal six top loading pockets. Each pocket has a different pattern paper.
On top of each pocket is a stamped "Date taken".
The mat inside the pocket has a die cut 1-1/2" Stitched Circle with a twine. The binding method used for this project I believe, is called a "hidden hinge" since the pages are secured in between the pockets.
Here's a side view:
Details: All stamps and dies can be purchased on the LLC site here.
Stamps used: Marci with Camera, Photo Elements Stamp Set
Dies used: Stitched Circles, Photo Elements, Smile
Thank you for stopping by today to visit............stay tuned for the last Projects (#17 and #18) from Day 2 of the LLC 3rd Annual Retreat.
Day 2: Project #15 Cupcake Princess Marci Album Box designed by Irina Blount (Owner and Queen Designer) of La-la Land Crafts. See the LLC Blog here with lots of inspiration and ideas. This is an album with two drawers attached to the back cover. Album pages are Kraft card stock base. Project size finishes 8-3/4" x 6-1/2" x 2-7/8". There are lots of die cut embellishment on the cover and spine. Note the metal embellishment on the top right and right bottom corners. Lots of photos below with details of the dies used. And, I mean there are lots!!!!
Here's a side view showing the spine: a row of decorative paper, a row of lace then on top a row of sheer roses. Oh yes, a couple die cut Stitched Circles and Stitched Scallop Boarder on each side of the lace with a metal embellishment secured by brads. the metal embellishment needed to be cup to fit across the spine.
On the front, two die Teacups: adhere one to light weight chipboard on top of a white doily. Use a bone folder to shape the cup so it is no longer flat, then secure to the front. You can see the Stitched Scallop Border on both Teacup Edges. A few paper roses/calla lilies and die cut paper Rolled Roses further embellish the larger Teacup. The second teacup sits on top of the larger one. Die cut Fancy Butterfly sits on top of a die cut Fancy Butterfly in pink vellum card stock on the smaller Teacup - then add adhesive pearls as a finishing touch.
On the right front is a faux closure: metal embellishment secured with brads and a metal ring handle. This sits on top of the die cut Stitched Circles which wrap around to the inside front cover.
On the top left side is a metal Tea- spoon wrapped with a crumpled seam binding and a twine bow : a perfect embellishment for this album box. Notice the smaller sizes Stitched Circles position here, too? They also wrap around to the inside cover.
Cupcake Princess Marci is popped with foam squares. She sits on top of the die cut Diamond Doily Border, Heart Fence and Grass.
Copic original colors used changed to the following:
Hair: W2, W4, W6, W8
Dress and shoes: R01, R32, R35, R37, R39
Crown, and Scepter: Y21, Y24
Cupcake: R11, R20, R32, R35, E13, E17, E51 and Sakura White Gel Pen
Cup: R35, R37, R39, G07, Yr 21, YR24, YR31
Stardust Stickles added to flowers, crown, cupcake liner, lace on her dress, and scepter.
Overhead view of the album box:
Front view of the album box:
One of the drawers pulled out: LOVE the metal pulls
The following photos are the pages in the album box: inside front cover is a pocket
The punched circle cupcakes for tabs:
randomly sizes album pages:
Pocket with pull outs:
Even some printed acetate pages:
A flip out and flip up page:
Back inside cover:
Back album box cover:
Details: All stamps and dies can be purchased on the LLC site here.
Stamps used: Cupcake Princess Marci
Dies used: Stitched Circles, Heart Fence, Grass, Diamond Doily Border, Rolled Rose (medium), Teacups (set of 2)
Thank you for stopping by today to visit............stay tuned for Project #16 from Day 2 of the LLC 3rd Annual Retreat.