The lid: the only place card stock was used is stamping the flower in Whisper White, Rose Red, and Soft Sued. The Sahara Sand shown under the punched flower is from the file folder scrap. The center of the flower is also a scrap from the file folder, punched using the 1/2" Circle Punch, placed onto Build -a brad. Looks great popped with dimensionals.

Remove the lid to reveal the 1st layer in Sahara Sand CS. I Heart List is stamped on index cards (which were cut down to 3-3/4" x 3-3/4") wrap the index cards with scrap file folder strip, a Mini Library Clip and a punched Heart)

Continue to open up the box to reveal the other trays: "Things" to Buy", Rubber Bands, and Claw Clips. On the sides of each tray are stamps words: I {Heart} Lists, Things to buy, Odds and Ends, Etc. - all of these are stamped using Staz-On Black ink on File Folder Scraps, then punched out using the Modern Label Punch, adhered to the tray using snail adhesive.

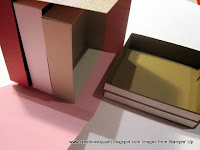
Closer view of Tray #1 and Try #2:

Left Photo: shows the 3rd and fourth trays.
Right Photo: measurement for the lid is 6-1/8 x 6-1/8, score around all sides 1".


Left photo: Optional way to cut the lid is to position the fold line of the file folder as shown and cut measurements.
To make the wrap around sides (photo not shown), cut a 4" x 17" strip from the file folder, score @4", 8", 12", 16" - set aside.
Right photo: Inside Tray measurement is 5-7/8" x 5-7.8", score 1" around each side.


Left Photo: adhere sticky tape to the lid areas
Right photo: cut and add sticky tape to the box areas.


Left photo: after adding sticky tape to one of the sides, start to attach the bottom tray to the 1st panel.
Right photo: continue to the 2nd panel - attach tray, then do the same for the 3rd panel 3rd tray and fourth panel 4th tray.


Left photo: The tray should look like this.......
Right photo: They should all "sit" on top of each other and slide into each other on top.


Supplies:
- Stamps: With All My Heart, I {Heart} Hearts, I Heart Lists
- CS: Thoroughly Modern File Folders, Rose Red, Sahara Sand, \Soft Suede, Whisper White
- Ink: Rose Red, Staz-On Black
- Accys: Extra Large Fancy Flower Punch, Build a Brad, 1/2" Circle Punch, Modern Label Punch, Heart to Heart Punch, Mini Library Clips, Sticky Tape, Dimensionals
Thank you for stopping by today...............HUGS!!!

I have not made one of these boxes - quite the project - wonderful!
ReplyDeletePatti! Love it! You always step up the challanges of us crafters. Thanks for always inspiring!
ReplyDeleteWhat a gorgeous box! Please check out my blog candy and color combo challenge at: http://www.pictureperfectcreations.blogspot.com
ReplyDeleteAmazing! I can't wait to try this. TFS!
ReplyDeleteThanks for the great idea! I've been wanting to make something with the decorative file folders I've been collecting, and now you gave me a great idea. Thanks, too, for ideas of what to fill it with. That's always stumped me a bit. :)
ReplyDeleteVery nicely done. I think you do a fabulous job with the details. This is adorable closed and open. Makes me want to make one!
ReplyDeleteWhat a wonderful use for SU's file folders!!!! I a inspired one more time by your creativeness. I can't wait to make one! Thank you for the tutorial.
ReplyDeletePatti,
ReplyDeleteThis is awesome! Thanks for sharing all the directions as well. You are so giving and I love your blog!
I love all your projects but this one really caught my eye. Thanks for the inspiration.
ReplyDeleteWow, Patti, awesome! You must not sleep cuz you're always coming up with something complicated and time-consuming that looks utterly gorgeous! Bravo once again.
ReplyDeleteFantasy boxes...ah, so that's what they're called. I too have been wanting to try this for quite a while. Thank you for the tutorial, you make it seem like it won't be as hard to do as I had originally thought!
ReplyDelete