

Left photo: overview
Right photo: side rings decorated with various tied ribbons and a special metal embellishment


Left photo: album back
Right photo: view of inside pages (there are a total of 7 pages)


Left photo: inside front cover, a tag made from the invitation, The first page for the bride & groom's photo
Right photo: turn page over to reveal the veil to hold the bride's photo and the left side is for the brides train. The train is decorated using a elaborate die cut with adhesive pearls.

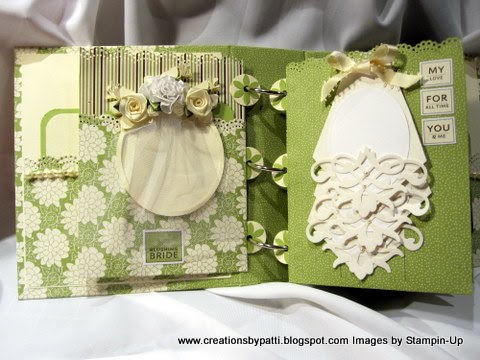
Left photo: pull down each section of the train to place photos on the oval mats
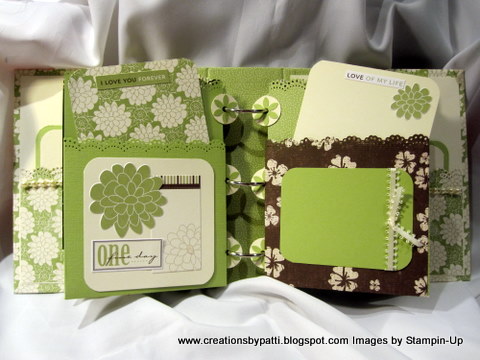
Right photo: turn page to see the ring page and the Groom's page


Left photo: inside the ring page, a tri-fold card for photos and journaling. Inside the Groom's vest shows the shirt which can be pulled out for a photo, tucked in the cumberbund is another photo mat
Right photo: tucked into both sides of the pockets are photo mats for the Maid of Honor and Best man.

Left photo: a basket with little mats for the brides attendants and a garter on the left side along with a photo mat for the Groom's attendants
Right photo: shows the inserts taken out from the pockets


Left photo: closer view of the garter
Right photo: the cake and the toasting page


Left photo: closer view of the cake
Right photo: closer view of the tasting glasses: metal embellishments on the glasses on the gate fold page


Left photo: Cake holds 3 tags, each stamps with special messages. Open the gate fold to reveal sections for additional areas for tasting photos
Right photo: turn the page to reveal pages for the reception photos


Left photo: pull out the tri-fold photo mats on each side to hold reception photos
Right photo: A mat for the new couple on the back of the last page. The back cover page has a pocket containing a tag.


Of course, then a bag had to be made to hold the album: a Kraft bag with some of the "Tie the Knot" stickers. Ticked inside the bag with tissue (finally) is the album................


Thank you for stopping by today.............I hope you enjoyed this post.
Have a great weekend!!!
Patti
ReplyDeleteOMGosh that is simply amazing, awesome, gorgeous, exquisite and wish I was the recipient....You are truly a gift crafter. What an amazing gift....you have to let us know what the bride and groom think? This was a gift or you were hired to make it???
Wow, wow, wow. Speechless...as always! Diana
ReplyDeleteAmazing, Patti! It came out so beautifully and I know they will love it. :)
ReplyDeleteAbsolutely amazing! You are such an inspiration.
ReplyDeleteOne word... BEU-TEE-FUL!!!!
ReplyDeleteHave never seen such a gorgeous and detailed album.
ReplyDeleteYou've covered everything beautifully - this is a treasure.
PJ(Jessie Adams)
Beautiful, wonderful and more... more... You have amazing ideas!!! :)
ReplyDeleteOK Patti, just how long did this take you? It is just beautiful! (I really want to know!)
ReplyDeleteWow, this is awesome. Lovely work and what great detail. A truly amazing gift. Thank you for sharing.
ReplyDeleteHi Everyone,
ReplyDeleteTHANK YOU all for your comments. It took me about 10 hours from start to finish to complete the album. I did have all the necessary embellishments handy and ready to go with some that parts still to "cut" gathered in my project box. Following the instructions along with Laura's Ustream video was really helpful, too. (THANK YOU, Laura). It was very satisfying to complete this amazing project. I was not comissioned to make this album - it is a custom gift for a dear friend. Her wedding invitation matched the color of the scrap book papers used. So everything worked out perfectly. Thanks again!
my best,
Patti
OMG! Patti! This is a master piece. Look at all the details! Phew!!!
ReplyDeleteOh my gosh, Patti, this is absolutely breath taking!!! I can't even imagine the HOURS/DAYS/WEEKS that went into this! Great job, what a blessed recipient!
ReplyDeleteWow! Your work is beautiful! I love the colors you used! As always, I love visiting your blog!
ReplyDeleteWow! This album is gorgeous! What a wonderful gift.
ReplyDeleteThis is beautiful. I wish I could have one
ReplyDeleteWOW!!! is all I have to say.
ReplyDeleteOMG!!! Simply stunning and soooooo creative Patti, what a wonderful gift. I would have cried I think if someone gave this to me :)
ReplyDeleteHi Patti,
ReplyDeleteI really adore your creations. You are so creative.
Thanks for sharing with us.
Oh....and I've added you to my blog-list. I hope you don't mind.
Happy Halloween!
Absolutely beautiful, Patti. I clicked on your photos of every page you created so I could get an up close view and see all the wonderful intricate details. This is an album that will undoubtedly be cherished and treasured!
ReplyDeletemon dieu!!!que c'est splendide
ReplyDeleteBRAVO!!!!!
bises de la France
That is very very nice. I'm sure your friend was astonished. GREAT JOB!
ReplyDeleteThis is amazing. All that detail just beautiful. The person receiving it will love it. Where do you find the time. Love it.
ReplyDeleteLiam