Wednesday, February 29, 2012

Year of the Dragon Calendars

Now here's a grrreat surprise I got in the mail and finally got around to posting it to share with you all. I got this from my fabulous and creative friend Gene L. This calendar is 5-3/4" x 8-1/2" and has a magnetic back. I absolutely love the gold frame detail and I mean detail............yikes!!! It is a Cherry Lynn flat steel rule die and cuts so beautifully. The detailed dragon is also a Cherry Lyn flat steel rule die, too. I tell ya, I don't even know how she ever adhered this detailed dragon to the card stock - goodness!!!!

Want to see this dragon up close?

Even the calendar part is very clever: it is from the Sizzix Architectural Accents Die set. She cut four of them and put them together to make the frame..........cool and very clever!
Well, not only did I receive one fabulous calendar, I got another one in the same package. This is one is so cute: it is an easel style but what is so dainty is the randomly scattered cherry blossoms. The frame is detailed with gold edging. This octagonal frame is possibly a Spellbinders Nestibility. This calendar size is 3-3/4" x 3-3/4"

The easel reveals a ornate Dragon embossed in black on gold card stock.
Hmmm..which one do I like best? I can't decide - I love both!!!!! Thank you so much much Gene for thinking of me! Blog friends are the very BEST!!!!

Monday, February 27, 2012

A Dragon Sweet Treat Box

I received a wonderful surprise from one of my Silhouette Sisters: a elegant Hexagon Dragon Treat Box. Both the treat box and the dragon images are from the Silhouette on line store to be purchased and used with the Silhouette Cameo. The metal Gold Dragon embellishment is from Hanko and is popped with dimensionals. Finished box size is 4" x 2". I just love it (it's in my favorite colors, too).

Here's a closer view of the detail in this image, cleanly cut using the Silhouette Cameo:

Open the lid to reveal: CANDY!!!!! And, Of course the candy matches the box...........why not? Box side is wrapped with Gold Paper and Black Grosgrain ribbon.
And a happy crafting day to you all!

Friday, February 24, 2012

Myako Valentine Frame Easel Tutorial

This card: Miyako's Valentine Frame was previously (2/13/12) posted on my blog here. I have received a couple questions how to make the easel back. This is the front of the photo:

And, here is the back:

To make a generic frame: (4-1/4 x 5-1/2" used in the example), cut out the frame size. Test punch the boarder/corner punch edge's to be used. Be sure the extra excess is taken into account since some have 1/8" and up to 1/4" excess.

To make the easel (measurement is only applicable to the 4-1/4" x 5-1/2" base frame). My easel is 5/8" smaller than the card base. You can make it any size that would be appropriate.
1. (2) 3" x 4-1/4" card stock
2. Score on the 3" side @1-1/2".
3. On the 3" side- cut away 1/2" from the 1-1/2" score line down to the right side: about 1/2" from the bottom on both pieces .
4. Cut away about 1/4" to "0" from the right side to the 1-1/2" score line on both pieces. Adjustments can be made to cut more for the slant if desired once card is completed.
5. Apply sticky tape to right side on one piece in the area as shown. Connect the second piece. this will provide stability to the easel.
6. Apply sticky tape to the left side edge and also to the right of the 1-1/2" score line on BOTH pieces.
7. Remove sticky tape - apply to the card base.

Hope this information is helpful and a happy crafting day to you!!!

Wednesday, February 22, 2012

Dandelion Girl's Day Fan Card

I love Dandelion Designs Stamps - here's a new one released cling just in time for Girl's Day in March. Aren't they so cute? Check out her blog here to get some fabulous and cute ideas for this and other sets she has available - here's the incentive: she has free down loadable templates. Because all girls are holding fans, why not...............a shaped fan easel card. Colors are the ones from the Washi Paper. Finished card size is 5-1/2" x 4".

Fan with easel tucked on "hugs" message:
Close-up of girls: Copic colors used: BV00, BV000, R81, 0, 110, R20, E21, decorate their clothing with a Pentel Slicci Gold pen.

Side view:

The double knotted ties: one gold cord and one lavender organdy ribbon. Inside mat is embossed with a Asian embossing folder (Cuttlebug)
To make this card, you will need:
(1) Shaped SVG Cut File Fan - I used my SCAL3 to remove the inside of the fan, flip one fan to make a mirror image, then merge/weld 2 fans together and cut using my Silhouette Cameo. File can be obtained for free here.
(1) Washi cut fan (be sure to back with some Avery Full Sheet label for stability) - remove top inside parts of the fan.
(1) Solid Pink embossed fan - re size fan to fit inside the card.
(1) Large Oval punch
(1) Small Oval Punch with stamped message
Here's the layout on my Silhouette Cameo mat:
Supplies:


  • Stamps: MC-17 Girl's Day, MC-16 Fuzzy Bear 2 (hugs)

  • CS: SU Lovely Lilac, Washi from Hanko

  • Ink: Momento Black

  • Accys: SVG Cut files For fans, Copic Pens as listed above, Gold Cord, lavender 1/4" Organdy Ribbon, SU Large Oval Punch, SU Small Oval Punch, Dimensionals, Pentel Slicci Gold Pen

A Foot note: don't have SCAL3? Well, why not? OK - got the Cricut Pagoda cartridge? You can try using one of the fans from the cartridge and "connect them" to simulate the card base so there is a way............happy crafting to you!

Monday, February 20, 2012

Yoshimi Fan Sprial Pop Up Card

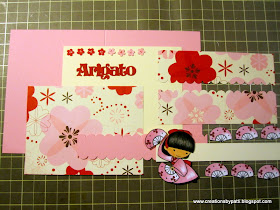
Now here is a fun card. This is a Sister Stamps release #5 which can be purchased from Pineapple Cove . The die cut words "Arigato" (Thank You) originates from a store in Hawaii called Island Scrapbooking. Yoshimi is Copic colored, cut, and popped with dimensionals. Color Yoshimi with the following Copic colors: R20, E21, W4, W7, W10, R81, R46, O.
When this card is opened............it reveals a acetate spiral pop up filled with fans (cut from the Yoshimi stamp) along with punched mini Sakura flowers. Both sides of the flower centers are "dotted" since the spiral pop up is made from acetate. To create the spiral pop-up: get on the Silhouette on line store to purchase the image for 99 cents!!! Yes, I did cut this spiral with my Silhouette Cameo. For this card, the finished spiral width is 4". 2 spirals were cut off the original spiral image. Flank each side with punched mini Sakura flowers in red, Vanilla, and Pink.
Here's a view of the spiral effect when card is fully opened
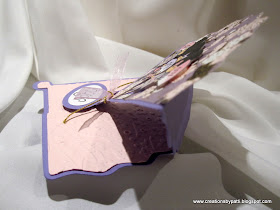
Here is a side view of the card:

To make this card, you will need:
(1) 8-1/2" x 5-1/2" SU Pretty in Pink CS, score on the 8-1/2" side @ 4-1/4"
(1) 5-1/4" x 4" Vanilla CS(1) 5" x 3-3/4" DSP - SU's retired Sending Love DSP was used
(1) 1-1/2" x 5-1/2" SU Pretty in Pink CS, use scallop punch on each side, trim
(1) 3/4" x 5-1/2" Vanilla, emboss with Cuttlebug Dot embossing folder
(2) 5-1/4" x 1-1/4" retired SU Sending Love DSP, punch 5-1/4" side with scallop edge punch
Punched mini Sakura flowers, at least 6 fansAcetate Spiral Pop-Up mechanism
(1) Stamped message, use SU's scallop oval punch
Thank you for stopping by today and a happy crafting day to you!

Monday, February 13, 2012

Miyako's Valentine Frame

OK - I haven't posted much last week because I had been under the covers and under the weather. I am 100% better and am now catching up to some half baked projects on my table.............this one is an oldie previously posted on my blog here. It was first made much smaller in size. This one will fit in a A2 envelope. I always loved this beautiful paper which has been retired from SU called Sending Love DSP. Only one 12x12 sheet was used so I still have lots left!!!! Hah! Finished project size is 4-1/4" x 5-1/8" and of course using the wonderful and cute stamps from Sister Stamps release #5 which can be purchased from Pineapple Cove.

Remove the belly band to review the inside:
Unfolding the inside: the perfect heart size was cut 11.513x9.438 using my Silhouette Cameo with my SCAL3 (sure cuts a lot) program. The heart shape is from the SCAL3 library. There was enough paper to cut the belly band and the mat for the frame.

This frame (and belly band) is made using two Martha Stewart punches: French Scroll Boarder and French Scroll Corner. Copic markers used: R29, E21, W4, W7, W10, R81, R46

And, here is a close-up of Miyako showing the Stardust Stickles on the heart.
Here's what the back of the frame showing how it is easily propped up.
To make this card: here are the pieces
(1) 11-1/2" x 9-1/2 (approx) heart cut using any two sided pattern paper
(1) belly band about 1-1/4" x 9" long
(1) 4-1/8" x 5 Red CS for the frame
(1) 2-7/8" x 3-3/4" pattern designer paper
(1) 2-3/8" x 3-1/4" White (stamped Miyako image and message)
(1) Large Oval White punched "for you" stamped image
(1) Red Punched Scallop Oval

Use the Martha Stewart French Scroll punches as shown:

To make the Heart envelope, position the punched frame onto the heart. Completely score all four sides outside the frame:

Last step: apply sticky tape to the frame back, then apply the stand to complete the frame.
Supplies:


  • Stamps: Miyako Sister Stamps, SU Holidays & Wishes (retired), SU Mini Mates (retired)

  • CS: SU Sending Love DSP (retired), Red, Nennah White

  • Ink: Momento Black

  • Accys: Martha Stewart French Scroll Boarder and Corner Punch, SU Scallop Oval Punch, SU Large Oval Punch, Stardust Stickles, Dimensionals, Copic Pens as listed above.

Thank you for stopping by and a happy and healthy crafting day to you all..................

Wednesday, February 8, 2012

Keitaro Swing Out Valentine Message

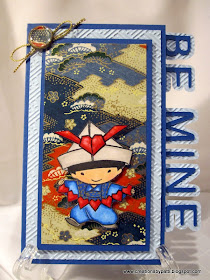
Now here's a card that was fun. The side "Be Mine" was created from my SCAL3 (Sure Cuts a Lot) computer program and cut using my Silhouette Cameo. The font is called Arial cut at 3/4" high. A shadow of the font was created, then it is welded to the inside of a rectangular shape (rectangular shape can be obtained from the SCAL3 library). This was simpler than I thought............yay!!!! I just love these kind of car-razy cards that flip out. Overall size of this card is 5-1/2" x 4". And that wonderful image? Well, it is a cling stamp and of course it is from Sister Stamps release #5 which can be found here on their blog site HERE.

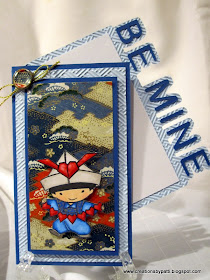
Start to swing out the "Be Mine"

Inside flap fully swung out:

Crystal Effects was added to the string of hearts and on hat. Stamped image is popped with dimensionals. A Sakura Gold Metallic pen is used on the clothing. The following Copic colors used to color Keitaro: W10, R20, E21, R46, O colorless, W4, W6, W1, W3, B18, B32.

Here's a closer look at the SU "build-a-brad" used. The inside of the brad is the same Washi paper on the card front.

To make this card:
(1) 6-1/2 "x 5-1/2" SU Brilliant Blue, score on the 6-1/2" side @ 3-1/4"
(1) 3"x 5-1/4" Bashful Blue Mat
(1) 2-1/2" x 4-3/4" Brilliant Blue Mat
(1) 2-1/4" x 4-1/2" Washi Paper
(1) 2-3/4" x 4-1/2" White for the inside
(1) SVG cut file with "Be Mine" words
(1) set of "Be Mine" letters cut 3/4" high using Arial Font

To make the Brad embellishment: use SU's "build-a-brad". A 1/2" circle punch will fit inside the brad. Because the brad is originally silver color, a gold oil based pen was used to color the brad. Don't use a water based marker because the ink will not "stick".
Use a piercer for the Brad. Add sticky tape only to the inside bottom.
Supplies:


  • Stamps: Sister Stamps Keitaro

  • CS: SU Bashful Blue, SU Brillant Blue, Washi, White

  • Ink: Momento Black

  • Accys: SU Build a Brad (retired), Gold Cord, 1/2" Circle Punch, Crystal Effects, Dimensionals, Cuttlebug Asian Embossing Folder, Piercer, Sticky Tape, 2 way Glue pen, Gold Oil base marker, Sakura Gold Metallic Pen, Copic pens as listed above


Thank you for stopping by and a very happy crafting day to you!!!

Monday, February 6, 2012

Cupcake Tag Birthday Album

Now here is another cute cute kit from Pine Cone Press. You can find the kit here. the colors are so girly and a fabulous gift to make. I did add some Stardust Stickles all over the heart, around the cupcake icing and on the Surprise words. Lots of sparkle!!!! Front and back covers are made from heavy weight chipboard. The front is completely pleated to look like a cupcake liner. cool, eh? Finished cupcake album size is 8" x 7" x 2".

Open the front cover to see the inside cover with a mat for a large size photo. The rest of the album consist of shaped tags. Each tag is 3" x 5". Tags are decorated or left for fun photos. there are a total of 12 double sided tags. Lots of opportunity for journaling and small cute photos.
This is the back cover fora large size photo.
Here's the back cover:

Side view of the album:

I hope you enjoyed this album - it was really easy to assemble with all the step by step instructions included in the kit.
Happy Crafting!!!!