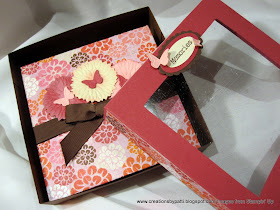
The Chocolate Chip CS used for the box itself peeks out about 1/4" with the lid decorated only at the side.

Lid off:
(1) 7-5/8" x 7-5/8" Rose Red CS for the lid, score on all sides 1"
(4) 7/8" x 5-3/8" DSP for sides of lid
(1) 4-3/4" x 4-3/4" clear acetate
(1) 8" x 8" Chocolate Chip CS for the bottom, score on all sides 1-1/4"

Here are the cut pieces (without the DSP)
Assemble the box bottom in the same manner. Your box is complete. Optional embellishment: stamp "memories" and attach to either inside on the album or on the outside of the album. Wha-la............you are finished!!!
Supplies:
- Stamps: unknown
- CS: Rose Red, Chocolate Chip, DSP (unknown)
- Ink: Chocolate Chip
- Accys: SU Exclusive Beautiful Wings Big Shot Embosslit die, Small Oval Punch, Large Oval Punch, Scallop Oval Punch, Dimensionals, Sticky Tape, Mini Glue Dots
Thank you for stopping by today - this is a quick project.


Patti, I just wanted to take the time to say thank you for all your wonderful tutorials. I'm a visual learner and your posts are so helpful to me.
ReplyDeleteHi Patti!
ReplyDeleteI have always loved the idea of a box to put a project in for gift giving and this is lovely! Great idea and thank you for the tutorial!
Wishing you sunshine today! :<)
Barbara Diane
can't wait to try this cute little box.
ReplyDeleteAWESOME! You have the biggest (and the most creative) heart to share this wonderful tutorial with us! Thankful hugs - KT
ReplyDeletewhat a fantastic box!
ReplyDeleteTh♥nks for sharing!
sending greetings from Germany
Regina
You're projects are always so beautiful! thank you so much for sharing your awesomness!
ReplyDeleteWhat a great idea!
ReplyDelete