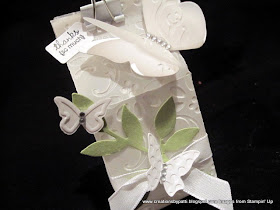
Bottom side of cartons are not embossed:

Very Vanilla Version:

Back:

Pretty in Pink Version:


Back:
The recipe for the Vellum Milk Carton: Clear plate, die, vellum, Premium Crease Pad (see how I marked mine so I don't get confused?), 2 shims, clear plate.
Yippee: Cut vellum with the fold lines!!! This is what we call "success":

The sandwich recipe to emboss Vellum: Tab1, clear plate, embossing folder with milk carton in between, clear plate on top. The textured folder will not fit the fulllength of the milk carton. You will need to run it through the Big Shot again but only in the spot that is not embossed.

The embossed vellum looks like this. The bottom flaps were not embossed.

Supplies:
- Stamps: Tiny Tags
- CS: Card Stock Vellum, Pretty in Pink, Whisper White, Rose Red, Certainly Celery
- Ink:Black
- Accys: SU Exclusive Big Shot Beautiful Wings Embosslits Die, SU Exclusive Milk Carton Die, SU Textured Impressions Perfect Polka Dots Folder, SU Exclusive Textured Impressions Final Press Folder, SU Textured Impressions Manhattan Flower Folder, SU Exclusive Little Leaves Embosslit Die, Medium Jewelry Tag Punch, Pink Taffeta Ribbon, White Taffeta Ribbon, Eggcellant Eggs Kit, White Clip (non SU), Mini Glue Dots, Sticky Tape
Thank you for stopping by today...............HUGs!!!


I Love, love love them all. Can't pick a favourite. How clever to use vellum- something I would not have thought of. Thanks for sharing. Cheers Donna Zammit
ReplyDeleteI too love them all but must vote with my blah little heart and go VANILLA. Can't say why - I just liked it a tiny bit more.
ReplyDeleteVellum milk carton - awesome idea. That is why we all MUST read your blog. It is an addiction.
Love them all, but like the red one best. Never thought about using vellum - gotta give it a try. TFS as always.
ReplyDeleteOH My goodness..I just love them...you did an awesome job...thanks for the fun inspirations..
ReplyDeleteThese are beautiful - every last one of them!
ReplyDeleteIt's so beautiful!!! I love your blog!
ReplyDeletePatti these are SO pretty! They would be perfect for a wedding!
ReplyDeleteOooooh what to chose, what to chose!!
ReplyDeleteThe very vanilla is perfect for a wedding.
The red one for Vaentine's Day.
The pink for a wonderful, beautiful granddaughter or daughter or daughter-in-law.
Using the vellum is brilliant!!
You are brilliant!! TY Patti.
JUST in time for my neice's wedding favors. You are so creative, and uber pretty designs .... Wow! I found you through Inking Idaho, and I'm so glad I did.
ReplyDeleteOhhhhh, sooooo pretty! LOVE the idea of using the vellum cs to make these - gorgeous! tfs
ReplyDeleteAbsolutely stunning. My vote is for the rose red one. Have got to try these.
ReplyDeleteWhich is my favorite....I'm gonna have to say pink...cause I'm still in a pink phase. But adore the different embossing techniques you used. Creating these on vellum is gorgeous. Nicely done.
ReplyDeletePick one???? No way! They are all gorgeous!!!
ReplyDeleteBeautiful. I am always so impressed with your creativity. Thanks for sharing, and I love your blog. Sending ALOHA from O'ahu, Myra
ReplyDeleteWhat total cuteness! The vellum gives such a soft, springy look.
ReplyDelete