Wednesday, March 31, 2010

Easter Fun in the House!

Wanted to share with you some fabulous projects one of my gal pals made: Frances!!! I asked her if it is OK if I post her projects and she was delighted. You can see how cute they all: M&M tubes, Egg Containers, and the BEST: chocolate spoons................sooooo cute!Sorr, but she doesn't have a blog even thouugh she should! !!! She did such a GREAT job - wouldn't you agree?

Spoons and M & M tubes:
Here are more chocolate spoons with candy sprinkles - yummy!!!


I won't be listing the supplies since this wasn't my project but you can see what an amazing job Frances did!!! clap......clap.....clap!!!

Tuesday, March 30, 2010

Another Surprise Package to Send

I was busy today finishing up another package to be sent out for a SPECIAL FRIEND - she's 8!!! When she opens up the box, this is the first thing she will see: a ginormous card. It's 4" x 9-1/4" - no, there's no envelope. I love the Big Shot Natural Serif Alphabet dies for this card. I even adhered the Card stock to faux chipboard (that means cereal boxes) and then cut the letters out. I love the results. Inside the box are lots of "fun" surprises!

Here's the card:

One of the special gifts in the carton was a banner made from colored foam. These were left over from a recent party so it was perfect to use. The butter fly shape is also foam. Card stock was matched up to each flower before the letters were cut through the Big Shot.

Here are the letters H-A-P-P-Y:

Multi colored scalloped circles added color to the foam flowers.

Here's one finished side of the butterfly: love this little girl - she's made using the circle scissor plus (2-5/8" diameter) with two 1-1/4" Punched Black CS Circles. I decide to ramp up the background by stamping the swirls in Black on the foam butterfly and foam flowers. Flower blings were added to the hair buns along with 1/8" pink bows. Like the blings on the scallop circle, too? The crop-o-dile was used to punch the extra large brads, connecting the foam flowers.

I will not attempt to take a photo of this banner all stretch out - the photo never turns out. Here are all the foam flowers connected using grosgrain ribbon: H-A-N-A is spelled out on one side. Each floam flower is 5-3/4" x 5-3/4". Total length of this banner is 34" long.

On the flip side: H-A-P-P-Y is spelled out - she is always happy! On the foam butterfly, I was actually able to use the Extra Large Flower punch through extra yellow and orange foam. Not difficult at all.

Supplies:
  • Stamps: Baroque Motifs
  • CS: DSP (non SU), scraps of Pixie Pink, Summer Sun, Green Galore, Only Orange, Whisper White, Real Red, Blush Blossom, Black.
  • Ink: Black, Pretty in Pink (for cheeks)
  • Accys: Big Shot Natural Serif Alphabet, Big Shot Scallop Circle #2 Die, 1-1/4" Circle Punch, Extra Large Flower Punch, Scallop Boarder Punch, Extra Large Brads, 1/4" Pumpkin Pie Grosgrain Ribbon, 1/4" and 1/8" pink ribbon (non SU), Black and Real Red Stampin Write Pens, Daubers, Mini Glue Dots, Crop-o-dile, adhesive rhinestones and flowers (non SU).

Thank you for stopping by today..............remember my New Year goal? use what you have.........I am trying to do this and by doing so am creating some fun gifts, too!

Monday, March 29, 2010

Surprises to send

Guess what these are? They are stacked up high - I actually made about 14 of these this weekend. I felt like I was on a production line while making these. See the next photo:

Can you guess? They are File Folder Note books. I had made a few of these in February (previous blog posted on February 15, 2010 for the instructions "how to").

Here are some of the File Folder Notebooks with Monogrammed initials. This time I cut Whisper White CS to make a "shadow".


Close-up of the letters:


They are bubble wrapped ready to be mailed tom............
See blog posting February 15, 2010 for supply list and thank you for looking to see what I have been doing this weekend..........have a great day!!!

Friday, March 26, 2010

Sorry to Disappoint

I am a bit distracted today so no posting. Thank you for stopping by today................Have a great weekend.

Thursday, March 25, 2010

Vellum Milk Cartons

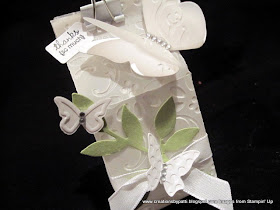
Wow - this posting is really late!!! So sorry, the acetate version was a BUST - had to trash it.....ever have one of those day?...I wasn't happy with how it turned out - actually it didn't turn out. I prefer this Card Stock Vellum version - it turned out much better than I thought, a bit more "elegant' than I thought. I made 3 versions using the textured folders. These would probably look OK using solid card stock, too. Which one do you like?

Bottom side of cartons are not embossed:

Very Vanilla Version:

Back:

Pretty in Pink Version:
Back:

Rose Red Version:

Back:

The recipe for the Vellum Milk Carton: Clear plate, die, vellum, Premium Crease Pad (see how I marked mine so I don't get confused?), 2 shims, clear plate.
Yippee: Cut vellum with the fold lines!!! This is what we call "success":

The sandwich recipe to emboss Vellum: Tab1, clear plate, embossing folder with milk carton in between, clear plate on top. The textured folder will not fit the fulllength of the milk carton. You will need to run it through the Big Shot again but only in the spot that is not embossed.

The embossed vellum looks like this. The bottom flaps were not embossed.

Lightly crease folds, secure with sticky tape:

Secure Leaf (as shown) and butterflies with mini Glue dots:

Stamp and punch message. Secure under the clip.

Supplies:
  • Stamps: Tiny Tags
  • CS: Card Stock Vellum, Pretty in Pink, Whisper White, Rose Red, Certainly Celery
  • Ink:Black
  • Accys: SU Exclusive Big Shot Beautiful Wings Embosslits Die, SU Exclusive Milk Carton Die, SU Textured Impressions Perfect Polka Dots Folder, SU Exclusive Textured Impressions Final Press Folder, SU Textured Impressions Manhattan Flower Folder, SU Exclusive Little Leaves Embosslit Die, Medium Jewelry Tag Punch, Pink Taffeta Ribbon, White Taffeta Ribbon, Eggcellant Eggs Kit, White Clip (non SU), Mini Glue Dots, Sticky Tape

Thank you for stopping by today...............HUGs!!!

Wednesday, March 24, 2010

Tulip Pitcher Milk Carton

Here's my version of the pitcher using the milk carton die. The inspiration is from Amanda (see her blog http://www.stampvamps.com/ posted March 11, 2010). My gal pal Becky (http://www.inkingidaho.blogspot.com/) also has a version posted on March 17, 2010 which is soooo cute, too so check hers out for even more inspiration! I used the Extra Large Two Step Bird punch to create the tulip flowers and greenery. This was a hit at a recent workshop. Thank you Amanda and Becky!!!


See the cute lady bug clip
This is what you will need:
(1) Bashful Blue CS Milk Carton. Use a bone folder to make crisp folds (except no folding on the "v" lines /top section of the carton is necessary)
(1) 1/2" x 2-1/2" Bashful Blue CS for the side handle. Score 1/4" on each end of the 2-1/2" side
(1) 3/4" x 7" Old Olive Patterns DSP for the "grass"
(9) punched Pretty in Pink CS Wings from the Extra Large Two Step Bird Punch
(6) Barely Banana CS Wings from the Extra Large Two Step Bird Punch
(3) Old Olive CS Leaves from the Extra Large Two Step Bird Punch
(5) Old Olive CS Stems from the Extra Large Two Step Bird Punch
scrap for the message to be stamped
Punch along the 7" length with the scallop boarder punch
How to make the tulips: not sure if this is the right way but this is how it was done. 3 bird wings = 1 tulip. Adhere 2 of the wings, cut off a section of the third and position the tip in between the 2 other tips. There will be 5 tulips: 3 Pink ones and 2 Yellow ones.

Assemble the tulips with their stems: place a dimensionals on top as shown

Using a piercer, attach ONLY THE top handle for now with a brad.

Position your tulips on the carton - then remove the back of the dimensionals and adhere.

Place the Old Olive Pattern DSP along the bottom of the carton and create folds from the carton sides (do not adhere to the carton flat - there will be trouble! if this is done!). Apply a little snail adhesive to the bottom of the handle on the 1/4" section to keep it in place. After folds are made to the Old Olive DSP, adhere . Piece the hole for the bottom of the handle and put the brad through now. Fold the Bashful Blue flaps under the carton and cut off the excess stems.
Last step: stamp message and use Medium Jewelry Tag punch. Attach with a fun ladybug clip (found this in my stash and it works great!)

Supplies:
  • Stamps: Tiny Tags
  • CS: Pretty in Pink, Barely Banana, Old Olive, Old Olive Designer Pattern DSP
  • Ink: Black
  • Accys: SU Exclusive Big Shot Bigz Milk carton Die, Extra Large Two-step Bird Punch, Silver Brads, Scallop Boarder Punch, Sticky Tape, Dimensionals, Piercer

Thank you for stopping by today...........HUGs!!!

Tuesday, March 23, 2010

Lollypop Flower Pot Favor

Here are my version of these cute favors...........hmmm...they first showed up at my gal pal Whitney's site (http://www.whitney69@blogspot.com/) a few weeks back, then I made one as a shoebox swap (Denise W.) so I finally decide to include this project for a workshop. The attendees loved it. Thank you Whitney and Denise! Cute Cute Ciute!!!!

Close-up of the Lavender one with the Shades of Spring DSP:

Close-up of the Real Red versions with Sending Love DSP:


Side views:

Back Views:

Here's what you need:
(1) 3" x3" Shades of Spring DSP for the smallest size Flower in the die
(2) 3-1/2" x 3-1/2" Lovely Lilac CS for the 2nd smallest size Flower in the die
(1) 2-3/4" x 1" Old Olive CS for the Flower Pot top
(1) 2-1/2" x 7-1/2" Close to Cocoa CS for the pot. Score along the 7-1/2" side, 3/4", 2-1/2", 1", 2-1/2", 3/4". To create the "pot" shape, cut 1/2" to nothing toward the top of the pot. (see photo of pot) - regretfully, not template photo this time.
(1) 2" x 2" Whisper White CS scrap for the center message, use 1-1/2" Circle Punch
(1) cut 6-1/2" long 1/4" Old Olive Grosgrain Ribbon

Use Old Olive and Lovely Lilac Stampin Write pens for the message, then punch using 1-1/2" Circle Punch. For the Real Red Flower Pot version, use Real Red and Old Olive Stampin' Write Pens.


After scoring the flower pit and cutting the shape, use the texture plate:

Use Scallop trim boarder punch for one side of the Old Olive CS as shown:

Pierce each side of the pot about 1/2" from the edge, apply the brad. Prong side will be the front and brad side will be the back.

Add sticky tape for the scallop pot top to cover the brad legs. Use pop up glue dot for the back large Lovely Lilac flower.
Apply one more pop up glue dot on top of the lolly pop stick. Place the 2nd Lovely Lilac Flower, then apply the Shades of Spring DSP with another pop-up glue dot, then another glue dot or dimensional for the message. Project complete.

Supplies:
  • Stamps: Whimsical Words
  • CS: Sending Love DSP, Shades of Spring DSP, Lovely Lilac, Real Red, Close to Cocoa, Whisper White, Old Olive
  • Ink: none
  • Accys: SU Exclusive Big Shot Flower Folds die, Big Shot Texture Plate #4, 1/4" Old Olive Grosgrain Ribbon, Gold Brads, Pop Up Glue Dots, Sticky Tape, Piercer, Scallop Trim Boarder Punch (SAB), Real Red-Old Olive, Lovely Lilac Srampin' Write Pens.

Thank you for stopping by today.....HUGs!!!