Carefully open the card revealing...........................

The opened card inside:

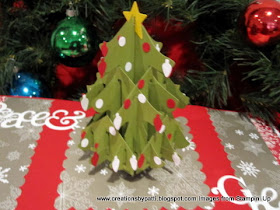
The tree as the center piece of the card:

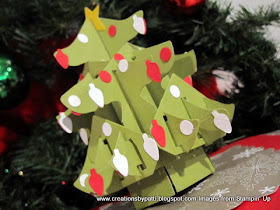
The view from the top:


The die cut message at the bottom right corner: Cheer. Adhere using 2 way glue pen
Pieces used for the card front:
(1) 6" x 12" Real Red CS, score along the 12" side @ 6", fold in half.
(1) 5-3/4" x 3" Whisper White CS
(1) 5-1/2" x 2-3/4" Flocked DSP from Christmas Cocoa DSP
(1) Big Shot Die Cut Swirl
(1) Message using Old Olive ink, Wide Oval punch. Add dimensionals to pop up
(1) Old Olive 5/8 Grosgrain Ribbon 7-1/2" + (1) 5-1/2" for the front knot
For the Front, assemble the pieces as shown, pop up with dimensionals before placing on to the Real Red CS front.


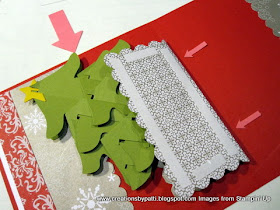
This is another view - note: the scallop square is not glued down yet so it is shown a little crooked in the photo.
Be sure to position the collapsed tree where it will clear the top of the card when closed: see the large pink arrow. Now you can also position the Scallop Square on the center fold line after sticky tape is applied: see the small pink arrows.
(1) Assembled Tree - follow instruction from the SU Big Shot die
(1) Scallop Square Big Shot Christmas Cocoa DSP, score in Half
(2) 5-3/4" x 3" Christmas Cocoa DSP, use scallop boarder Punch on one edge
(2) 5-3/4" x 3/4" Christmas Cocoa DSP (flocked): place on top of the printed DSP
(2) 5-3/4" x 1/2" Whisper White DSP: note: only 1/8" will be exposed

Position the tree 1-1/2" down the center fold line of the scallop Square (OR that means 2-1/2" down from the top of the card at center) - see the pink arrow.

This is another view - note: the scallop square is not glued down yet so it is shown a little crooked in the photo.

Be sure to position the collapsed tree where it will clear the top of the card when closed: see the large pink arrow. Now you can also position the Scallop Square on the center fold line after sticky tape is applied: see the small pink arrows.
A word about decorating the tree:
I hadn't realized how many ornaments this tree would take. I guess it depends on how you wish to decorate it. The larger ornament from the SU Exclusive Tree Decorations Die seemed a bit overbearing so it was not used. It was sooooo much easier to use a 1/4" hand held punch for the circle ornaments. Running the "bulb" style ornaments through the Big Shot (even 2-3 layers of CS at one time) was very tedious: SU, if you are reading this............a punch would have been much easier!!!
Supplies:
Supplies:
- Stamps: Christmas Punch (Level 2 Hostess)
- CS: Real Red, Whisper White, Old Olive, Christmas Cocoa DSP
- Ink: Old Olive
- Accys: SU Exclusive Big Shot O Christmas Tree Die, SU Exclusive Tree Decorations Die, SU Exclusive Big Shot Bigz Clear Scallop Square Die, SU Exclusive Big Shot Join in the Cheer Sizzlits Decorative Strip Die, Big Shot Swirly Sizzlits Decorative Strip Die, Scallop Edge Punch, Scallop 5/8" Old Olive Grosgrain Ribbon, Wide Oval Punch, Dimensionals, 2 Way Glue Pen, Sticky Tape, 1/4" Circle Hand held Punch (retired)
Thank you for stopping by today........stay tuned tomorrow for a BIG surprise!!! HUGS........


Can you believe I have this die and shamefully have not used it yet !!! YIKES !!! BUT...you've inspired me to run it through my Big Shot and play with it !!
ReplyDeleteThanks :) and I love, love, love you card !!!
Thanks for sharing. I had problem with tree inside the card. I plan to use it for stamp club this coming Friday. Thanks again.
ReplyDeleteIt's very beautiful! All your creations are beautiful. Have you try the Medallion stamp under the tree?
ReplyDelete