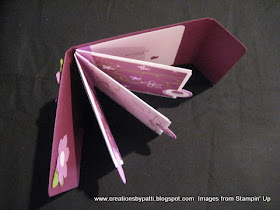
I had to make another one for myself. I decided to add the flowers from the SU Exclusive Birds & Blooms Big Shot die - see how the flower shape matches the paper. Don't forget to curl up the ends of the flower for that dimensional look! Oh yes, the flower above the "things I love" is on top of (2) dimensionals. The flower on the bottom right has (1) dimensional. Those leave are also on the die and I put them through torture: a crimper! to get that oh so subtle texture.

I added a flower on the inside (no dimensional)

Top View:

And, here's the "How To":
(1) 4-1/4" x 11" Solid CS (don't you love you can use 1/2 sheet of 8-1/2 x 11?), score @4-1/2", 4-3/4", 9-1/4", 9-1/2"
(3) 4-1/8" x 1" Solid CS, score all pieces @1/2"
(3) 3-3/4" x 4" White CS (inserts)
(1) 3-1/4" x 4" White CS (back page)
(3) Punched 1-1/4" Circle Solid CS
(3) Punched 1" Circle White CS
Business Envelopes: seal opening, (3) cut to 3-3/4" (these were 4-/18" high)
Outside album Designer Paper:
(1) 1-1/4"x4"
(2) 4-1/4" x 4"
Inside Designer Paper on envelopes:
(6) 3-1/2" x 3-7/8": 3 different patterns, 2 of each to be cut


To make the front label as a "closure" (love this part- no Velcro!), after adding the Square Rhinestone, position dimensionals only as shown. The right flap will be secure under this label.

Make a template for the circle tabs: the 1st one is 3/8" from the top edge. 2nd one is 1-3/8" from the bottom edge and last one is 3/8" from the bottom edge.

Adhere all designer paper to both front & back, then punch using 1-1/4 Circle Punch.

Don't forget to make the inserts: Perfect! Gotta use that stamp-a-mah-jig!

Tip: place inserts into envelopes, apply adhesive to top stamped circle. Then put on top of the punched circle - it fits so nicely! Turn envelope over, apply adhesive to the solid CS circle and sandwich between the insert and stamped circle.

See how clean the back side looks:

To connect the envelopes, add sticky tape to both sides. Adhere 1st strip slightly to the right of the fold line. Then put the 3-1/4" x 4" CS with the message as shown.

Remove the sticky tape and place the 3rd envelope on top. Continue with the remaining strips to add the envelope. (wink***hope this makes sense).

Supplies:
- Stamps: Things I love, I Heart Lists
- CS: Rich Razzleberry, Orchid Opulence, Whisper White, Old Olive, Cottage Wall Designer Series Paper
- Ink: Rich Razzleberry
- Accys: Fire Square Rhinestone Brad, Dimensionals, Sticky Tape, 1/16" Corner Punch, 1-1/4" Circle Punch, 1" Circle Punch, Large Oval Punch, Scallop Oval Punch, Stamp-a-mah-jig, Piercer
- Accys (optional): SU Exclusive Big Shot sizzlits Birds and Blooms Die, 1/2" Circle Punch, 1/4" Circle Punch.
Thank you for stopping by today..........stay tuned tom for other colors in this envelope book.............

Love it - will have to give this a go!
ReplyDeleteTFS
xXx
Very creative! Love the colors.
ReplyDeleteWow! Thanks for the tutorial!! I'll be making this!
ReplyDeleteThis is quite lovely. I rarely put together a wish list...but his would definitely be a cute way to let my husband know of things he can get me for special occassions. Or maybe I should make a masculine version and have my husband fill in his wishlist! =)
ReplyDeleteRegardless, it's adorabe. Very nice.
This is adorable!!
ReplyDeleteSo pretty! Thanks for sharing the pics and how-to.
ReplyDeleteLove it love it love it. Just so much woow with this. thanks for sharing another great and fab tutorial you are the best.
ReplyDeleteLiam