Here's what they look like: Left photo is top view. Right photo is view of the table top card closed.

View of Panel 1

View of Panel 2:

View of Panel 3:

View of Panel 4:

So how is this made? Visual supplies below. (4) 6" circles: so (1) sheet of 12x12 paper is used. balance of the supplies are self explanatory - if not, feel free to e-mail me. Note: the embellishments shown are randomly placed in each panel.

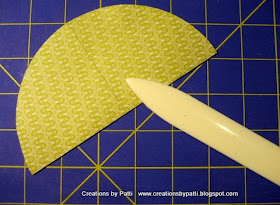
For the basic Fold Up Circle card, fold each circle in Half, turn paper, fold in half again:

For all (4) circles: Open, cut out one of the sections but leave 3/8" allowance after the fold (as shown), apply sticky tape.

Remove sticky tape, adhere to the opposite side. Crease all (4) circles "base" as shown in photo.

The (4) sections should be positioned as the following. Apply adhesive to (3) of the (4) "backs".

Using the Horizontal Slot Punch, punch 1/2" in from the edge through 2 layers of Designer Paper. The left photo shows the underside of one of the layers. The right photo shows the top side of the 2nd layer. Cut ribbon about 9" long, thread through, tie knot to keep closed or open.


This is what the base looks like from the bottom after 3 panels are together:

tip: after preparing the messages for each panel, if they are to be positioned on the base, ONLY apply adhesive to HALF of the left side so the base panel can be folded in wards. See View of Panel 4: only the left side is "stuck" down, the right side is "loose".
Supplies:
- Stamps: Boho Backgrounds, Great Friend, Curvy Verses
- CS: Walk in the Park Designer Paper, So Saffron, Whisper White, Cameo Coral, Baja Breeze, Basic Grey, Kiwi Kiss, Old Olive
- Ink: Black
- Accys: 3/8" Kiwi Kiss/Very Vanilla Satin Ribbon, Horizontal Slot Punch, Scallop Circle Punch, 1-3/8 Circle Punch, Large Oval Punch, Scallop Oval Punch, Silver Brads, Piercer, SU Exclusive Big Shot Leaves die, SU Exclusive Big Shot Little Flower Embosslits Die, SU Exclusive Beautiful Butterflies Die, Tombow Glue, Dimensionals, Circle Scissors Plus Cutter.
Hope you enjoyed this small table top version. There are "larger" ones out there........this one is big enough for me.

Absolutly Wonderful !!!!
ReplyDeletelove those card !
hello Patti
ReplyDeleteit's so cute and very impressive!
Excellent tutorial! Thanks for sharing.
greetings Regina
Patti - this is just super CUTE!!!! You never cease to amaze me. Love this!
ReplyDeleteI love this card... thanks so very much... I owe you big time
ReplyDeleteDeb
Love it!!
ReplyDeletethanks for this great tutorial, I will make this extraordinary for for a eytraordinary b-day
ReplyDelete