Friday, May 17, 2013

Geisha Card

I love receiving Jan's cards in the mail.  Here she has used the Cheery Lynn Lattice Frame Die #114 in black card stock covering beautiful multi color Washi paper underneath.  There are hints of gold outline in the flowers on the Washi Paper (does not show up in the photo). 
The floral stamp is from Hampton Arts by Lynette Anderson Taylor Designer Flower. She stamped it on black card stock using Versamark Ink with gold embossing powder by Judikins. Those flowers are using Twinkling H2O's. Note this image is behind the lattice screen - the Lattice Frame is cut out for the image to be behind.
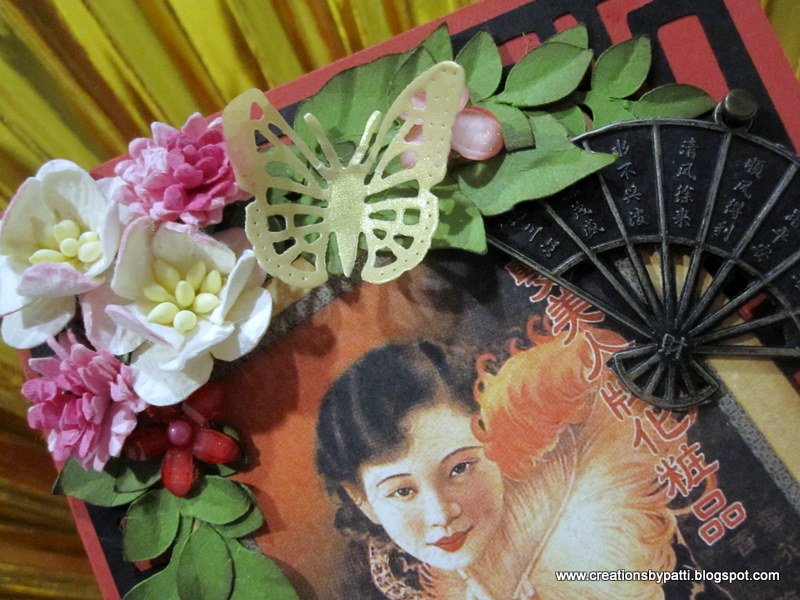
The Geisha image is a stamp: Bamboo and Butterfly Geisha by Inkadinkado #97878-DD. It is stamped on white card stock using black Versafine ink and clear embossing powder.  She is colored using Copics. And, when I get her cards, I frequently wonder: how'd she do that?  Well, on this image, she explains, she made a mask for the Geisha's dress and umbrella, then used a 'kewl Tool-course' to stipple gold paint.  Nice look!  I have to tell you her fussy cutting on this image (eliminated the butterflies) is really  perfect. 
And, inside the card............always a nice touch: the words friend (in Chinese)............
I am glad to be sharing this card with you today..........have yourself a crafty day!

Wednesday, May 15, 2013

Another Asian Mother's Day Card

Here's another Mother's Day card.  This time I used a "Cheong Sam" (which is the traditional Chinese Dress) for one of the images (it is popped up with foam squares). I had gotten this image from one of my overseas travels, scanned it, and traced it using my SCAL program ( which can also be done using the Silhouette, too). The girl is from the Graphic 45 Bird Song Shanghai Ladies  8x8 paper pack. The paper used is the Graphic 45 Bird Song Joy Luck paper. Yes, my mother-in-laws birthday is the day after Mother's Day. "Mom" is cut using my SCAL program/font is Lobster 2 in black card  stock.  The card edge is a tweaked Martha Stewart Modern Cube punch - I shrunk it down in SCAL so it would fit perfectly in the 5-1/2 card length. The mat used under the Chinese Dress form is Stampin Up Pretty in Pink card stock. Flowers are from Wild Orchid (located in the UK) except lilies and leaves are from the Silhouette on line store.
Here's a closer look: Adhesive Pearls around the neckline of the Dress. 
The Lilies are cut using white card stock then using Copic Y18, R85, R89, RV10.
Card inside used up some of the leaves:
Here's what the lilies look like when they are cut, I made a trial using a hand cut larger size sample.  
After coloring all the petals, use one of those flower squishers with a ball to shape the petals (it really helps). Note, I used a tweezer to bend down the tips of the stamen.
This was a grat crad to make................enjoy your carfty day.

Monday, May 13, 2013

My Mom's Asian Accordion 3D Flip Album

Part 2 of my Mother's Day project.
Papers are from the Graphic 45 Bird Song collection: Tranquility and Jasmine Dream.  Sizzix Accordion Flip 3D die and Frame and Label, Bracket dies used. Corner frame images is a Martha Stewart Punch Around the Page: Canning (not sure why they named this punch Canning) that is diagonally cut after it is punched.  Spellbinders Nestabilities Label One for the inside photo frame (whew! Thank goodness that die worked).  Since I have 4 siblings, there are five sections.Here is the overview:
Butterfly is a die from Cherry Lynn Designs: Exotic Butterfly Small DL-112.  Each photo has a unique antique gold year of the "snake, rabbit, rat, tiger, and dragon" charm I found in my stash of things that needed to be used.  This project is the perfect one! Those photos: are when we were toddlers.
Here's a closer look at the Zodiac charms:
The gold vellum butterfly:
FLIP or turn over the project to find us all grown up!!!!! How quickly did that happen!!!!! OMG!!!!
For the photos: they were adjusted in Picasa (a FREE photo program) and color used is a "sepia" tone. It was really easy to do...................I loved how this project turned out and know my Mom will get a kick out of it, too.

Friday, May 10, 2013

My Mother's Teapot, Tea Cup, and Card

Part 1 of my present to my Mom
My Mother will just love this teapot and cup using the Graphic 45 Bird Song Collection papers........... so gorgeous. This is the second teapot and tea cup I made. The first one was posted on 4/26/2013,  The Tea pot along with the cup are from SVGcuts.com, their Tea for You and Me SVG Collection. The Tea pot's lid comes off and inside is a surprise. Finished tea pot is 8-1/2" x 7" .............. Finished cup size is 2-3/4" x 3-3/4. Note this tea cup does not have the handle since it is a traditional Chinese tea cup style. Paper used is the Graphic 45 Bird Song: Jasmine Dream and Tranquility
The card: Card base is SU Rose Red with Modern Punch in Black card stock.  Butterflies are dies from Cherry Lynn Designs: Exotic Butterfly Small #2-DL113 and Exotic Butterfly Small DL-112. Metal Fan on the card is from Blue Moon Beads (can be found at any craft store) and flowers are from Wild Orchid Crafts from the UK. The adhesive red resin flowers with rhinestone centers are from Queen and Company. Leaves are using a Carl Punch, punch it and crumple it.
See the gorgeous flowers and butterfly: The Asian image is from the Graphic 45 Bird Song Collection: Shanghai Girls
Bottom right corner of card:
Metal dragon embellishment:
Card inside: yes.......it is also my Mother's birthday, too
The teapot:
A larger gold vellum butterfly perches on the side
The tea pot lid medallions are resin pieces attached back to back using a mini glue dot. Finish it off with 3/8" Gold Organdy ribbon.
The tea cup: holding some sugar free life saver candies, a gold organdy ribbon as well as a gold Vellum butterfly.
Cup inside:
Just lovin this project and can't wait to see my Mom's face when she gets it!!!!!

Wednesday, May 8, 2013

Teresa Collins far & Away Travel Mini Album

Are you ready for a Teresa Collins Far and Away Travel Mini? Recently I took this class from Scrapbook Island (in San Jose, California). It was taught by Janet Ang.  Even though it was only a two hour class, we were able to get our feet "wet" to complete this mini on our own at home. I am so happy mine is now completed. We were shown a few techniques throughout the class - so this mini is not just "cut and paste it down". We were free to change out the layout - and I started with the cover: it is completely different than the original instruction. Original binder cover was white - I covered it using black card stock.  Some of the additions made are: Prima Laser Wood camera and luggage embellishment painted in black, adhesive postage stamps, Tim Holtz Film Strips.  Some foam squares also helped to give the cover dimension, too.
The Globe is cut using the Sizzix Tim Holtz Globe die in Black chipboard. Globe is spritzed with shimmer and stand has a layer of shine using Inkessentials Glue n Seal Gloss finish.
Spine is tied with red and brown tulle. The antique copper pin is used to secure the charms. These three charms (antique copper and antique gold) were included in the kit but I did make the chains (a first for me!) to attach the charms.........somewhere, I misplaced the crown charm......oh well..
Inside the cover page: I made my own pocket to hold some tags.  The luggage tag is from Miss Kate Cuttables (SVG cut file).  The black luggage on the pocket is a wood embellishment from Prima. Those postage stamps are sections from the Travelling Washi Tape.
We were instructed to keep all the Teresa Collins packaging: the package is used as a photo mat here.  I did separate the rub on and only used the words "photograph" for this mat.  The film strip is from the Silhouette on line store. Red/white Stripe Washi take on top of the photo mat.
We made a photo "waterfall".  This page was suppose to be a pocket but I changed it to be a flap and secured the photo waterfall section down instead of tucking it into the flap. EK Success punch used on the edges.
The next page is "extra" - I decided to use one of the larger sheets I had left to make a pocket. In the pocket are four sheets: one is a black card stock with Travelling Washi Tape across the top.  Then there is a Kraft page with a rub on camera supplied as part of the kit.  The Travel (Airplane/Travel Card) card is from the Silhouette on line store, and finally a scrap to resemble a post card. The airplane is a cut file from the on line Silhouette on line store.
On the backside of the pocket page, another film strip (from the Silhouette on line store), a chipboard camera (a Sizzix Tim Holtz die), and a Project Life Travel Card with the world (from the Silhouette on line store). The Camera is spritzed with shimmer (just like the globe on the cover) and there are spots of Silver (using a Metallic Silver Pen).Note photos can be slipped into the film strip. There are more scattered Travelling Washi tapes on this page.
The second "photo waterfall" is on this page.  This page is suppose to be only black card stock but I added a bunch of postage stickers (from my stash of old 7 Gypsies)along with the Travelling Washi Tape and part of the postcard card stock from the TC Far and Away collection. EK Success Scallop punch used for the edges.
On the backside, I also added a panel of the TC World Map and strip of Words paper from the Far & Away Paper Collection.
The slanted pocket page holds some left over scraps that fit perfectly.  The Film Strip (from the Silhouette on line store) and the airplane (also from the Silhouette on line store) decorate the panel.
On the backside of the slanted pocket page: another Project Life Travel Card with a luggage silhouette (from the Silhouette on line store) and tucked into the side is the second luggage tag (from Miss Kate Cuttables). Scatted about are parts of the Travelling Washi tape.
This page was cool: a camera stencil was used to create this image with some Copic pens.
On the backside of the previous page, a simple black mat with Far & Away POST-IT Notes..........yup, they are post it notes used to embellish this page.  Along the right side is the Tim Holtz Film Strip attached using mini glue dots.
The is the second black card stock page: I decided to embellish it with Travelling Washi Tape across the top edge, add a panel at the bottom, then attach the pocket with a pull out mat. "Explore" is attached to the tab to pull the TC Word mat. Travelling Washi Tape is also added to the bottom of the pocket as well as scattered on the bottom panel.
On the backside of the black card stock, a panels of variegated flags.  I added the red/white twine across the top.  These larger sized luggage tags are from Miss Kate Cuttables inserted into the pocket.  There is an actual small stitched notebook (3-3/8" x 5") which is embellished with a SU Large Oval Punch with the Prima Laser Wood typewriter on top...........oops, forgot to print out "Little notes" for the typewriter. On the pocket is a Anytime Postal Mark cut out is from the Silhouette on line store.
This page has a flap with the Words mat, edge is EK Success Punch and Travelling Washi Tape across the bottom edge.
Open the flap to reveal a few mats. The flourish is a rub on. The Project Life Travel Card has the airplane cut out for one of the mats.
On the backside is a larger pocket with tags and scattered Travelling Washi tape as well as on the bottom edge. The luggage cut out is from the Project Life Travel Card in a larger size.
This flap page also has a pocket embellished with a Airplane/Travel Card cut out from the Silhouette on line store.
Open the flap to reveal a few mats. On the top right side are several "loose" 3" x 4" cards clipped together for journaling or additional photos.
On the backside, are additional black mats, the Tim Holtz Film Strip and punched tabs.
Inside back cover: This 5-3/8" x 7" stitched notebook kept in the pocket.  The airplane is a Prima Wood embellishment painted in black.
Whew!  This was a wonderful class given by a wonderful teacher! Hope you enjoyed seeing it, too.